Introduction
Remplacez le cerveau de votre 3DS par une nouvelle carte mère.
Ce dont vous avez besoin
-
-
Enlevez les 4 vis cruciformes #00 qui sont présentes sur le haut de la coque.
-
-
-
Insérez un outil d'ouverture en plastique dans l'encoche du boîtier inférieur au-dessus de la batterie.
-
Soulevez la batterie avec l'outil d'ouverture en plastique.
-
Saisissez le bord supérieur de la batterie et retirez-la du boîtier inférieur.
-
-
-
Retirez les neuf vis cruciformes noires de 6,3 mm du boîtier inférieur.
-
Retirez la vis cruciforme argentée de 2,4 mm au-dessus de la fente de la cartouche de jeu.
-
-
-
Retirez les deux vis cruciformes de 7,7 mm fixant l'arrière du pad circulaire à la carte mère.
-
-
-
Retirez les deux vis cruciformes de 4,5 mm fixant la carte SD à la carte mère.
-
-
-
-
Insérez l'extrémité plate d'une spatule entre la carte SD et la carte mère.
-
Faites glisser la spatule le long des côtés de la carte SD pour la détacher de l'adhésif qui la maintient en place.
-
Une fois qu'elle est complètement détachée, soulevez la carte SD à la verticale de la carte mère.
-
-
-
Faites glisser l'extrémité plate d'une spatule sous le coin de la carte Wi-Fi et retirez-la de la carte mère.
-
-
-
Saisissez la nappe du microphone près du microphone avec une pincette.
-
Tirez le microphone vers le haut, hors du boîtier supérieur.
-
-
-
Utilisez la pointe d'une spatule ou vos doigts pour décoller le ruban adhésif blanc qui recouvre le connecteur de la nappe de la vitre tactile.
-
-
-
Utilisez l'extrémité plate d'une spatule ou votre ongle pour relever le clapet de retenue de la prise ZIF de la nappe du microphone.
-
-
-
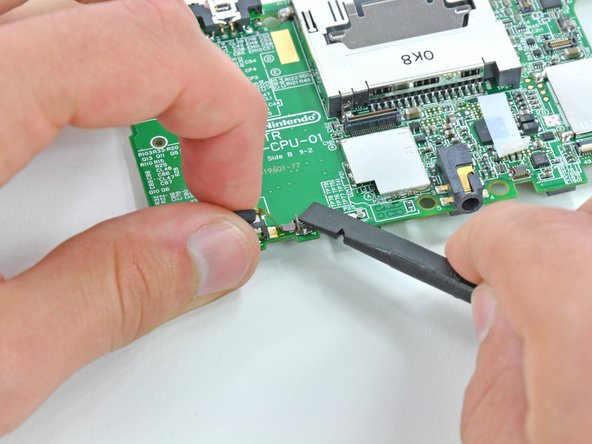
Utilisez l'extrémité plate d'une spatule pour débrancher le connecteur du bouton de volume de sa prise sur la carte mère.
-


Pour remonter votre appareil, suivez ces instructions dans l'ordre inverse.
Pour remonter votre appareil, suivez ces instructions dans l'ordre inverse.
Annulation : je n'ai pas terminé ce tutoriel.
37 autres ont terminé cette réparation.
Merci à ces traducteurs :
100%


Ces traducteurs nous aident réparer le monde ! Vous voulez contribuer ?
Commencez à traduire ›

11 commentaires
This guide seriously helped me get a broken 3DS and replace the motherboard to make it a working one. Thank you for doing this guide, you are awesome. :)
I can't thank you enough for this guide! My 3 year old submerged my 8yr olds coveted 3DS in the toilet yesterday...I frantically took it apart as soon as I found it (knew not to turn it on) and wisely took pics on my phone as I frantically took apart each piece to get it dried....was however up all night dreading my ability to put it back together again...until I found this awesome step by step guide. Won't try to put it back together for another few days, but I will update my post and let you know if I got it working again:) Thanks so much!
I need help!
My 3DS is acting alone directional up!
I opened the device and realized that there is a short between TP85 and ground !
I need to know what CI is responsible for the control functions !
Thanks!
The control functions are on the back of the motherboard facing the lower screen. It is the 4 white buttons right below the huge gap where the circular pad goes
Excellent guide. This is an incredibly frustrating device to take apart and get back together.
Probably the toughest part is the ribbon cables. They're positively tiny and some of them force you to insert them without much space to work. The best strategy I've found is to use a small poking tool like a pen cap clip to nudge them very patiently into place. First one corner in the socket so it doesn't fly back out, then nudge it along and get the other corner. Then straighten it out to line up perfectly. Being extremely patient and gentle are key -- if you even slightly bend a corner without damaging the wires, it becomes infinitely harder to get it in successfully. Most of the ribbons have small notches you can use to help you push them in and judge how far in they are.
Also if the wifi antenna wire gets loose when you're putting it back together, you'll have to undo everything to get it back into the right spot.