Introduction
Ce guide vous accompagnera tout au long du processus d'ouverture et de remplacement de la caméra.
Ce dont vous avez besoin
-
-
Placez la 3DS à l'envers. Enlevez la cartouche de jeu, écouteurs, chargeur, stylet et tout ce qui pourrait être connecté à la console.
-
-
-
Avec un tournevis JIS #000, enlevez les six vis de 6mm sur le contour du second couvercle.
-
-
-
-
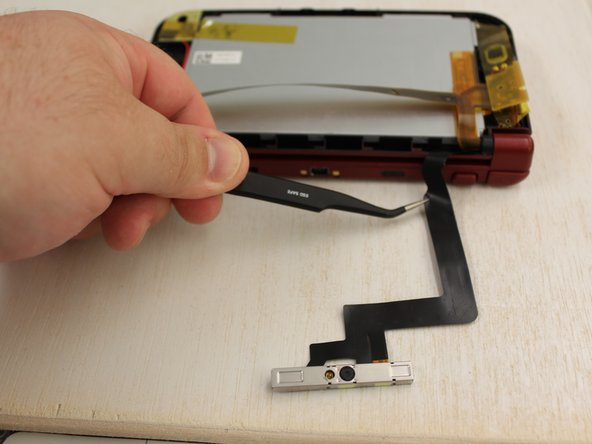
Utilisez une pince à épiler pour relever le petit rabat de verrouillage à charnière afin de déverrouiller le connecteur ZIF fixant le ruban du tampon circulaire.
-
Faites glisser le ruban hors du connecteur ZIF.
-
-
-
Pivotez doucement la carte mère à 90 degrés vers les charnières pour révéler deux connecteurs ZIF supplémentaires sous la carte.
-
Les deux ont des verrous qu'il faut soulever. Celui de gauche est long et noir; celui de droite est plus court et blanc. Soulevez les clapets, otez les nappes et retirez la carte mère.
-
-
-
À l'aide d'une tête plate de 1,5, retirez les quatre autocollants en caoutchouc rouge qui se trouvent à l'intérieur du boîtier.
-
Sous le caoutchouc se trouve un adhésif argenté
-
A l'aide d'un tournevis PH00, retirez les vis.
-
-
-
La caméra doit être lâche, il suffit de la soulever avec précaution.
-
Le câble qui y est attaché doit être facile à retirer de la moitié inférieure de la DS.
-


Pour réassembler votre console, suivez ces instructions dans l'ordre inverse.
Pour réassembler votre console, suivez ces instructions dans l'ordre inverse.
Annulation : je n'ai pas terminé ce tutoriel.
Une autre personne a terminé cette réparation.
Merci à ces traducteurs :
100%

Wiwok nous aide à réparer le monde ! Vous voulez contribuer ?
Commencez à traduire ›

Équipe

iFixit, Team 1-1, Weber Winter 2016 Membre de l'équipe iFixit, Team 1-1, Weber Winter 2016
FIX-WEBER-W16S1G1
4 membres
37 tutoriels rédigés
6 commentaires
This doesn't actually show how to get the new camera in, I managed to pull the cable of the old one out but I have no idea how to get the new one through the hinge cover wrapping surround the wires
In some youtube video I saw that guy rolled new camera ribbon cable and got it through the hinge cover.
A whole bunch of steps missing the end. First you have to release the hinge: Remove the circuit board that has the arrow keys (4 screws), remove two plastic pieces immediately above (one black square, when removed a transparent thin piece is visible.
Open hinge to near 180. Using probe or bent tweezers or stiff, thin item, push the hinge pin towards the middle through the narrow opening exposed when the plastic pieces were removed. When it touches the display it's far enough, you may have to slightly flex the hinge to release the pin.
You can now release the other side, with the flex cables going through it and the antenna cable. Feed the 3 flex cables into the slot in the plastic as you release the hinge; once it's clear you can pull them through.
Curl the camera cable (it was on top, and attached on the upper side of the corner of the mainboard) and pull it through the rung and hollow ring.
continues...
"missing at the end" :-)
jesup -
Now reverse with the new cable - curl it gently to get it into the hinge and through the ring, help pull through with tweezers. Now you can start reversing. Note that the hinge pin needs the screen to be open near 180 to slide back into place. Also be careful when reattaching ribbon cables - the display cable (bottom cable of the 3 in the hinge, the longest one) is easy to put in upside down. Take pictures when disassembling. (contacts for this one go down)