Ive just done a Galaxy Tab 3 digitizer & LCD replacement. I used a hot water bottle 1/3 filled with fresh boiling water. The reason for it only being 1/3 filled was - if you put too much water in the hot water bottle it almost turns in to an oval shape. So you have less of the bottle touching the surface of the screen. With 1/3 the surface of the bottle remains quite flat, so all of the areas of the screen become heated, softening the glue enough to get a scalpel or other thin sharp object in. Once the digitizer was off it was just a matter of making sure all the peripherals & ribbon cables were disconnected from the logic board. Then place the exposed lcd side of the frame back on to a refilled 1/3 full hot water bottle. I found a small amount of adhesive holding the LCD to the inner frame. Once warmed up enough i then gently pressed the lcd from the inside part of the frame until the complete LCD just popped out.
Installing the LCD & Digitizer was the same but in reverse. Once i was sure all the glass & other bits of crap had gone from the frame i placed the replacement LCD in to the cut out of the frame to be sure if fit then removed it & put a few strips of double sided screen tape in to hold the LCD in place. The other tip i found was to use the double sided tape around the digitizer edge & the inside of the frame where the 2 surfaces would meet. Once the glass was ready to put back on i left both the glass & the frame on the previously mentioned hot water bottle for around 6 or 7 mins. This softened all the adhesive up enough to be able to slide the new digitizer around to get a perfect fit.
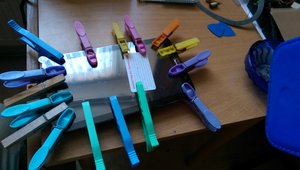
After i was happy with the positioning i then reheated the front of the digitizer on another 1/3 full hot water bottle & then clamped the digitizer down with around 15 or 20 clothes pegs. This put just enough equal pressure all around the glass to the frame. Then i left it all to cool down for a couple of hours.
Im rather pleased with the results :-)
Gazza
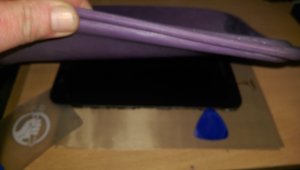
1/ Heating up the digitizer for gentle removal
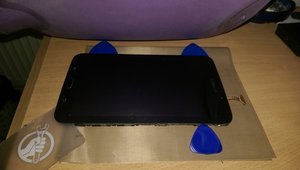
2/ Gradually working the digitizer free
3/ Clamping the new digitizer down with clothes pegs while the adhesive cools & hardens
Cette réponse est-elle utile ?
A voté
Annuler
Indice
0
Annuler
Faites défiler ce fil pour trouver l'endroit approprié pour y placer ce commentaire. Cliquez ensuite sur « Ajouter un commentaire à cette contribution » pour le déplacer.

Sorry. I posted my comment in the wrong section. See below
par gazza667