Aller au contenu principal

ASUS TUF Dash F15 Battery Replacement

Ce dont vous avez besoin

  1. ASUS TUF Dash F15 Battery Replacement, Unfasten the lower case: étape 1, image 1 de 3 ASUS TUF Dash F15 Battery Replacement, Unfasten the lower case: étape 1, image 2 de 3 ASUS TUF Dash F15 Battery Replacement, Unfasten the lower case: étape 1, image 3 de 3
    • Remove the 14 Phillips screws securing the lower case:

    • Seven 8.8 mm screws

    • Seven 10.1 mm screws

    • Use a Phillips screwdriver to loosen the captive screw.

    • Loosening this captive screw will pop up and separate the bottom-right corner of the back cover from the chassis.

    • During reassembly, tighten the captive screw before the rest of the screws.

  2. ASUS TUF Dash F15 Battery Replacement, Insert an opening pick: étape 2, image 1 de 2 ASUS TUF Dash F15 Battery Replacement, Insert an opening pick: étape 2, image 2 de 2
    • Insert an opening pick between the lower case and the chassis on the front right edge near the captive screw.

  3. ASUS TUF Dash F15 Battery Replacement, Release the clips: étape 3, image 1 de 3 ASUS TUF Dash F15 Battery Replacement, Release the clips: étape 3, image 2 de 3 ASUS TUF Dash F15 Battery Replacement, Release the clips: étape 3, image 3 de 3
    • Slide the pick along the front edge to release the clips securing the lower case.

    • Repeat this process along the perimeter of the lower case to release the remaining clips.

  4. ASUS TUF Dash F15 Battery Replacement, Remove the lower case: étape 4, image 1 de 3 ASUS TUF Dash F15 Battery Replacement, Remove the lower case: étape 4, image 2 de 3 ASUS TUF Dash F15 Battery Replacement, Remove the lower case: étape 4, image 3 de 3
    • Lift the lower case from the chassis and remove it.

    • During reassembly, this is a good point to power on your laptop and test all functions before sealing it up. Be sure to power your laptop back down before you continue working.

  5. ASUS TUF Dash F15 Battery Replacement, Reposition the tape: étape 5, image 1 de 2 ASUS TUF Dash F15 Battery Replacement, Reposition the tape: étape 5, image 2 de 2
    Outil utilisé dans cette étape :
    Tweezers
    $4.99
    J'achète
    • Use tweezers or your fingers to peel back the tape on the battery connector.

  6. ASUS TUF Dash F15 Battery Replacement, Disconnect the locking bar: étape 6, image 1 de 2 ASUS TUF Dash F15 Battery Replacement, Disconnect the locking bar: étape 6, image 2 de 2
    • Use the flat end of a spudger to gently push the locking bar away from the battery connector.

    • Make sure the locking bar is not covering the battery connector, or you may damage the battery connector's socket in the next step.

  7. ASUS TUF Dash F15 Battery Replacement, Disconnect the battery: étape 7, image 1 de 3 ASUS TUF Dash F15 Battery Replacement, Disconnect the battery: étape 7, image 2 de 3 ASUS TUF Dash F15 Battery Replacement, Disconnect the battery: étape 7, image 3 de 3
    • Insert the pointed end of a spudger under the battery connector.

    • Pry under the left edge of the battery connector to disconnect the left side of the connector.

    • Repeat this procedure for the right side of the connector.

  8. ASUS TUF Dash F15 Battery Replacement, Unfasten the battery: étape 8, image 1 de 1
    • Use your Phillips screwdriver to remove the six 5.1 mm-long screws securing the battery.

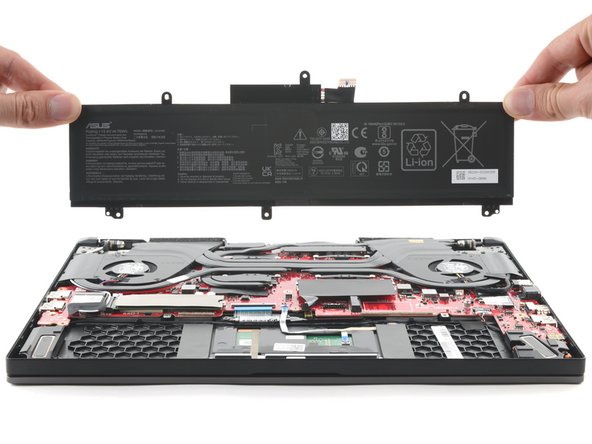
  9. ASUS TUF Dash F15 Battery Replacement, Remove the battery: étape 9, image 1 de 2 ASUS TUF Dash F15 Battery Replacement, Remove the battery: étape 9, image 2 de 2
    • Remove the battery from its recess.

Conclusion

To reassemble your device, follow these instructions in reverse order.

For optimal performance, calibrate your newly installed battery after completing this guide.

Take your e-waste to an R2 or e-Stewards certified recycler.

Repair didn’t go as planned? Try some basic troubleshooting, or ask our ASUS TUF laptop answers community for help.

Une autre personne a terminé cette réparation.

Clay Eickemeyer

Membre depuis le 09/19/22

67 297 Réputation

453 tutoriels rédigés

Équipe

iFixit Membre de l'équipe iFixit

Staff

136 membres

17 420 tutoriels rédigés

0 commentaires

Ajouter un commentaire

Nombre de vues :

Dernières 24 heures : 5

7 derniers jours : 37

30 derniers jours : 198

Total : 3,367