Aller au contenu principal

Acer Aspire R11 R3-131T-C1Z5 Motherboard Replacement

Ce dont vous avez besoin

  1. Acer Aspire R11 R3-131T-C1Z5 Motherboard Replacement, Battery: étape 1, image 1 de 2 Acer Aspire R11 R3-131T-C1Z5 Motherboard Replacement, Battery: étape 1, image 2 de 2
    • Flip the laptop on to its front, so that the back is facing up

    • Unscrew the twelve 19.05 mm PH#0 screws.

  2. Acer Aspire R11 R3-131T-C1Z5 Motherboard Replacement: étape 2, image 1 de 2 Acer Aspire R11 R3-131T-C1Z5 Motherboard Replacement: étape 2, image 2 de 2
    • At the left front corner of the laptop, under the intel sticker, press the sharp end of a metal spudger between the keyboard and the back cover to pry it apart.

  3. Acer Aspire R11 R3-131T-C1Z5 Motherboard Replacement: étape 3, image 1 de 1
    Outil utilisé dans cette étape :
    Anti-Static Wrist Strap
    $7.95
    J'achète
    • Connect the clip of an anti-static wrist strap to any piece of metal on the computer.

    • It is important to ground yourself to avoid static.

  4. Acer Aspire R11 R3-131T-C1Z5 Motherboard Replacement: étape 4, image 1 de 2 Acer Aspire R11 R3-131T-C1Z5 Motherboard Replacement: étape 4, image 2 de 2
    • Locate the large black rectangle at the bottom . This is your battery.

    • If you see that your battery is oozing or bulging, step away from the device.

    • Remove the black electric tape that is on the rainbow colored cable at the top of the battery.

    • Gently pull on the cable to disconnect.

  5. Acer Aspire R11 R3-131T-C1Z5 Motherboard Replacement: étape 5, image 1 de 3 Acer Aspire R11 R3-131T-C1Z5 Motherboard Replacement: étape 5, image 2 de 3 Acer Aspire R11 R3-131T-C1Z5 Motherboard Replacement: étape 5, image 3 de 3
    • Remove the two 12.7 mm PH#0 screws. One of these screws is located on the top of the left side of the battery and the other is located in the top of the right side of the battery.

    • Remove the battery

  6. Acer Aspire R11 R3-131T-C1Z5 Motherboard Replacement, Motherboard: étape 6, image 1 de 1
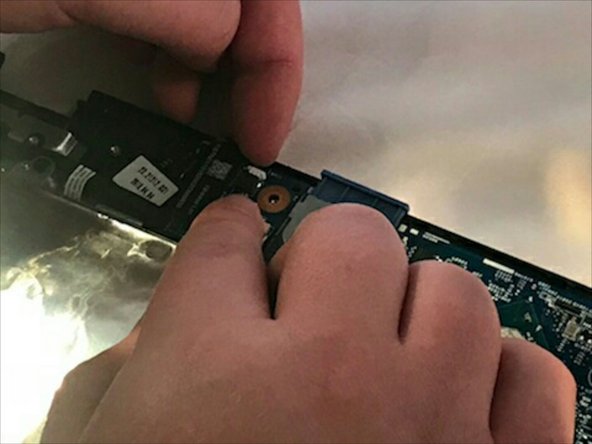
    • Locate the blue circuit board. This can be identified by locating the two USB ports.

  7. Acer Aspire R11 R3-131T-C1Z5 Motherboard Replacement: étape 7, image 1 de 1
    • Remove the four 12.7 mm PH#0 screws that are surrounded by a copper ring.

  8. Acer Aspire R11 R3-131T-C1Z5 Motherboard Replacement: étape 8, image 1 de 3 Acer Aspire R11 R3-131T-C1Z5 Motherboard Replacement: étape 8, image 2 de 3 Acer Aspire R11 R3-131T-C1Z5 Motherboard Replacement: étape 8, image 3 de 3
    • Unclip and remove the three ribbon cables. The ribbon cables clip in with a white clip.

    • Disconnect the three wires from the blue circuit board.

  9. Acer Aspire R11 R3-131T-C1Z5 Motherboard Replacement: étape 9, image 1 de 1
    • Remove the blue circuit board.

Conclusion

To reassemble your device, follow these instructions in reverse order.

2 autres ont terminé cette réparation.

Davyd Goff

Membre depuis le 09/27/17

464 Réputation

4 tutoriels rédigés

0 commentaires

Ajouter un commentaire

Nombre de vues :

Dernières 24 heures : 1

7 derniers jours : 3

30 derniers jours : 14

Total : 3,997