Introduction
The speaker allows audio from the device, however, overtime the speaker may stop working due to damage from dirt and dust or long-term use of the high volume. This guide demonstrates how to replace the speaker.
Ce dont vous avez besoin
-
-
Remove the SD card located on the right side of the device by pushing into the SD card slot and pulling the card out.
-
Remove the six 1.2 mm screws that secure the back case with a 2.5 Hex Bit screwdriver.
-
-
-
Use your fingernails or tweezers to gently remove the battery connector from its socket.
-
-
-
-
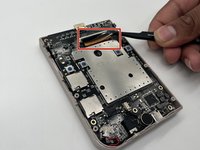
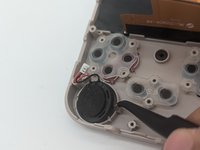
Disconnect the red audio cable from its motherboard port by carefully pulling the connector with your index finger and thumb or with fine tip tweezers.
-
-
-
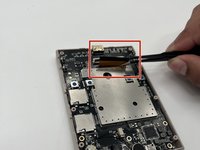
Take a pair of angled tweezers and put it in the square hole next to the tweezers.
-
Rotate the tweezer tip clockwise to push the speaker out of the chassis.
-
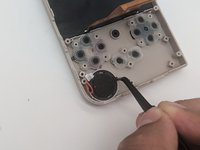
Remove the speaker.
-


To reassemble your device, follow the above steps in reverse order.
Take your e-waste to an R2 or e-Stewards certified recycler.
Repair didn’t go as planned? Try some basic troubleshooting or ask our Answers community for help.
To reassemble your device, follow the above steps in reverse order.
Take your e-waste to an R2 or e-Stewards certified recycler.
Repair didn’t go as planned? Try some basic troubleshooting or ask our Answers community for help.

Équipe

University of North Texas, Team 6-16, Kilpatrick Fall 2024 Membre de l'équipe University of North Texas, Team 6-16, Kilpatrick Fall 2024
UNT-KILPATRICK-F24S6G16
3 membres
5 tutoriels rédigés