Introduction
The guide will help you replace the speaker in a BLU Advance 4.0 cell phone.
Ce dont vous avez besoin
-
Étape 1 Removing the back cover
Attention : les étapes 1 à 3 sont issues d'un tutoriel marqué comme étant en cours.
-
With the back camera on the top side and facing you, find a notch on the bottom right side of the phone.
-
Unclip the cover by raising it up from the notch and sliding a flat rigid tool along the edge.
-
-
-
Remove the battery.
-
Remove 3 screws from each side with a Phillips 00 screwdriver.
-
Unclip the screen by sliding a flat rigid tool between the black and the blue side-band.
-
Pop off the blue side-band to be exposed to the motherboard.
-
-
-
-
Remove 2 black plastic buttons from each side, exposing metallic padding.
-
Gently pry the metallic padding off the motherboard with a flat rigid tool.
-
Carefully separate the clip-on tabs while lifting the motherboard away from the screen.
-
-
-
Before starting, you should plug in and begin to heat up your soldering iron.
-
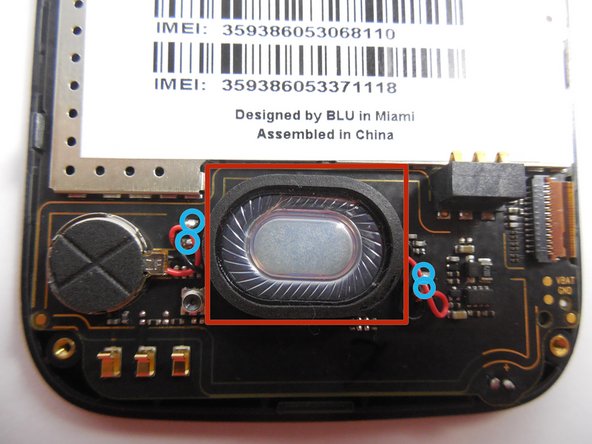
Flip the circuit board over and find the speaker connections to the red and black wires.
-
Take your soldering iron and heat the area where the wires are connected
-
Take your Solder sucker and remove the solder at the connection.
-
Carefully lift the speaker off of the circuit board.
-
-
-
Place the new speaker into the spot where you removed the old speaker.
-
Next, add solder to the tip of your soldering iron.
-
Solder all of the connections back into place as shown.
-


To reassemble your device, follow these instructions in reverse order starting from step 3
To reassemble your device, follow these instructions in reverse order starting from step 3
Équipe

UMass Dartmouth, Team 6-2, Vijaybhaskar Fall 2014 Membre de l'équipe UMass Dartmouth, Team 6-2, Vijaybhaskar Fall 2014
UMASSD-VIJAYBHASKAR-F14S6G2
3 membres
6 tutoriels rédigés