Aller au contenu principal
Pour réparer ensemble - Je crée un compte

Core Assembly Removal

Ce dont vous avez besoin

    1. Core Assembly Removal, Power down your watch: étape 1, image 1 de 1
      • Before starting repairs, take your watch off the charger and power it down.

      • Remove the watch band.

      Demander à FixBot

      Ajouter un commentaire

    2. Core Assembly Removal, Unscrew the back cover: étape 2, image 1 de 1
      • Use a Tri-point Y00 screwdriver to remove the four 4.0 mm-long screws securing the back cover.

      Demander à FixBot

      Ajouter un commentaire

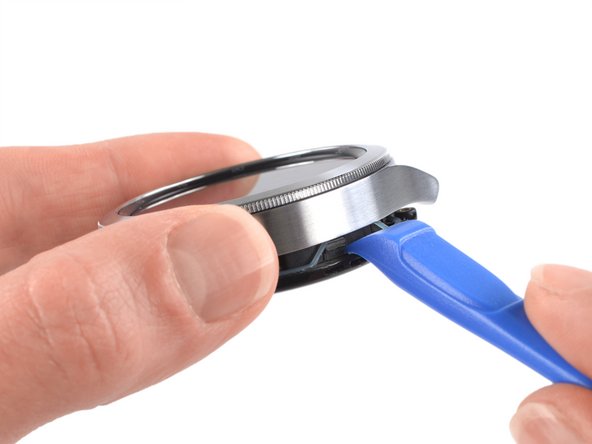
    3. Core Assembly Removal, Pry open the back cover: étape 3, image 1 de 2 Core Assembly Removal, Pry open the back cover: étape 3, image 2 de 2
      • Insert an opening tool into the seam between the back cover and the metal housing.

      • Twist the opening tool to create a gap.

      • Don't try to remove the back cover all the way yet. The sensor flex cable is still connected to the motherboard.

      Demander à FixBot

      Ajouter un commentaire

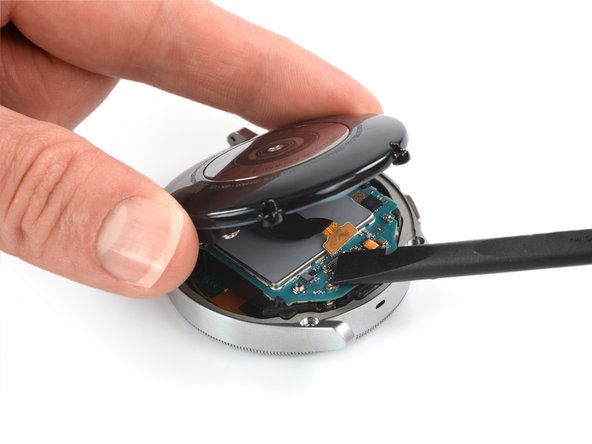
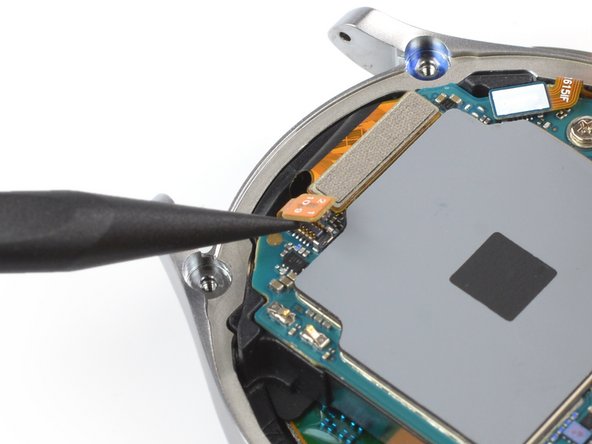
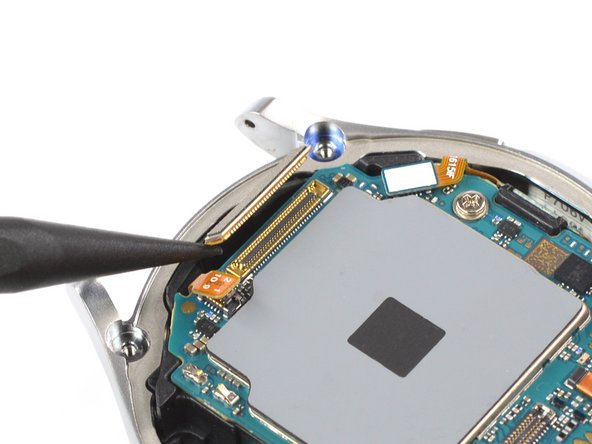
    4. Core Assembly Removal, Disconnect the sensor flex cable: étape 4, image 1 de 2 Core Assembly Removal, Disconnect the sensor flex cable: étape 4, image 2 de 2
      • Lay the watch face down.

      • Carefully swing open the back cover by folding it to the opposite site of the created gap.

      • Use the flat end of a spudger to pry up and disconnect the sensor flex cable from the motherboard.

      Demander à FixBot

      Ajouter un commentaire

    5. Core Assembly Removal, Remove the back cover: étape 5, image 1 de 1
      • Remove the back cover.

      • Make sure the rubber gasket is undamaged. If damaged, replace it with a new one during reassembly to maintain proper water resistance.

      Demander à FixBot

      Ajouter un commentaire

    1. Core Assembly Removal, Disconnect the hall sensor flex cable: étape 6, image 1 de 2 Core Assembly Removal, Disconnect the hall sensor flex cable: étape 6, image 2 de 2
      • Use the pointed end of a spudger to disconnect the hall sensor flex cable.

      Demander à FixBot

      Ajouter un commentaire

    2. Core Assembly Removal, Disconnect the display flex cable: étape 7, image 1 de 2 Core Assembly Removal, Disconnect the display flex cable: étape 7, image 2 de 2
      • Use a spudger to disconnect the display flex cable.

      Demander à FixBot

      Ajouter un commentaire

    3. Core Assembly Removal, Disconnect the side buttons: étape 8, image 1 de 2 Core Assembly Removal, Disconnect the side buttons: étape 8, image 2 de 2
      • Use a spudger to disconnect the crown button flex cable.

      Demander à FixBot

      Ajouter un commentaire

    4. Core Assembly Removal, Unscrew the motherboard: étape 9, image 1 de 1
      • Use a Phillips screwdriver to remove the 4.4 mm-long screw securing the motherboard.

      Demander à FixBot

      Ajouter un commentaire

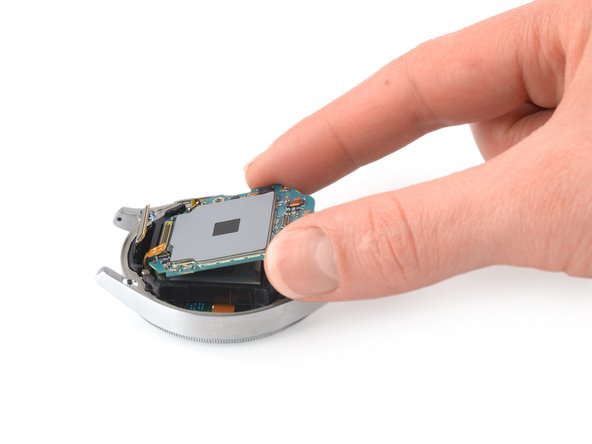
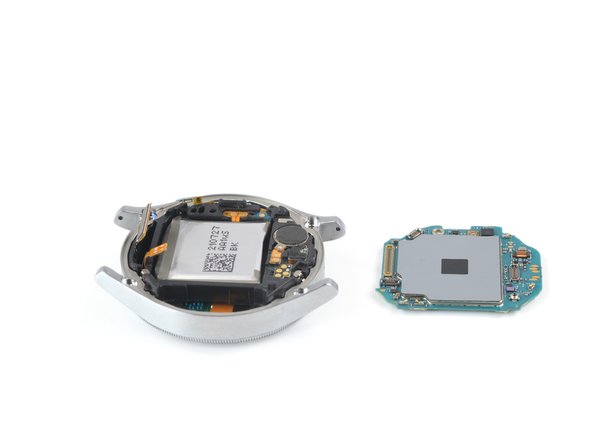
    5. Core Assembly Removal, Remove the motherboard: étape 10, image 1 de 3 Core Assembly Removal, Remove the motherboard: étape 10, image 2 de 3 Core Assembly Removal, Remove the motherboard: étape 10, image 3 de 3
      • Use your fingers to lift the motherboard out from the watch assembly towards the bottom of the watch.

      • During reassembly, make sure none of the flex cables become trapped underneath the motherbaord.

      Demander à FixBot

      Ajouter un commentaire

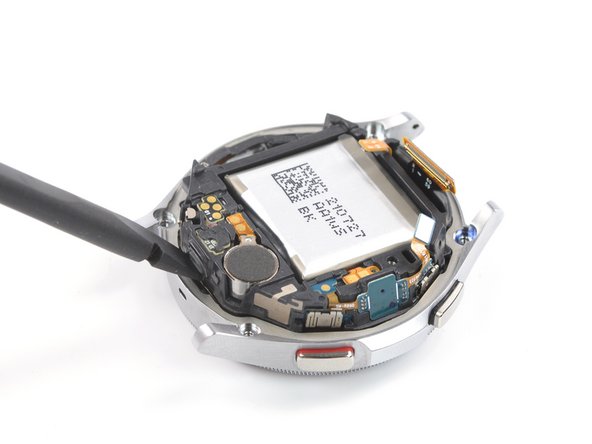
    1. Core Assembly Removal, Lift the core assembly: étape 11, image 1 de 3 Core Assembly Removal, Lift the core assembly: étape 11, image 2 de 3 Core Assembly Removal, Lift the core assembly: étape 11, image 3 de 3
      • Place the corner of the flat end of a spudger in the small opening of the barometric sensor, on the opposite side of the display connector.

      • Twist and tilt the spudger to lever the core assembly out of the metal housing.

      Demander à FixBot

      Ajouter un commentaire

    2. Core Assembly Removal, Release the core assembly: étape 12, image 1 de 2 Core Assembly Removal, Release the core assembly: étape 12, image 2 de 2
      • Thread the display flex cable through the opening in the core assembly.

      Demander à FixBot

      Ajouter un commentaire

    3. Core Assembly Removal, Remove the core assembly: étape 13, image 1 de 1
      • Remove the core assembly.

      Demander à FixBot

      Ajouter un commentaire

Conclusion

If possible, turn on your device and test your repair before installing new adhesive and resealing.

To reassemble your device, follow these instructions in reverse order.

Take your e-waste to an R2 or e-Stewards certified recycler.

Repair didn’t go as planned? Try some basic troubleshooting, or ask our Answers community for help.

Annulation : je n'ai pas terminé ce tutoriel.

2 autres ont terminé cette réparation.

Adriana Zwink

Membre depuis le 12/18/19

68 729 Réputation

167 tutoriels rédigés

Équipe

iFixit Membre de l'équipe iFixit

Staff

123 membres

86 246 tutoriels rédigés

0 commentaires de tutoriel

Ajouter un commentaire

Nombre de vues :

Dernières 24 heures : 5

7 derniers jours : 10

30 derniers jours : 47

Total : 1,614