Cette version peut contenir des modifications incorrectes. Passez au dernier aperçu vérifié.
Ce dont vous avez besoin
-
Cette étape n’est pas traduite. Aidez à la traduire
-
Loosen the four 2x3mm captive screws (yellow) on the bottom of the shell. These screws will not come out.
-
Unscrew the six 2.5x6mm (blue) screws and remove them using a Phillips #1 screwdriver. The center screw is magnetized and will drop out when the laptop is turned upside down. It can be difficult to get out otherwise.
-
-
Cette étape n’est pas traduite. Aidez à la traduire
-
Remove the clamshell from the top down using a smudging tool. The shell should come off fairly easily without much resistance.
-
-
Cette étape n’est pas traduite. Aidez à la traduire
-
Disconnect the Battery from the mainboard to ensure power is not running through the board during the repair.
-
-
Cette étape n’est pas traduite. Aidez à la traduire
-
Using two plastic removal tools or a spudger, gently work around the LCD bezel until it is free from the LCD case. Apply heat as necessary, however, use caution as heat can warp the bezel.
-
-
-
Cette étape n’est pas traduite. Aidez à la traduire
-
Remove the plastic bracket that sits between the LCD and the keyboard.
-
-
Cette étape n’est pas traduite. Aidez à la traduire
-
Clean off all old adhesive from the LCD bezel. Roll the adhesive into a ball and discard.
-
-
Cette étape n’est pas traduite. Aidez à la traduire
-
Remove the 6 screws which hold the LCD to the mount.
-
Use a spudge tool to check the amount of tension between the LCD and the mount. If the LCD comes away from the mount easily, remove gently, lower from the top down (pull towards you) and rest it on the keyboard.
-
If the LCD shows signs of tension, do not force it off of the frame. Use either a heat gun or dehydrator (preferable) to loosen the adhesive behind the panel.
-
If placing in a dehydrator, leave the laptop (WITHOUT BATTERY) for 30 minutes at high heat.
-
When removing from the dehydrator (if required) move quickly to remove the LCD from the frame. The heat will dissipate quickly,
-
-
Cette étape n’est pas traduite. Aidez à la traduire
-
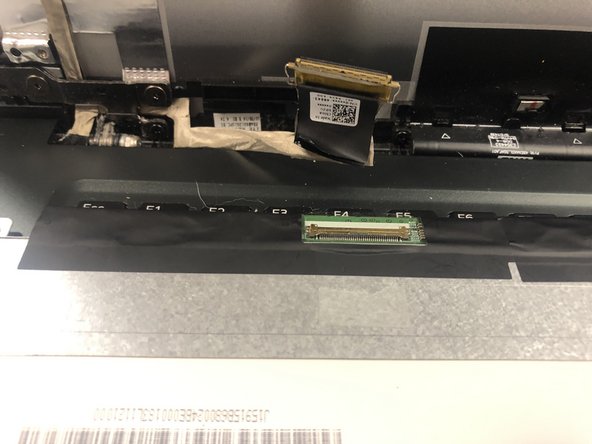
Once the LCD is removed from the frame and has been set on the keyboard, peel back the black adhesive, which will reveal the LCD connector.
-
Flip the silver tab (blue arrow) and disconnect the cable (Orange Circle) from the old LCD.
-
Once removed, discard the old LCD and prepare the new LCD for installation. (remove from wrap, etc)
-
-
Cette étape n’est pas traduite. Aidez à la traduire
-
Reconnect the LCD cable to the LCD panel and secure the silver tab in place
-
Position the new LCD panel over the six screw slots
-
Secure the new LCD to the frame using the six corresponding screws
-
-
Cette étape n’est pas traduite. Aidez à la traduire
-
Apply new adhesives to the LCD bezel
-
Snap the LCD bezel back in place over the new LCD starting from bottom to top
-
Snap the cover between the LCD and keyboard back in place
-


Un commentaire
What kind of “adhesive” would I need to glue the display back into the cover?