Introduction
If you want to upgrade your computer by putting in new RAM, or if you need to replace your RAM with new boards, use this guide to learn how to do it.
Ce dont vous avez besoin
-
-
Turn the computer over on its back so the battery compartment faces towards you.
-
Place your fingers on the small buttons with arrows pointing outwards.
-
Push and slide the buttons outward to unlock the battery compartment.
-
-
-
Use a Phillips #0 screwdriver to unscrew the sixteen 0.6 mm screws on the back panel.
To replace just the keyboard, you don’t need to remove all these screws. As Micheon already mentioned, the two screws for the hard drive don’t need to be removed but in fact, almost all the screws can remain. The only two that need to be removed are right around the Inspiron N5030 label: 1) just left of the label and 2) the one closest to the battery release slider.
I think you mean 6mm screws, not .6mm.
-
-
-
-
Pull up on the blue plastic tab connected by the white strip to unhook the keyboard panel from the motherboard.
Step 4 A,
Remove keyboard before removing cover, small flat blade along top edge of keyboard will work.
then you will have access to ribbon cable (flip latch to release) for keyboard and also cable for touchpad (lift edge to to release)
also allows for reassembly
Yes that's 100% right if not you can tear all wires. Ifixit please update in main instructions....
YY W -
This worked just enough for me to remove the harddrive from a spare-parts machine, but with very little working space.
Todd is right about another step which is not described here, which Nancy already pointed to.
The here omitted first step of keyboard removal, which allows easier cable disconnections, is clearly described in the Dell Service Manual for this type of laptop > https://www.dell.com/support/home/nl/nl/...
You don’t need to remove the entire top panel to just replace the keyboard. See my comment on step 3 to know which screws are truly necessary. Then instead of step 5 do what Todd says in his comment here which will give easier access to the ribbon cables, access to the RAM, Wifi adapter and access to remove the optical drive. Steps 5 - 9 in these instructions are only necessary if you want to replace the hard drive or clean the CPU fan.
-
-
-
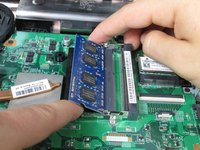
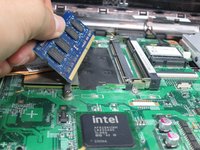
Place your fingers on the two metal tabs on the edges of the RAM.
-
Push on the tabs in the opposite direction.
-


To reassemble your device, follow these instructions in reverse order.
To reassemble your device, follow these instructions in reverse order.
Annulation : je n'ai pas terminé ce tutoriel.
5 autres ont terminé cette réparation.
Équipe

Cal Poly, Team 10-59, Amido Spring 2014 Membre de l'équipe Cal Poly, Team 10-59, Amido Spring 2014
CPSU-AMIDO-S14S10G59
4 membres
5 tutoriels rédigés
3 commentaires
Looking at the Dell service manual. You dont need to remove any screws, but only the keyboard, and if your careful you dont need to remove the ribbon cable. Its all in the service manual you can download free from Dell.
зависит от целей. озу можно поменять не разбирая всё. а вот пзу придется все разобрать. я так и не понял сьёмный тут проц или припаян. вроде есть защелка