Ce dont vous avez besoin
-
-
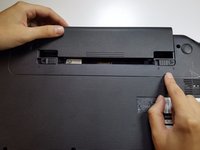
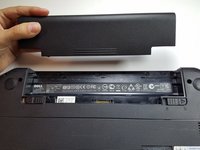
Retournez votre ordinateur afin de voir le dessous, et localisez les deux loquets.
-
-
-
-
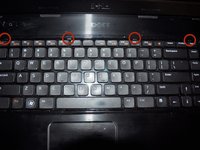
Retournez l'ordinateur pour le mettre à l'endroit. Ouvrez l'ordinateur pour voir le clavier.
-
À l'aide d'un outil pour ouvrir en plastique, appuyez délicatement sur les quatre clips qui retiennent le clavier, un par un.
-
-
-
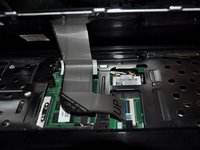
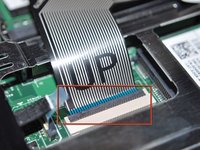
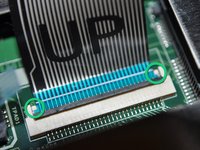
À l'aide du côté plat d'une spatule (spudger) en plastique, soulevez le loquet noir qui maintient la nappe du clavier à la carte mère, pour le détacher. Il s'agit du câble sur lequel est inscrit "UP".
-
Tirez ensuite délicatement sur la nappe pour la déconnecter de la carte mère.
-
Lorsque vous remettrez en place la nappe, repérez les deux ailettes sur les côtés. Elles doivent se positionner par rapport à deux petits ergots au niveau du connecteur sur la carte mère. Lorsque les ailettes sont correctement en place, la nappe est correctement positionnée et vous pouvez rabattre le loquet noir pour sécuriser la connexion.
-
-
-
Refermez votre ordinateur et retournez-le pour voir le dessous.
-
Retirez les 11 vis cruciformes (Philips) #PH00 qui maintiennent la partie supérieure du châssis (repose-poignets).
-
-
-
Débranchez délicatement la nappe d'alimentation :
-
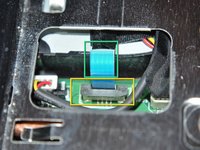
Soulevez le loquet noir qui maintient la nappe pour la détacher.
-
Tirez délicatement sur la nappe pour la déconnecter de la carte mère.
-
Débranchez délicatement la nappe du pavé tactile :
-
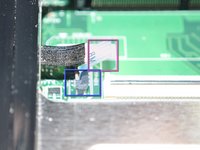
Soulevez le loquet noir qui maintient la nappe pour la détacher.
-
Tirez délicatement sur la nappe pour la déconnecter de la carte mère.
-


Pour réassembler votre appareil, suivez les instructions dans l'ordre inverse.
Pour réassembler votre appareil, suivez les instructions dans l'ordre inverse.
Annulation : je n'ai pas terminé ce tutoriel.
43 autres ont terminé cette réparation.
Merci à ces traducteurs :
100%

Ces traducteurs nous aident réparer le monde ! Vous voulez contribuer ?
Commencez à traduire ›


10 commentaires
Awesome guide! Thank you so much for posting this.
Thanks for your help - now reformattting in a different laptop
I've replaced my drive as described above.
Can anyone tell me what comes next?
*I turned it on, got dialog on the drive recognized, but I couldn't get it started.
I did try the dell drivers & utilities that came with it with no luck.
I looked into the options under F2, F8 & F12.
No luck there.
I'm still digging through e-how links.
A new hard drive normally doesn't have Windows installed on it. Hopefully you have created the dell recovery dvds when you first obtained the laptop. If you don't have that you can try and download the dvd image from Microsoft at http://www.microsoft.com/en-us/software-....
Tyler -