Aller au contenu principal

Fairphone 3 Rear Camera Module Replacement

Ce dont vous avez besoin

  1. Fairphone 3 Rear Camera Module Replacement, Back Cover: étape 1, image 1 de 2 Fairphone 3 Rear Camera Module Replacement, Back Cover: étape 1, image 2 de 2
    • Power off your phone before beginning disassembly.

    • Insert a thumbnail, or a prying tool like a spudger, into the notch at the bottom right of the back cover.

    • Pry the back cover up to start separating its plastic clips.

  2. Fairphone 3 Rear Camera Module Replacement: étape 2, image 1 de 3 Fairphone 3 Rear Camera Module Replacement: étape 2, image 2 de 3 Fairphone 3 Rear Camera Module Replacement: étape 2, image 3 de 3
    • Slide around the bottom right corner of the back cover to loosen the lower plastic clips.

    • Lift the back cover to release the rest of the plastic clips and remove it.

    • To reinstall the back cover press it firmly into place until you hear a snap from the plastic clips to form a seamless connection with the rear side of the phone.

  3. Fairphone 3 Rear Camera Module Replacement, Battery: étape 3, image 1 de 2 Fairphone 3 Rear Camera Module Replacement, Battery: étape 3, image 2 de 2
    • Use a fingernail or a prying tool at the marked notch to lever the battery out of its recess.

    • Lever the battery up until you can get a good grip.

  4. Fairphone 3 Rear Camera Module Replacement: étape 4, image 1 de 2 Fairphone 3 Rear Camera Module Replacement: étape 4, image 2 de 2
    • Lift the battery out of its recess and remove it.

  5. Fairphone 3 Rear Camera Module Replacement, Display Assembly: étape 5, image 1 de 1
    • Whenever a Phillips #00 screw is mentioned you can also unfasten it with a size #0 bit/screwdriver.

    • Remove the thirteen Phillips #00 screws (4 mm length).

  6. Fairphone 3 Rear Camera Module Replacement: étape 6, image 1 de 3 Fairphone 3 Rear Camera Module Replacement: étape 6, image 2 de 3 Fairphone 3 Rear Camera Module Replacement: étape 6, image 3 de 3
    • Make sure to insert the opening pick between the midframe and the display module and not into the small gap next to the screen. Otherwise you're going to pry up the screen instead of the whole display module.

    • Insert an opening pick between the midframe and the display module on the right edge of the phone.

    • Slide the opening pick down to the bottom right corner to pry open the plastic clamps of the display module.

  7. Fairphone 3 Rear Camera Module Replacement: étape 7, image 1 de 2 Fairphone 3 Rear Camera Module Replacement: étape 7, image 2 de 2
    • Slide the opening pick around the bottom right corner and use it to disengage the plastic clamps at the bottom of the display module.

  8. Fairphone 3 Rear Camera Module Replacement: étape 8, image 1 de 2 Fairphone 3 Rear Camera Module Replacement: étape 8, image 2 de 2
    • Slide the opening pick along the left side to pry the display module up.

    • The display module should pop out of the midframe during this process. In case it doesn’t, check for remaining clamps you might have missed.

  9. Fairphone 3 Rear Camera Module Replacement: étape 9, image 1 de 2 Fairphone 3 Rear Camera Module Replacement: étape 9, image 2 de 2
    • Remove the display assembly.

    • To reinstall the display-module press it into place on all sides until you can hear a snap from the plastic clamps to make sure it sits flush with the frame.

    • If you install a new display: The new display module comes with a white plastic cover held by 2 screws over the processor and the connectors. This needs to be taken off.

  10. Fairphone 3 Rear Camera Module Replacement, Rear Camera Module: étape 10, image 1 de 1
    • Remove the two 4.1mm-long Phillips #00 screws.

  11. Fairphone 3 Rear Camera Module Replacement: étape 11, image 1 de 2 Fairphone 3 Rear Camera Module Replacement: étape 11, image 2 de 2
    • Use a spudger to pry up and disconnect the camera connecting cable.

  12. Fairphone 3 Rear Camera Module Replacement: étape 12, image 1 de 2 Fairphone 3 Rear Camera Module Replacement: étape 12, image 2 de 2
    • Use a spudger to pry up the rear camera module.

  13. Fairphone 3 Rear Camera Module Replacement: étape 13, image 1 de 1
    • Remove the rear camera module.

Conclusion

To reassemble your device, follow these instructions in reverse order.

Information on what to do with the old module can be found on the FairPhone support page and in the FairPhone forum.

Take your e-waste to an R2 or e-Stewards certified recycler.

Repair didn’t go as planned? Try some basic troubleshooting, or ask our Answers community for help.

17 autres ont terminé cette réparation.

Adriana Zwink

Membre depuis le 12/18/19

48 292 Réputation

167 tutoriels rédigés

Équipe

iFixit Membre de l'équipe iFixit

Staff

135 membres

16 820 tutoriels rédigés

3 commentaires

How NOT to remove the display!

I just destroyed my display module a bit and had to fix it with glue. :(

This works better: https://www.youtube.com/watch?v=wGTYZNzg...

caroline - Réponse

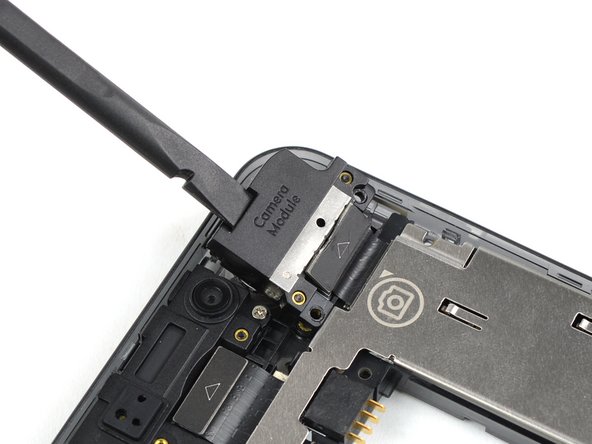
I think this guide should mention that the camera connecting cable can become disconnected accidentally on its other end (under the metallic cover) which is easy to miss. This forum post helped me: https://forum.fairphone.com/t/be-careful...

The metallic cover can be removed easily after screwing off two Torx screws. Couple of people on the forum experienced this and it helped me solve my problem.

cmur2 - Réponse

Pas de problème pour changer le module. Les explications données par ifixit sont claires et aisées à suivre.

Eric Beaucarne - Réponse

Ajouter un commentaire

Nombre de vues :

Dernières 24 heures : 4

7 derniers jours : 30

30 derniers jours : 112

Total : 7,353