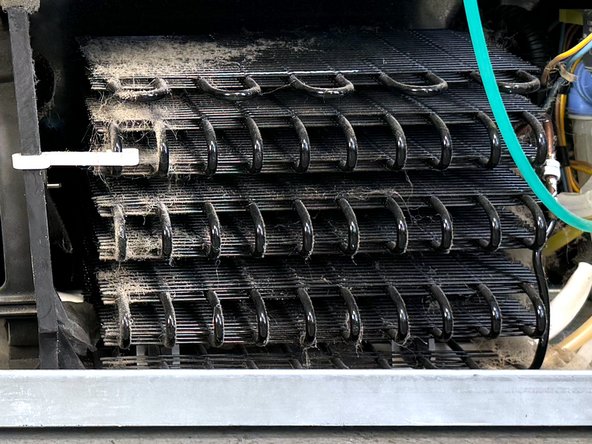
Aller au contenu principal

Frigidaire Side-By-Side Refrigerator Condenser Inspection and Cleaning

Ce dont vous avez besoin

  1. Frigidaire Side-By-Side Refrigerator Condenser Inspection and Cleaning, Unplug your refrigerator: étape 1, image 1 de 1
    • Unplug your refrigerator before you begin your repair.

    • If you are testing or repairing the following items, you may also need to shut off and disconnect the water supply:

    • Condenser fan motor

    • Compressor motor and thermal overload device

    • Water supply valve assembly

  2. Frigidaire Side-By-Side Refrigerator Condenser Inspection and Cleaning, Unfasten the rear cover: étape 2, image 1 de 1
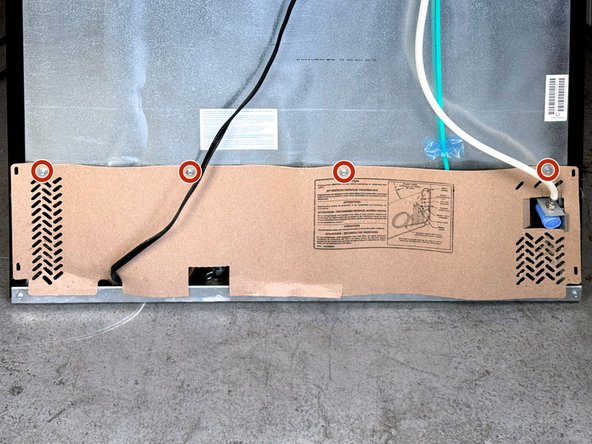
    • Use a 1/4" nut driver to remove the four screws securing the rear cover to the refrigerator.

  3. Frigidaire Side-By-Side Refrigerator Condenser Inspection and Cleaning, Lift up the rear cover: étape 3, image 1 de 3 Frigidaire Side-By-Side Refrigerator Condenser Inspection and Cleaning, Lift up the rear cover: étape 3, image 2 de 3 Frigidaire Side-By-Side Refrigerator Condenser Inspection and Cleaning, Lift up the rear cover: étape 3, image 3 de 3
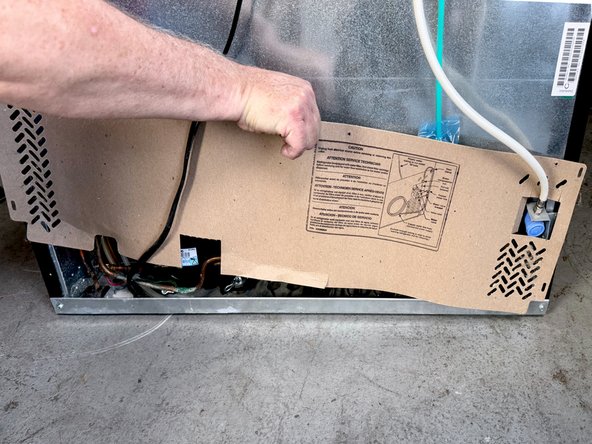
    • Lift the rear cover until it is free of the tabs.

    • If your water supply line is in use, turn the supply valve off, and disconnect it at the connection on the refrigerator.

    • If the water supply hose is not used, pass it through the hole in the cover.

  4. Frigidaire Side-By-Side Refrigerator Condenser Inspection and Cleaning, Remove the cover: étape 4, image 1 de 1
    • Remove the cover and set it aside.

  5. Frigidaire Side-By-Side Refrigerator Condenser Inspection and Cleaning, Clean and inspect the condenser.: étape 5, image 1 de 2 Frigidaire Side-By-Side Refrigerator Condenser Inspection and Cleaning, Clean and inspect the condenser.: étape 5, image 2 de 2
    • Use a soft brush to clean the condenser coils.

    • A vacuum cleaner with a hose can also be used alone or in combination with the brush for cleaning.

    • Look for oily spots on the condenser coils, often dust will stick in those places. This can be a sign of a refrigerant leak.

Conclusion

To reassemble your device, follow these instructions in reverse order.

Take your e-waste to an R2 or e-Stewards certified recycler.

Repair didn’t go as planned? Try some basic troubleshooting, or ask our  Answers community for help.

Bill Gilbert

Membre depuis le 06/30/22

38 497 Réputation

261 tutoriels rédigés

Équipe

iFixit Membre de l'équipe iFixit

Staff

123 membres

23 623 tutoriels rédigés

0 commentaires de tutoriel

Ajouter un commentaire

Nombre de vues :

Dernières 24 heures : 2

7 derniers jours : 21

30 derniers jours : 115

Total : 1,088