Cette version peut contenir des modifications incorrectes. Passez au dernier aperçu vérifié.
Ce dont vous avez besoin
-
Cette étape n’est pas traduite. Aidez à la traduire
-
Position the closed Chromebook with the rubber pads are facing up.
-
-
Cette étape n’est pas traduite. Aidez à la traduire
-
Slide the flat end of the spudger under the rubber pads at the upper right-hand and the upper left-hand corners.
-
Pry off the rubber pads to reveal a screw under each pad.
-
-
-
Cette étape n’est pas traduite. Aidez à la traduire
-
Insert the flat end of the spudger between the bottom body of the Chromebook and keyboard body.
-
Slide the spudger along the gap, applying downward pressure to separate the two components.
-
-
Cette étape n’est pas traduite. Aidez à la traduire
-
Lift the bottom of the keyboard assembly to reveal the internal components of the device.
-
-
Cette étape n’est pas traduite. Aidez à la traduire
-
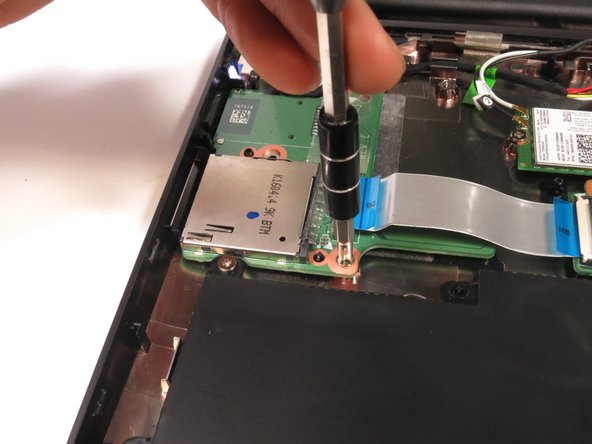
Use the pointed end of the spudger to flip up the black tabs on the two ZIF connectors located on the motherboard.
-
Disconnect the ribbon cables from the motherboard by gently sliding them out of their sockets.
-
-
Cette étape n’est pas traduite. Aidez à la traduire
-
Remove the keyboard assembly by lifting it off the laptop base.
-
-
Cette étape n’est pas traduite. Aidez à la traduire
-
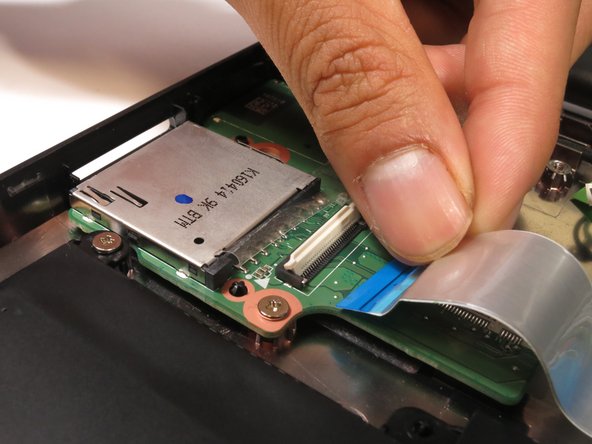
Flip up the flap on the ZIP connector with your finger.
-
Gently pull out the ribbon cable.
-
-
Cette étape n’est pas traduite. Aidez à la traduire
-
Lift the ribbon cable back and out of the way.
-
Pull out the SD card reader.
-


Annulation : je n'ai pas terminé ce tutoriel.
2 autres ont terminé cette réparation.
Équipe

Cal Poly, Team S16-G5, Banghart Winter 2018 Membre de l'équipe Cal Poly, Team S16-G5, Banghart Winter 2018
CPSU-BANGHART-W18S16G5
5 membres
15 tutoriels rédigés