Introduction
Your Chromebook has integrated wireless local area network (WLAN) options by way of an onboard wireless module. If you are having trouble connecting to Wi-fi, check out our troubleshooting page for possible solutions. If troubleshooting the settings on your device isn't resolving the issue, you may have a faulty wireless module that needs to be replaced. Follow this guide for steps to replace your wireless module and get connected to the world again.
1. Before starting, turn off the computer. If you are unsure whether the computer is off or in hibernation, turn the computer on, and then shut it down through the operating system.
2. Disconnect the power from the computer by unplugging the power cord from the computer.
3. Disconnect all external devices from the computer.
Ce dont vous avez besoin
-
-
Remove six 6.6 mm screws from the back case using a Phillips #1 screwdriver.
-
Remove two 8.7 mm screws from the back case using a Phillips #1 screwdriver.
-
Turn the computer over and open it as if you are going to use it.
-
-
-
-
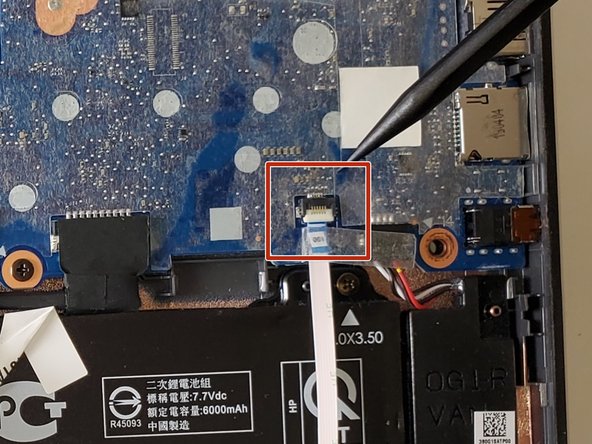
Use the tip of a spudger to disconnect the wireless antenna cable labeled "1/MAIN" from the "Main" terminal on the WLAN module.
-
Use the tip of a spudger to disconnect the wireless antenna cable labeled "2/AUX" from the "Aux" terminal on the WLAN module.
-


To reassemble your device, follow these instructions in reverse order.
To reassemble your device, follow these instructions in reverse order.
Équipe

Austin Community College, Team 13-2, Watkins Fall 2022 Membre de l'équipe Austin Community College, Team 13-2, Watkins Fall 2022
AUSTINCC-WATKINS-F22S13G2
4 membres
5 tutoriels rédigés