Aller au contenu principal

Hamilton Beach 70740 Power Cord Replacement

Tutoriel Archivé
Ce tutoriel est conservé uniquement à des fins de suivis historiques. Utilisez la version actuelle du tutoriel pour effectuer votre réparation.

Ce dont vous avez besoin

  1. Attention : les étapes 1 à 5 sont issues d'un tutoriel marqué comme étant en cours.

    Hamilton Beach 70740 Power Cord Replacement, Base Removal: étape 1, image 1 de 3 Hamilton Beach 70740 Power Cord Replacement, Base Removal: étape 1, image 2 de 3 Hamilton Beach 70740 Power Cord Replacement, Base Removal: étape 1, image 3 de 3
    • Hold the food processor upside down and remove the two screws indicated with a screwdriver. Once unscrewed, remove the two rubber suction pads.

  2. Hamilton Beach 70740 Power Cord Replacement: étape 2, image 1 de 2 Hamilton Beach 70740 Power Cord Replacement: étape 2, image 2 de 2
    • Use a spudger to remove the 4 rubber base pads located at the corners of the device.

  3. Hamilton Beach 70740 Power Cord Replacement: étape 3, image 1 de 1
    • Unscrew all 4 screws that are located beneath the pads with a screwdriver and remove the plastic grey base.

  4. Hamilton Beach 70740 Power Cord Replacement: étape 4, image 1 de 1
    • Remove the screws indicated with a screw driver.

  5. Hamilton Beach 70740 Power Cord Replacement: étape 5, image 1 de 1
    • Remove the two screws behind the knob with a screwdriver.

  6. Hamilton Beach 70740 Power Cord Replacement, Motor/Cord: étape 6, image 1 de 1
    • Use a regular nylon spudger to remove the plastic caps at these locations with moderate pressure.

    • When working with electronics, it's important to choose a tool that's ESD-safe to avoid accidental damage to the device. The regular black nylon spudger or a plastic opening tool should be used whenever possible.

    • Apply pressure at the edge of the plastic cap circles. Apply stress elsewhere may damage the device.

    • Note that the plastic caps are glued

  7. Hamilton Beach 70740 Power Cord Replacement: étape 7, image 1 de 1
    • Remove the 4 screws located under the plastic caps with a screw driver.

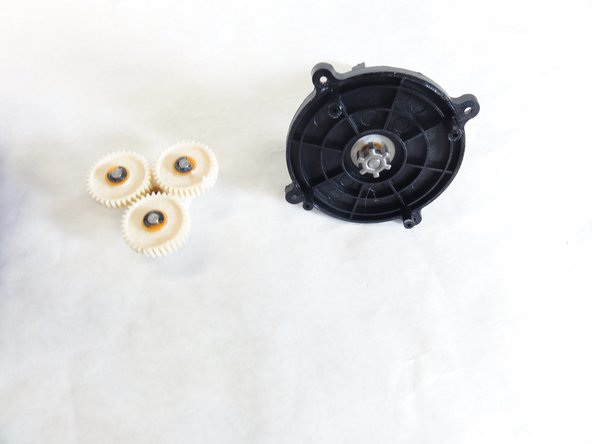
  8. Hamilton Beach 70740 Power Cord Replacement: étape 8, image 1 de 2 Hamilton Beach 70740 Power Cord Replacement: étape 8, image 2 de 2
    • Lift and remove the plastic gears at the center of the device.

    • Remove any grease residue underneath the plastic gears.

  9. Hamilton Beach 70740 Power Cord Replacement: étape 9, image 1 de 2 Hamilton Beach 70740 Power Cord Replacement: étape 9, image 2 de 2
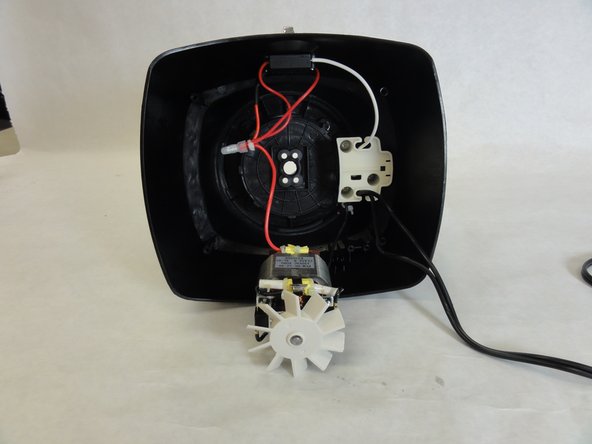
    • Remove the remaining screws to unhinge the motor located at the center of the device using a screw driver.

  10. Hamilton Beach 70740 Power Cord Replacement, Power Cord: étape 10, image 1 de 1
    • Solder the highlighted section of the power cord, and undo the wiring. Using soldering wire connect a new line with the soldering iron.

    • Learn more about soldering here.

  11. Hamilton Beach 70740 Power Cord Replacement: étape 11, image 1 de 1
    • Connect the other end of your power cord to the motor terminal.

Conclusion

To reassemble your device, follow these instructions in reverse order.

David Gedeon

Membre depuis le 09/17/15

806 Réputation

6 tutoriels rédigés

Équipe

IUPUI, Team 1-1, Baechle Fall 2015 Membre de l'équipe IUPUI, Team 1-1, Baechle Fall 2015

IUPUI-BAECHLE-F15S1G1

4 membres

8 tutoriels rédigés

0 commentaires

Ajouter un commentaire

Nombre de vues :

Dernières 24 heures : 0

7 derniers jours : 0

30 derniers jours : 0

Total : 353