Aller au contenu principal

Hover-1 Charger Bluetooth Speaker Replacement

Ce dont vous avez besoin

  1. Hover-1 Charger Bluetooth Speaker Replacement, Unplugging the Battery: étape 1, image 1 de 2 Hover-1 Charger Bluetooth Speaker Replacement, Unplugging the Battery: étape 1, image 2 de 2
    • Flip the hoverboard over so that the warning label is facing up.

    • Remove the twelve 12 mm screws with a Phillips #2 screwdriver.

    • Remove the four 10 mm screws with a Phillips #2 screwdriver.

    • The screws nearest to the wheels may be hard to access. Be sure to use a long, thin screwdriver.

  2. Hover-1 Charger Bluetooth Speaker Replacement: étape 2, image 1 de 1
    • Pull the right cover away from the hoverboard to expose the battery.

  3. Hover-1 Charger Bluetooth Speaker Replacement: étape 3, image 1 de 2 Hover-1 Charger Bluetooth Speaker Replacement: étape 3, image 2 de 2
    • Disconnect the two pronged black and yellow cable.

  4. Hover-1 Charger Bluetooth Speaker Replacement: étape 4, image 1 de 1
    • Pull the left cover away from the hoverboard.

  5. Hover-1 Charger Bluetooth Speaker Replacement: étape 5, image 1 de 2 Hover-1 Charger Bluetooth Speaker Replacement: étape 5, image 2 de 2
    • Disconnect the two pronged black and yellow cable. The battery is now fully disconnected.

  6. Hover-1 Charger Bluetooth Speaker Replacement, Bluetooth Speaker: étape 6, image 1 de 1
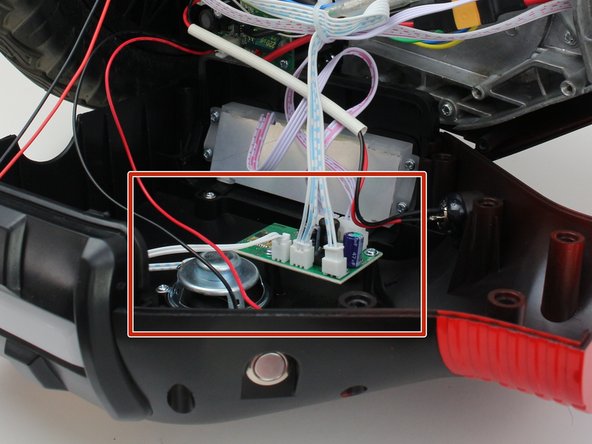
    • Locate the speaker attached to the left cover of the hoverboard.

  7. Hover-1 Charger Bluetooth Speaker Replacement: étape 7, image 1 de 2 Hover-1 Charger Bluetooth Speaker Replacement: étape 7, image 2 de 2
    • Unplug the red and white four pin connector from the circuit board. Unplugging this connector is photographed as an example.

    • Unplug the red and white four pin connector from the circuit board.

    • Unplug the white and blue three pin connector from the circuit board.

    • Unplug the white and blue two pin connector from the circuit board.

  8. Hover-1 Charger Bluetooth Speaker Replacement: étape 8, image 1 de 2 Hover-1 Charger Bluetooth Speaker Replacement: étape 8, image 2 de 2
    • Using a Phillips #1 screwdriver, remove the two 7 mm screws from the circuit board.

  9. Hover-1 Charger Bluetooth Speaker Replacement: étape 9, image 1 de 2 Hover-1 Charger Bluetooth Speaker Replacement: étape 9, image 2 de 2
    • Using a Phillips #1 screwdriver, remove the three screws securing the speaker to the outer shell.

  10. Hover-1 Charger Bluetooth Speaker Replacement: étape 10, image 1 de 1
    • Remove the speaker and circuit board from the outer shell.

Conclusion

To reassemble your device, follow these instructions in reverse order.

Une autre personne a terminé cette réparation.

Bryson Shishido

Membre depuis le 10/10/19

145 Réputation

1 tutoriel rédigé

Équipe

Cal Poly, Team S12-G1, Regan Fall 2019 Membre de l'équipe Cal Poly, Team S12-G1, Regan Fall 2019

CPSU-REGAN-F19S12G1

4 membres

6 tutoriels rédigés

0 commentaires

Ajouter un commentaire

Nombre de vues :

Dernières 24 heures : 0

7 derniers jours : 5

30 derniers jours : 25

Total : 1,282