Introduction
Si votre scanner se coince à mi-chemin, il se peut que la « colonne vertébrale » du boîtier soit pliée
Il y a une «colonne vertébrale» en métal qui s'étend sur toute la longueur de la base à l'intérieur du boîtier. Lorsqu'il est plié, cela pousse la tête du scanner vers le haut et dans le verre, ce qui provoque le blocage du moteur et crée un bruit horrible.
Si vous ouvrez le scanner et le pliez à nouveau, cela résout le problème.
Vous pouvez savoir s'il en a besoin en retournant le scanner et en plaçant un objet droit (règle métallique ?) sur la longueur du dos du scanner. Si vous pouvez voir une courbure (baisse ou une courbe vers le bas) vers le centre du boîtier arrière, le rail à l'intérieur est probablement plié.
Ce dont vous avez besoin
-
-
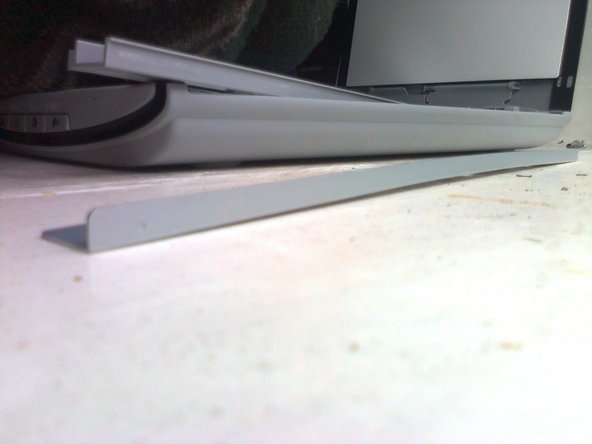
La « colonne vertébrale » métallique que vous allez remodeler se trouve sous le rail en plastique gris au bord « cranté », que vous pouvez voir à l’intérieur du scanner.
-
-
-
Retournez le scanner et retirez les 3 vis à l’arrière de votre scanner, qui sont recouvertes de bandes ovales en plastique gris foncé (2 aux extrêmes, 1 au centre). Ainsi, vous n’avez pas à retourner le scanner au risque que des pièces tombent. Ces vis maintiennent la « colonne vertébrale » métallique en place.
-
-
-
Pour atteindre la « colonne vertébrale », vous devez d’abord soulever doucement les deux bandes de plastique qui parcourent les longs bords du verre.
-
Utilisez un couteau pour les soulever, elles sont collées et ont des clips en plastique à l’extérieur qui leur permettent de glisser vers l’arrière (extrémité USB) du scanner une fois la colle enlevée.
-
Méthode alternative : les extrémités près de la charnière ne sont pas collées et ont une languette qui glisse sous le bord arrière. Vous pouvez plier chaque bande avec un couteau près de la charnière et glisser la languette sous le bord arrière. La bande se trouve ensuite sur le bord arrière.
-
-
-
-
Ensuite, soulevez la plaque de verre depuis l’avant (extrémité des boutons) du scanner, des deux côtés.
-
Méthode alternative : après avoir placé les bandes latérales sur le bord arrière, vous pouvez faire glisser la plaque de verre vers la charnière pour défaire les attaches sur le côté. À l’avant, près des boutons, vous pouvez soulever la plaque de verre, puis la tirer vers l’avant et la retirer.
-
-
-
Maintenant, soulevez doucement la tête du scanner du rail en plastique gris et mettez-la à l’écart, d’un côté du boîtier.
You saved my scanner, and a very important project with a deadline. Can't thank you enough!!!
-


Pour remonter votre appareil, suivez ces instructions dans l'ordre inverse.
Pour remonter votre appareil, suivez ces instructions dans l'ordre inverse.
Annulation : je n'ai pas terminé ce tutoriel.
19 autres ont terminé cette réparation.
Merci à ces traducteurs :
100%


Ces traducteurs nous aident réparer le monde ! Vous voulez contribuer ?
Commencez à traduire ›
22 commentaires
I had a problem where the scanner made a horrible noise, but the metal rail did not seem to be bent. I opened up the scanner according to this guide, reseated the scanning head, closed it, and it worked smoothly again. Thanks.
By doing this, I found out that it is not necessary to undo the glue of the side strips. I inserted two steps in the guide to explain this (sorry, no pictures).
Thank you very much! :)
Thank you so much! I was in the middle of a project, scanning some of my quartet/quintet music into pdfs so I didn't have to cart my music all over with me--just a thumb drive! My well-intentioned 6 year-old wanted to help and the scanner was knocked off the table. Oops! The metal last was bent and the scan bar was jammed at the top. I sat in a coffee shop and fixed it. Thank you, thank you, thank you!
Fixed my Canon LIDE 25 with the help of this manual.
There are only 2 screws with our machine. First remove the 2 screws (covered by the stickers in the back - yes the round circles are stickers)
Then turn over, carefully remove the plastic on both sides with a sharp knife (they are glued). Afterwards the glass comes out by pushing in a bit and lifting out.
Now place the middle rod in its grooves with a small pin midway that goes into a small hole. (if the scanner head is in the beginning push it a bit)
Then carefully place the two screws back. Run a test scan to see the head is OK. Then place the glass back by placing at the end first and when inside the end turn the scanner upside down and slide the glass to the end. turn over pull the glass a bit to the front. return the two plastics on the side that were glued (the glue is sticky and still good).
Hope this can help somebody.
Excellent. This took me like 10 minutes to do and it worked. Before I found your answer, I was wondering wtf happened to the scanner. After seeing your explanation I thought, well I guess the spine could be bent. Took it apart and sure enough it was. Bent it back, slapped it back together and WHAM, IT WORKED. Thanks!
Getting the thing open was not too difficult. Do not be too afraid of breaking anything when prying off the sides. There's no clips, just two tabs on the back that pull out. It's primarily held in by glue. I did not bother using double-sided tape to put the sides back on because it would seriously muck up the glass and be a pain if I have to open it again. Besides, they stay in place well enough on their own, even without the glue.
Dealing with the actual bar was what took most of my time. The bend may not necessarily be obvious, so you have to look very closely at it, and if you make a mistake, you can spend a lot of time undoing the damage. Also, there's no guarantee that the surface you have it on while examining it is actually level, so you might want to check that out too.
Thanks for this tip because I doubt I would have figured it out on my own. What causes this? Could it have been that some screws were put in too tight during manufacturing? It's worked for a long time until recently without issue.
Thanks.
I just received my, new for me, unit (LiDE 110) from eBay yesterday and it was getting stuck intermittently when I tried it last night. I used the edge of a ruler to determine whether the back casing was true or not: There was a slight bow to mine.
I didn't want to go and open it just yet, so I Just tightened/loosened the three screws (in step 2 above) on the back outside to undo warp/bent using the ruler to determine the result. This worked for me.
The next thing I was going to do if that didn't work was get longer screws to install a metal strip along it's length (temporarily or permanent) to straighten and reinforce the back.
Again, thanks.
the same things on canon lide 110?
My LiDE 210 scanning head was hanging at the end.
So I opened the scanner as illustrated, but I found that there are no mechanical problems, and it rather seems that the scanner software doesn’t give a command to the motor for a return stroke.
Do you have any idea how could that be fixed?
Is there a way to reset the scanner software (not the OS driver)?
Note: Scanning works on Linux, but I get an initialization error on Windows.
Thanks! I had a similar problem with my Lide 50; however in my case it was the flat cable that stupidly bent in the wrong direction, thus jamming the scanner head half way. The alternate disassembly method worked for me, but it helped to also peel the sides a bit loose on the front side as it was then easier to slide the glass plate towards the rear. Next I straightened the flat cable, added some more glue to fix it more to the side, and I also added scotch tape the too “bendy” section in order to stiffen it, That worked.
The plastics by the sides, on top of the glass, do not come out easy. I was able to insert a blade close to the back side, to the end, towards the USB connector and then I lifted up one end and then slowly pull out the entire plastic edge. On the front was not needed to remove the plastic, because it came out together with the glass.
In my case the plastic toothed rack was in good state, the metal plate underneath was not bent, but the scanner jammed in the middle.
That moving part is centered in balance by being pushed towards the glass. In my case was somehow not pushed equally along its length and on the left side was touching the plastic under it from middle of the scanner towards USB connector end.
What I have done was to tension a bit more the spring from left side and to bend up the metal plate under the spring. I got then a bit more space under that metal plate and the plastic body of the scanner.
And it worked, no more jams.
Here are some photos:
I have a similar problem with my Canon Lide 100, but the reader is stuck at the end and it doesn’t move back. Do you think is the same procedure to repair it? Anticipated thanks for your answer!
Hi Jorge, I have no experience with the LIDE 100. So, you need to judge yourself how similar it looks from the pictures provided. Given that people have reported successes with other LIDE models, following these instructions, it seems that you could try to follow the steps carefully and sensibly. Reporting your experience here would help others.
Identical process for LIDE 210 model. To slightly expand the disassembly instructions, the plastic side panels are held on with double-sided tape strips, plus three plastic hooks. Slide a solid metal spudger under the plastic, 1-2cm away from the hinge end. You can then gently, but forcefully, twist towards the front as though rolling open a sardine can, until the hook near the hinge pops free. Then pry and slide to release the tape strip. You will feel resistance when you reach the middle. These remaining are intended to slide towards the hinge but the tape will stop that. Apply pressure to the side of the strip, towards the centre of the glass, then gently pry again to release each clip.
Reassembly: I inserted the hook at the hinge end, and laid the strip *near* horizontal (so it wouldn't stick) then bent it upwards in the middle. This allows the hooks to slide back enough snap into place. Last, smooth the whole strip downwards and towards the front and press into the tape once it is sitting flat.
Thanks for this info. Just to add - before getting too stuck into this - try running the scanner once you’ve removed 1 or more screws. Simply removing the screw at the end where things were jamming relieved enough tension from the spine of mine for things to start running smoothly again.
My LIDE 90 was getting stuck 2/3 of the way through. I straightened the metal piece and ...voila! I can't thank you enough. This saved not only my scanner but a time sensitive, valuable project.