Aller au contenu principal
Pour réparer ensemble - Je crée un compte

How to Clean iRobot Roomba 4100 Brushes

  1. How to Clean iRobot Roomba 4100 Brushes, Battery Pack: étape 1, image 1 de 1
    • Turn the Roomba upside down to be able to see the yellow battery pack.

    Demander à FixBot

    Ajouter un commentaire

  2. How to Clean iRobot Roomba 4100 Brushes: étape 2, image 1 de 2 How to Clean iRobot Roomba 4100 Brushes: étape 2, image 2 de 2
    • Remove the battery by placing your fingers into the two holes and firmly press your fingers against both sides of the battery.

    • Lift the battery directly up and out of the device.

    Demander à FixBot

    Ajouter un commentaire

  3. How to Clean iRobot Roomba 4100 Brushes: étape 3, image 1 de 1
    • Line up the replacement battery’s larger tab side with the larger tab hole and the smaller tab side with the smaller tab hole.

    • Insert the replacement battery into the empty space and firmly press down onto the battery until two audible clicks are heard.

    Demander à FixBot

    Ajouter un commentaire

  4. How to Clean iRobot Roomba 4100 Brushes, Brush Guard: étape 4, image 1 de 1
    • Lay the Roomba upside down on a flat surface with the blue strip away from you.

    Demander à FixBot

    Ajouter un commentaire

  5. How to Clean iRobot Roomba 4100 Brushes: étape 5, image 1 de 2 How to Clean iRobot Roomba 4100 Brushes: étape 5, image 2 de 2
    • Use your index fingers to pull the yellow tabs towards you.

    • While still pulling the yellow tabs with your index fingers, tilt up the brush guard.

    • For reassembly, make sure to push in the brush guard until it clicks into place.

    Demander à FixBot

    Ajouter un commentaire

  6. How to Clean iRobot Roomba 4100 Brushes: étape 6, image 1 de 1
    • Pull back the brush guard to unhook it from the latches.

    • Remove the brush guard by lifting it up and out of the Roomba.

    • This picture has a change in orientation to illustrate the latches. Continue disassembling the Roomba with the blue strip away from you.

    Demander à FixBot

    Ajouter un commentaire

  7. How to Clean iRobot Roomba 4100 Brushes, Flexible Rubber Brush: étape 7, image 1 de 1
    • Set the brush guard aside.

    • The flexible rubber brush is the smooth, all-rubber brush that is closest to the yellow battery.

    Demander à FixBot

    Ajouter un commentaire

  8. How to Clean iRobot Roomba 4100 Brushes: étape 8, image 1 de 2 How to Clean iRobot Roomba 4100 Brushes: étape 8, image 2 de 2
    • Remove the flexible rubber brush by grabbing it and pulling it up and out of the Roomba.

    • For reassembly, orient the Roomba with the battery closest to you:

    • First, insert the black end of the flexible rubber brush into the black square opening on the right side.

    • Second, lay the flexible rubber brush back into place.

    Demander à FixBot

    Ajouter un commentaire

  9. How to Clean iRobot Roomba 4100 Brushes, Filter: étape 9, image 1 de 1
    • Lay the Roomba on a flat surface with the red side up.

    Demander à FixBot

    Ajouter un commentaire

  10. How to Clean iRobot Roomba 4100 Brushes: étape 10, image 1 de 2 How to Clean iRobot Roomba 4100 Brushes: étape 10, image 2 de 2
    • Push in the red, gumdrop-shaped button with your thumb.

    • While holding in the button, slide the back piece away from the main body of the Roomba.

    Demander à FixBot

    Ajouter un commentaire

  11. How to Clean iRobot Roomba 4100 Brushes: étape 11, image 1 de 3 How to Clean iRobot Roomba 4100 Brushes: étape 11, image 2 de 3 How to Clean iRobot Roomba 4100 Brushes: étape 11, image 3 de 3
    • Flip the back piece over in your hand.

    • Using your other hand, grab the yellow tab and pull it away from the back piece.

    Demander à FixBot

    Ajouter un commentaire

  12. How to Clean iRobot Roomba 4100 Brushes: étape 12, image 1 de 3 How to Clean iRobot Roomba 4100 Brushes: étape 12, image 2 de 3 How to Clean iRobot Roomba 4100 Brushes: étape 12, image 3 de 3
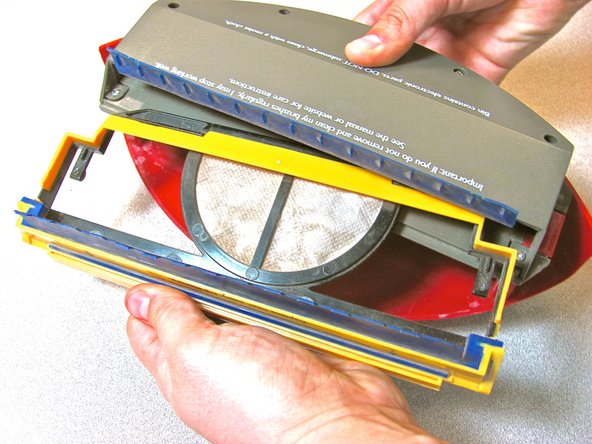
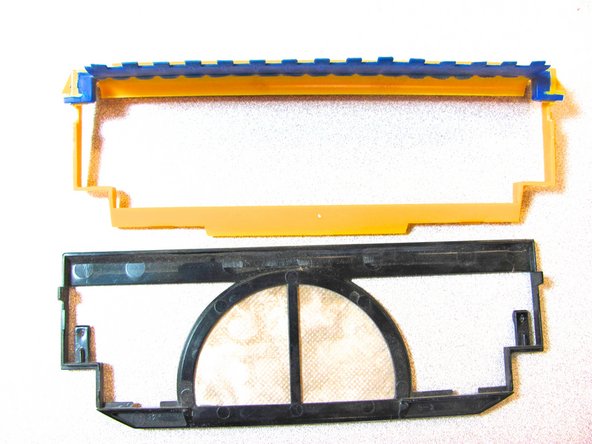
    • Pinch the black plastic of the filter and pull it away from the yellow filter holder.

    Demander à FixBot

    Ajouter un commentaire

  13. How to Clean iRobot Roomba 4100 Brushes, How to Clean iRobot Roomba 4100 Brushes: étape 13, image 1 de 1
    • Remove the particle bin from the back of the Roomba.

    Demander à FixBot

    Ajouter un commentaire

  14. How to Clean iRobot Roomba 4100 Brushes: étape 14, image 1 de 1
    • Pop out the two yellow tabs to remove the brush cover.

    Demander à FixBot

    Ajouter un commentaire

  15. How to Clean iRobot Roomba 4100 Brushes: étape 15, image 1 de 3 How to Clean iRobot Roomba 4100 Brushes: étape 15, image 2 de 3 How to Clean iRobot Roomba 4100 Brushes: étape 15, image 3 de 3
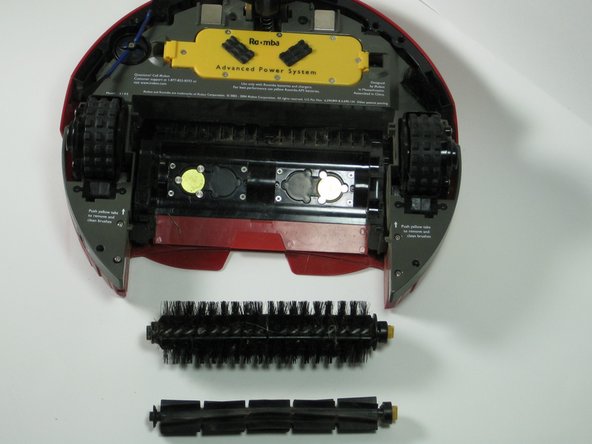
    • Remove the two brushes from the iRobot Roomba 1400.

    • The brushes will easily pop in and out when cleaning them.

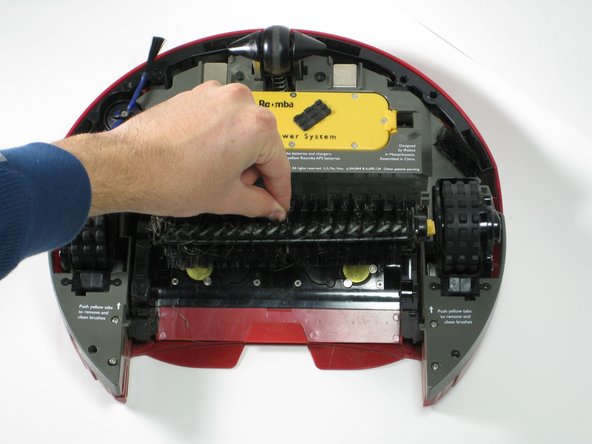
    • Completely remove any debris or tangled hair around the brushes when cleaning.

    Demander à FixBot

    Ajouter un commentaire

Conclusion

To reassemble the iRobot Roomba 4100, follow the stated instructions in reverse order.

Annulation : je n'ai pas terminé ce tutoriel.

4 autres ont terminé cette réparation.

Scott Leonard

Membre depuis le 10/05/10

445 Réputation

3 tutoriels rédigés

Équipe

Cal Poly, Team 20-6, Maness Fall 2010 Membre de l'équipe Cal Poly, Team 20-6, Maness Fall 2010

CPSU-MANESS-F10S20G6

2 membres

7 tutoriels rédigés

1 commentaire de tutoriel

looking for user Manual for Welch A;;yn EKG CP10

Robert Castillo - Réponse Partager

Ajouter un commentaire

Nombre de vues :

Dernières 24 heures : 0

7 derniers jours : 10

30 derniers jours : 37

Total : 4,744