Aller au contenu principal
Pour réparer ensemble - Je crée un compte

Huawei Mate 10 Pro Camera Assembly Replacement

Ce dont vous avez besoin

  1. Huawei Mate 10 Pro Camera Assembly Replacement, SIM Card Tray: étape 1, image 1 de 2 Huawei Mate 10 Pro Camera Assembly Replacement, SIM Card Tray: étape 1, image 2 de 2
    • Insert a SIM opening tool in the hole on the left side and push it in.

    • Remove the SIM card tray.

    Demander à FixBot

    Ajouter un commentaire

  2. Huawei Mate 10 Pro Camera Assembly Replacement, Back Cover: étape 2, image 1 de 1
    • Switch off your phone.

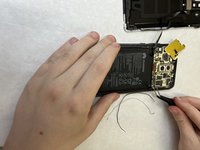
    • Prepare an iOpener and apply it to the back of the phone for about two minutes to loosen the adhesive beneath the back cover.

    Demander à FixBot

    Ajouter un commentaire

  3. Huawei Mate 10 Pro Camera Assembly Replacement: étape 3, image 1 de 3 Huawei Mate 10 Pro Camera Assembly Replacement: étape 3, image 2 de 3 Huawei Mate 10 Pro Camera Assembly Replacement: étape 3, image 3 de 3
    Outil utilisé dans cette étape :
    Halberd Spudger
    $2.99
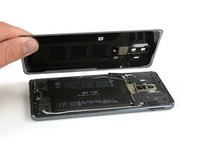
    • Lift up the back cover with a suction cup until you can insert the flat end of a halberd spudger.

    • Use the halberd spudger to cut the adhesive beneath the back cover on all sides of the phone.

    • Use opening picks to avoid the adhesive from sticking to the back cover again while cutting the adhesive on all sides.

    Demander à FixBot

    Ajouter un commentaire

  4. Huawei Mate 10 Pro Camera Assembly Replacement: étape 4, image 1 de 2 Huawei Mate 10 Pro Camera Assembly Replacement: étape 4, image 2 de 2
    • Don't remove the back cover all the way, yet. The fingerprint sensor cable is still connected to motherboard.

    • Flip the back cover over to the side.

    • Remove the Phillips #00 screw which holds down the metal shield, sitting on top of the connection of the fingerprint sensor cable.

    Demander à FixBot

    Ajouter un commentaire

  5. Huawei Mate 10 Pro Camera Assembly Replacement: étape 5, image 1 de 2 Huawei Mate 10 Pro Camera Assembly Replacement: étape 5, image 2 de 2
    Outil utilisé dans cette étape :
    Tweezers
    $4.99
    • Use a pair tweezers to remove the metal shield covering the connector of the fingerprint sensor.

    • Disconnect the fingerprint sensor cable with a spudger.

    • When reassembling your phone apply new adhesive where it is necessary.

    Demander à FixBot

    Ajouter un commentaire

  6. Huawei Mate 10 Pro Camera Assembly Replacement, Motherboard: étape 6, image 1 de 2 Huawei Mate 10 Pro Camera Assembly Replacement, Motherboard: étape 6, image 2 de 2
    Outil utilisé dans cette étape :
    Tweezers
    $4.99
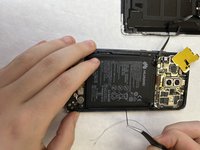
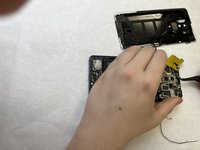
    • Unscrew screws on black cover and remove using tweezers to leverage.

    Demander à FixBot

    Ajouter un commentaire

  7. Huawei Mate 10 Pro Camera Assembly Replacement: étape 7, image 1 de 2 Huawei Mate 10 Pro Camera Assembly Replacement: étape 7, image 2 de 2
    • Pop off gold covers.

    Demander à FixBot

    Ajouter un commentaire

  8. Huawei Mate 10 Pro Camera Assembly Replacement: étape 8, image 1 de 3 Huawei Mate 10 Pro Camera Assembly Replacement: étape 8, image 2 de 3 Huawei Mate 10 Pro Camera Assembly Replacement: étape 8, image 3 de 3
    • Disconnect wires attached to motherboard assembly.

    Demander à FixBot

    Ajouter un commentaire

  9. Huawei Mate 10 Pro Camera Assembly Replacement: étape 9, image 1 de 2 Huawei Mate 10 Pro Camera Assembly Replacement: étape 9, image 2 de 2
    • Wedge tweezers under motherboard and leverage assembly to pop assembly out.

    Demander à FixBot

    Ajouter un commentaire

  10. Huawei Mate 10 Pro Camera Assembly Replacement: étape 10, image 1 de 1
    • Separate camera assembly by popping it out, if only the motherboard is needed.

    Demander à FixBot

    Ajouter un commentaire

  11. Huawei Mate 10 Pro Camera Assembly Replacement, Camera Assembly: étape 11, image 1 de 3 Huawei Mate 10 Pro Camera Assembly Replacement, Camera Assembly: étape 11, image 2 de 3 Huawei Mate 10 Pro Camera Assembly Replacement, Camera Assembly: étape 11, image 3 de 3
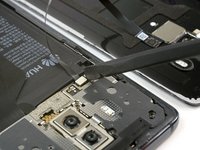
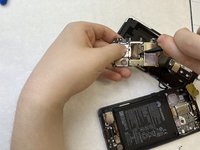
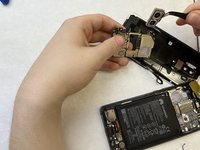
    • On the backside of the motherboard assembly, detach the camera assembly from the motherboard.

    Demander à FixBot

    Ajouter un commentaire

Conclusion

To reassemble your device, follow these instructions in reverse order.

Annulation : je n'ai pas terminé ce tutoriel.

2 autres ont terminé cette réparation.

Annabelle Harding

Membre depuis le 03/31/22

433 Réputation

3 tutoriels rédigés

Équipe

IUPUI, Team 3-5, Harley Spring 2022 Membre de l'équipe IUPUI, Team 3-5, Harley Spring 2022

IUPUI-HARLEY-S22S3G5

3 membres

6 tutoriels rédigés

0 commentaires de tutoriel

Ajouter un commentaire

Nombre de vues :

Dernières 24 heures : 2

7 derniers jours : 10

30 derniers jours : 37

Total : 1,004