Aller au contenu principal

Huawei Mate 9 Rear and Front Camera Replacement

Ce dont vous avez besoin

  1. Huawei Mate 9 Rear and Front Camera Replacement, Rear and Front Camera: étape 1, image 1 de 3 Huawei Mate 9 Rear and Front Camera Replacement, Rear and Front Camera: étape 1, image 2 de 3 Huawei Mate 9 Rear and Front Camera Replacement, Rear and Front Camera: étape 1, image 3 de 3
    • Turn off your Huawei Mate 9 smartphone and remove the SIM card tray with a SIM card removal tool.

    • Remove the two T2 screws at the base of the phone next to the USB Type- C port with a T2 Torx Screwdriver.

  2. Huawei Mate 9 Rear and Front Camera Replacement: étape 2, image 1 de 3 Huawei Mate 9 Rear and Front Camera Replacement: étape 2, image 2 de 3 Huawei Mate 9 Rear and Front Camera Replacement: étape 2, image 3 de 3
    • Using a suction cup, carefully start pulling the display assembly from the back cover.

    • Insert a pick when pulling the display assembly off the back cover, while sliding the pick along the edge of the phone to loosen the display assembly.

    • While removing the display assembly, make sure to not completely remove the back cover. This is due to the power button and fingerprint sensor cables still being connected to the motherboard.

  3. Huawei Mate 9 Rear and Front Camera Replacement: étape 3, image 1 de 2 Huawei Mate 9 Rear and Front Camera Replacement: étape 3, image 2 de 2
    • To protect the internal cables and components, you will need to carefully disconnect the battery connector. Ensure the 1.3 mm Phillips #000 screws securing the metal plate is removed with a Phillips 000 screwdriver.

    • Remove the metal plate with tweezers.

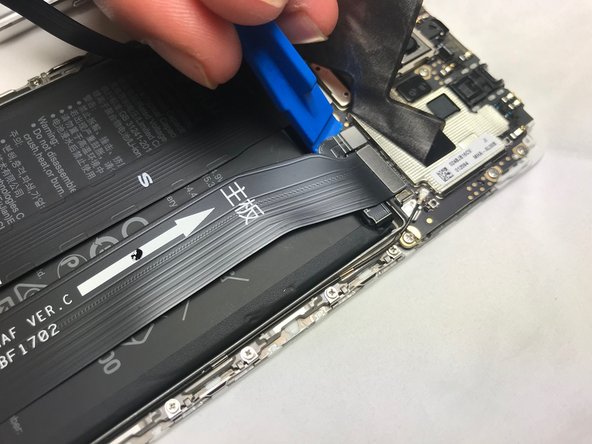
    • Disconnect the battery connector from the motherboard using the spudger.

  4. Huawei Mate 9 Rear and Front Camera Replacement: étape 4, image 1 de 2 Huawei Mate 9 Rear and Front Camera Replacement: étape 4, image 2 de 2
    • Using a spudger, disconnect the battery connector.

    • After disconnecting the battery connector, you can now completely remove the back cover.

  5. Huawei Mate 9 Rear and Front Camera Replacement: étape 5, image 1 de 3 Huawei Mate 9 Rear and Front Camera Replacement: étape 5, image 2 de 3 Huawei Mate 9 Rear and Front Camera Replacement: étape 5, image 3 de 3
    • Use a Philips 000 screwdriver to remove the two 1.0 mm Philips #1 screws securing the metal plate.

    • Remove the metal plate with tweezers.

    • After removing the metal plate, you can now remove and replace the rear camera from its slot.

  6. Huawei Mate 9 Rear and Front Camera Replacement: étape 6, image 1 de 2 Huawei Mate 9 Rear and Front Camera Replacement: étape 6, image 2 de 2
    • To remove the front-facing camera, peel off the conducting fabric from the metal shield on the display assembly.

    • Disconnect the front camera connector and remove the front-facing camera.

Conclusion

To reassemble your device, follow these instructions in reverse order.

2 autres ont terminé cette réparation.

Rogelio Ramirez

Membre depuis le 06/25/17

524 Réputation

3 tutoriels rédigés

Équipe

UC Davis, Team S7-G8, Lore Fall 2018 Membre de l'équipe UC Davis, Team S7-G8, Lore Fall 2018

UCD-LORE-F18S7G8

3 membres

6 tutoriels rédigés

0 commentaires

Ajouter un commentaire

Nombre de vues :

Dernières 24 heures : 0

7 derniers jours : 3

30 derniers jours : 12

Total : 2,110