Introduction
Remplacez votre disque dur pour plus d'espace de stockage!
Ce tutoriel comprend les étapes pour remplacer le disque dur de votre iMac par un SSD. Il décrit aussi comment installer le capteur de température sur le SSD afin que les ventilateurs de votre Mac fonctionnent à la bonne vitesse.
Avant de commencer toute intervention sur votre iMac, débranchez l'ordinateur et appuyez sur le bouton de marche pendant dix secondes pour décharger les condensateurs de l'alimentation.
Faites très attention à ne toucher ni les fils du condensateur ni les joints de soudure accessibles à l'arrière de l'alimentation.
Ce dont vous avez besoin
-
-
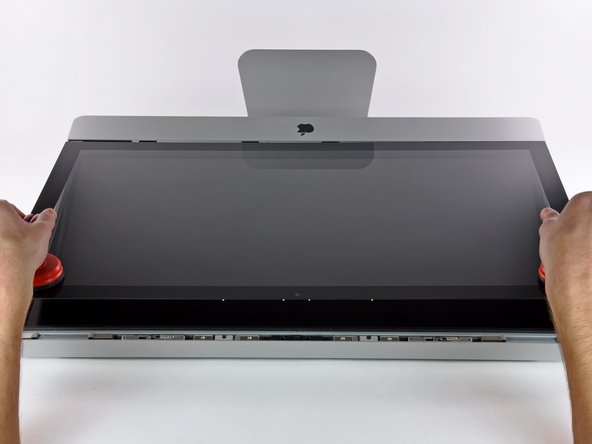
Collez une ventouse dans chacun des deux angles supérieurs de la vitre.
-
Tout en maintenant légèrement la ventouse contre la vitre, soulevez la poignée mobile jusqu'à ce qu'elle soit parallèle à l'autre poignée (comme indiqué par la troisième photographie).
-
-
-
Retirez les huit vis Torx T10 par lesquelles l'écran LCD est fixé au boîtier extérieur.
-
-
-
-
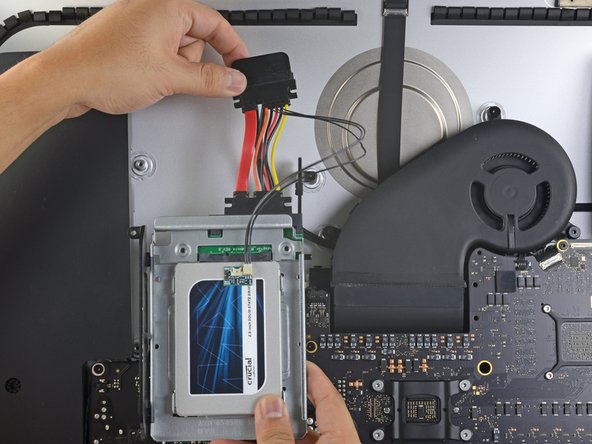
Déconnectez le capteur thermique, l'alimentation SATA et les câbles de données SATA en retirant leurs connecteurs de leur prise sur le disque dur.
-
-
-
Alignez les connecteurs de SSD avec les prises du boîtier métallique.
-
Appuyez le disque contre les prises du boîtier jusqu'à ce que le SSD soit bien encastré.
-
-
-
Décollez le film de protection blanc qui recouvre l'adhésif derrière la petite sonde de température,
-
Collez le circuit de la sonde de température à la surface métallique du SSD, à côté du connecteur SATA.
-
Repliez les câbles de la sonde de température, qui dépassent, de façon qu'ils ne vous gênent pas quand vous montez le boîtier.
-
-
-
Trouvez le connecteur labellisé HD TMP ou HDD TEMP sur la carte mère.
-
Si la sonde de température précédente est encore connectée à la carte mère, débranchez-la et ôtez-la. Vous n'en avez plus besoin.
-
Connectez le câble à double fil rouge-noir de la sonde de température au connecteur labellisé HD TMP ou HDD TEMP.
-
Disposez le fil qui dépasse de façon qu'il n'interfère avec aucun composant.
-
Pour remonter votre appareil, suivez les mêmes instructions dans l'ordre inverse.
Pour remonter votre appareil, suivez les mêmes instructions dans l'ordre inverse.
Annulation : je n'ai pas terminé ce tutoriel.
581 autres ont terminé cette réparation.
Merci à ces traducteurs :
100%
Ces traducteurs nous aident réparer le monde ! Vous voulez contribuer ?
Commencez à traduire ›
87 commentaires
While putting the system back together, I recommend untaping and removing the vertical sync cable from the back of the led screen. Plug it back into the LED Driver board and then into the back of the screen. Reapply the tape and continue reassembling as normal. It is far easier to plug it back into the screen than into the driver board through such a small gap.
Wow! That's a great tip... I looked at doing this and thought it would be a hassle but if you said it is easier than doing it taped than it must be easier. I'm going to do this time. Thaanx
My hd failed and i used this guide to replace it with the same model. The problem i'm stuck with now is installing os x again. The installation starts and goes on for a while, while the hard drive makes a weird clicking noise. Then randomly the installation fails and asks to try again. I've done this ten times now.
I'm not here to rant though, i've some useful tips as well.
Instead of buying suction cups, i used a vacuum cleaner inserted into the back of a plastic container to create more pressure per inch. Also used duct tape on edges of the container to create more friction and not damage the glass. Although later i noticed you could wedge the sharp edge of a knife between the glass and the case and widen the gap with a fingernail, then pull the glass out completely.
A note when you're buying screw drivers... The ones with the interchangeable bits won't reach the screws on the lcd, so be prepared to fiddle with strips of paper and screws falling into the sides!
Were you able to finally install the osx ?
Kul -
I'm supposing my SSD will go before my HDD, but either way this doesn't look like the inside of my 27" iMac. Help?


