Aller au contenu principal

Jura Capresso IMPRESSA J5 opening procedure

Ce dont vous avez besoin

  1. Jura Capresso IMPRESSA J5  opening procedure, Jura Capresso IMPRESSA J5  opening procedure: étape 1, image 1 de 1
    • Unplug the power cord!

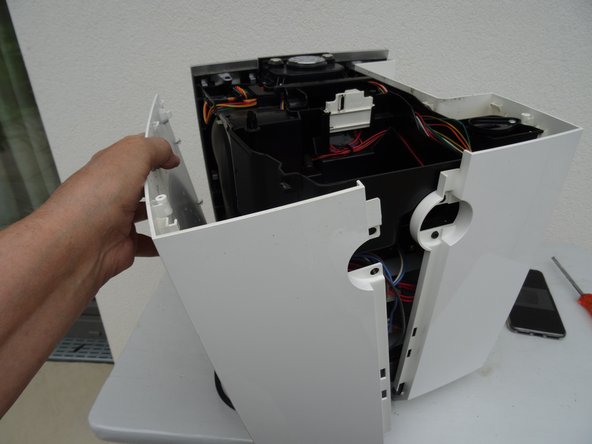
    • Remove the water tank and the drip tray. Remove all coffee beans from the storage container.

  2. Jura Capresso IMPRESSA J5  opening procedure: étape 2, image 1 de 3 Jura Capresso IMPRESSA J5  opening procedure: étape 2, image 2 de 3 Jura Capresso IMPRESSA J5  opening procedure: étape 2, image 3 de 3
    • Flip open the lid of the bean compartment.

    • Unscrew the two slotted screws inside the bean compartment. The screws have a rubber washer and will not come out completely.

    • Remove the bean compartment.

  3. Jura Capresso IMPRESSA J5  opening procedure: étape 3, image 1 de 3 Jura Capresso IMPRESSA J5  opening procedure: étape 3, image 2 de 3 Jura Capresso IMPRESSA J5  opening procedure: étape 3, image 3 de 3
    Outil utilisé dans cette étape :
    iFixit Precision 4 mm Screwdriver Bit
    $2.99
    J'achète
    • The top cover is fastened with oval head screws. Unscrew them.

    • These screws have an oval head that makes them look like rivets (picture 2). You need to use a special bit - also available at iFixit - for their removal. Here a DIY guide. If the right bit is not available, it could be done with a pair of needle nose pliers. Jura wants to keep us out of our own machines!!!

  4. Jura Capresso IMPRESSA J5  opening procedure: étape 4, image 1 de 1
    • Also remove the two oval head screws underneath the ground coffee compartment lid.

  5. Jura Capresso IMPRESSA J5  opening procedure: étape 5, image 1 de 1
    • Now you can pry up the top cover all around.

    • Remove the top cover. This often requires a little force.

    • Use plastic tools to avoid scratching your device.

  6. Jura Capresso IMPRESSA J5  opening procedure: étape 6, image 1 de 2 Jura Capresso IMPRESSA J5  opening procedure: étape 6, image 2 de 2
    • Turn the device with the back facing you.

    • Turn the Jura label a few degrees counterclockwise. If it's hard to do, use a small suction cup.

    • Remove the Jura label.

  7. Jura Capresso IMPRESSA J5  opening procedure: étape 7, image 1 de 3 Jura Capresso IMPRESSA J5  opening procedure: étape 7, image 2 de 3 Jura Capresso IMPRESSA J5  opening procedure: étape 7, image 3 de 3
    • Underneath the label you will find two Torx T15 screws. Remove them.

    • Carefully pull the top of the chrome cover slightly outwards, then push it down and put it aside.

  8. Jura Capresso IMPRESSA J5  opening procedure: étape 8, image 1 de 1
    • Remove the Torx T15 screw on the side panel with the water tank.

  9. Jura Capresso IMPRESSA J5  opening procedure: étape 9, image 1 de 2 Jura Capresso IMPRESSA J5  opening procedure: étape 9, image 2 de 2
    • Pull the right side panel slightly towards the back.

    • Remove the side panel.

  10. Jura Capresso IMPRESSA J5  opening procedure: étape 10, image 1 de 1
    • Pull the left side panel slightly towards the back and remove it.

Conclusion

Follow the steps in reverse order to reassemble your device.

2 autres ont terminé cette réparation.

Merci à ces traducteurs :

de en

100%

Ces traducteurs nous aident réparer le monde ! Vous voulez contribuer ?
Commencez à traduire ›

VauWeh

Membre depuis le 10/19/15

202 869 Réputation

246 tutoriels rédigés

Équipe

Repair is War on Entropy Membre de l'équipe Repair is War on Entropy

Community

25 membres

1 110 tutoriels rédigés

0 commentaires

Ajouter un commentaire

Nombre de vues :

Dernières 24 heures : 1

7 derniers jours : 10

30 derniers jours : 34

Total : 4,350