Aller au contenu principal

KitchenAid Professional 600 Drive Motor Replacement

Ce dont vous avez besoin

  1. KitchenAid Professional 600 Drive Motor Replacement, Top Cover: étape 1, image 1 de 1
    • Take out the screw which holds on the silver band using a Phillips #2 screwdriver.

    • Remove the silver band.

    Maybe start with unplugging it ?

    Ryan F - Réponse

  2. KitchenAid Professional 600 Drive Motor Replacement: étape 2, image 1 de 1
    • Remove the four Phillips #2 screws located around the mixer where the band was removed.

    • This picture only shows two of the screw that you need to remove. The other two are on the exact opposite side of the mixer.

  3. KitchenAid Professional 600 Drive Motor Replacement: étape 3, image 1 de 1
    • Remove the top of the mixer to reveal the inner parts.

    • The top should lift off, but may not if it is stuck. A sharp strike from the back with the hand may unstick it. It will slide forward about a 3/8 of an inch. Push it back again from the front and it should be free enough to lift.

  4. KitchenAid Professional 600 Drive Motor Replacement, Speed Selector: étape 4, image 1 de 1
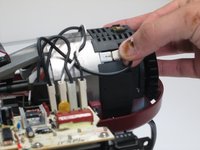
    • Locate the selector switch.

    • Remove the two Phillips #2 screws holding the selector switch in place.

  5. KitchenAid Professional 600 Drive Motor Replacement: étape 5, image 1 de 3 KitchenAid Professional 600 Drive Motor Replacement: étape 5, image 2 de 3 KitchenAid Professional 600 Drive Motor Replacement: étape 5, image 3 de 3
    • Unplug the cords attached the drive motor to the switch.

    • We suggest numbering them left from right so they are reattached to the replacement part in the right order.

    I would suggest labeling with what they go to (line, motor 1, etc) since at least for the HD version they changed the board layout so you need the labels to match them up.

    kevincash - Réponse

  6. KitchenAid Professional 600 Drive Motor Replacement: étape 6, image 1 de 1
    • Pull out the Selector Switch.

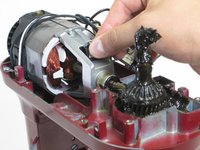
    Somewhere between steps 4 and 7, you removed the planetary cover. This is just two more screws and must happen before the motor will lift out.

    Steve Muhween - Réponse

    Oops, make that 4 more screws. Still, it's easy. Just a little gooey with the transmission grease, so mind you don't get any dirt or whatnot in there when it's open.

    Steve Muhween -

  7. KitchenAid Professional 600 Drive Motor Replacement, Drive Motor: étape 7, image 1 de 1
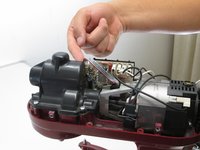
    • Remove the two Phillips #2 screws holding the motor in place, located near the fan at the back of the motor.

    • The picture only shows one of the screws. The other screw is located on the exact opposite side of the motor.

  8. KitchenAid Professional 600 Drive Motor Replacement: étape 8, image 1 de 1
    • Pull upward to remove the motor.

    You missed the step about removing the gearbox cover, even though it is shown as removed in the pictures. The motor cannot be removed with the gearbox cover in place. For anyone doing this repair, remove the four phillips screws holding the cover on and lift upwards. It is full of grease so have some paper towels handy in case any spills. When replacing the cover (after re-installing the motor) you may need to spin the gears (do this by rotating the motor fan) so that the accessory drive gear meshes properly in order for the cover to fit back into place. Be sure to align the planetary shaft with the recess in the gearbox cover as well.

    Keith Everline - Réponse

Conclusion

To reassemble your device, follow these instructions in reverse order.

2 autres ont terminé cette réparation.

Tallon Dotinga

Membre depuis le 04/11/16

487 Réputation

2 tutoriels rédigés

Équipe

Cal Poly, Team 25-4, Maness Spring 2016 Membre de l'équipe Cal Poly, Team 25-4, Maness Spring 2016

CPSU-MANESS-S16S25G4

4 membres

18 tutoriels rédigés

4 commentaires

anyone know where I can get the hall effect sensor receiver that is on the motor shaft? Somehow it's missing?

Barclay Berger - Réponse

is there not a fusible link in series with the drive motor?

wa1shm - Réponse

I accidentally pluged my 110v mixer to 220v. Now, what are the possible parts that i need to change? How can i check if the motor is busted?

hyalmar planta - Réponse

Are the motor brushes serviceable on this model mixer and where are they located

Thanks

Gary Bell - Réponse

Ajouter un commentaire

Nombre de vues :

Dernières 24 heures : 3

7 derniers jours : 25

30 derniers jours : 149

Total : 13,677