Aller au contenu principal
Pour réparer ensemble - Je crée un compte

Lenovo Yoga C930-13IKB Speaker Replacement

Ce dont vous avez besoin

    1. Lenovo Yoga C930-13IKB Speaker Replacement, Back Cover: étape 1, image 1 de 1
      • Flip the device over so that the underside is facing up.

      • Remove the six 3.5 mm T5 Torx screws.

      Demander à FixBot

      Ajouter un commentaire

    2. Lenovo Yoga C930-13IKB Speaker Replacement: étape 2, image 1 de 2 Lenovo Yoga C930-13IKB Speaker Replacement: étape 2, image 2 de 2
      • Pry off the back cover using the plastic opening tool.

      • Loosen the back cover in multiple spots using the opening tool, then remove the whole back.

      • You may have to run the plastic tool along the edges until you find a small gap to separate the back cover from the laptop.

      • Do not use a metal tool when working with your device.

      Demander à FixBot

      Ajouter un commentaire

    3. Lenovo Yoga C930-13IKB Speaker Replacement: étape 3, image 1 de 2 Lenovo Yoga C930-13IKB Speaker Replacement: étape 3, image 2 de 2
      • Carefully lift the cover off with your hands.

      Demander à FixBot

      Ajouter un commentaire

    1. Lenovo Yoga C930-13IKB Speaker Replacement, Battery: étape 4, image 1 de 3 Lenovo Yoga C930-13IKB Speaker Replacement, Battery: étape 4, image 2 de 3 Lenovo Yoga C930-13IKB Speaker Replacement, Battery: étape 4, image 3 de 3
      • Unplug the battery from the motherboard by pinching the cables with your fingers and tugging out with force.

      • Use the spudger for assistance.

      Demander à FixBot

      Ajouter un commentaire

    2. Lenovo Yoga C930-13IKB Speaker Replacement: étape 5, image 1 de 1
      • Unscrew the four 3mm screws with a Phillips screwdriver.

      Demander à FixBot

      Ajouter un commentaire

    3. Lenovo Yoga C930-13IKB Speaker Replacement: étape 6, image 1 de 2 Lenovo Yoga C930-13IKB Speaker Replacement: étape 6, image 2 de 2
      • The battery is still held in place with two stretch-release adhesive strips, similar to ones found in an iPhone.

      • Use your fingers to pry up the clear plastic pull-tab for one of the stretch release adhesives.

      • Grasp the pull-tab and slowly pull away from the battery at a shallow angle. The adhesive strip will stretch to many times its length and slowly release from underneath the battery.

      • Repeat the procedure for the second strip on the opposite side of the battery.

      • Be careful not to bend the battery. Breaking the battery is dangerous.

      • Remove the battery with your hands.

      Demander à FixBot

      Ajouter un commentaire

    1. Lenovo Yoga C930-13IKB Speaker Replacement, Speakers: étape 7, image 1 de 2 Lenovo Yoga C930-13IKB Speaker Replacement, Speakers: étape 7, image 2 de 2
      • Remove the four 2mm screws that attach the speakers to the laptop body using a Phillips #00 screwdriver.

      Demander à FixBot

      Ajouter un commentaire

    2. Lenovo Yoga C930-13IKB Speaker Replacement: étape 8, image 1 de 3 Lenovo Yoga C930-13IKB Speaker Replacement: étape 8, image 2 de 3 Lenovo Yoga C930-13IKB Speaker Replacement: étape 8, image 3 de 3
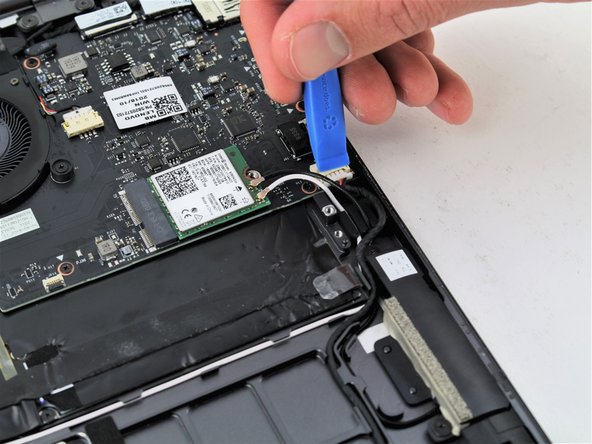
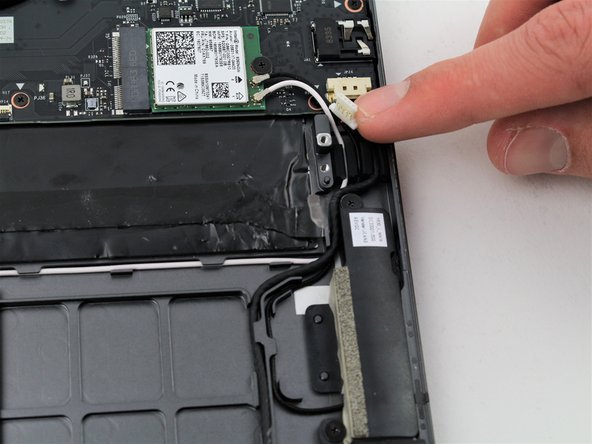
      • Gently unplug the connector using two fingers.

      • Use an opening tool if needed.

      Demander à FixBot

      Ajouter un commentaire

    3. Lenovo Yoga C930-13IKB Speaker Replacement: étape 9, image 1 de 2 Lenovo Yoga C930-13IKB Speaker Replacement: étape 9, image 2 de 2
      • Lift the black wire that connects the speakers to the motherboard from its track using an opening tool.

      • Press the wire down firmly and in the right track when reassembling.

      Demander à FixBot

      Ajouter un commentaire

    4. Lenovo Yoga C930-13IKB Speaker Replacement: étape 10, image 1 de 2 Lenovo Yoga C930-13IKB Speaker Replacement: étape 10, image 2 de 2
      • Remove the right speaker using your fingers.

      • Remove the left speaker, which is connected to the right speaker by the black and red wire.

      • When reassembling, make sure the black and red wire is in the right track so that you are able to put the back cover back without wire poking out.

      Demander à FixBot

      Ajouter un commentaire

Conclusion

To reassemble your device, follow these instructions in reverse order.

Annulation : je n'ai pas terminé ce tutoriel.

2 autres ont terminé cette réparation.

Andrew Walker

Membre depuis le 01/23/20

166 Réputation

1 tutoriel rédigé

Équipe

Cal Poly, Team S19-G5, White Winter 2020 Membre de l'équipe Cal Poly, Team S19-G5, White Winter 2020

CPSU-WHITE-W20S19G5

4 membres

51 tutoriels rédigés

1 commentaire de tutoriel

What would be the additional steps to replace a right hinge as the speakers are in the hinge?

Brian Dernbach - Réponse Partager

Ajouter un commentaire

Nombre de vues :

Dernières 24 heures : 1

7 derniers jours : 7

30 derniers jours : 35

Total : 1,471