Aller au contenu principal

Cette version peut contenir des modifications incorrectes. Passez au dernier aperçu vérifié.

Tutoriel Archivé
Ce tutoriel est conservé uniquement à des fins de suivis historiques. Utilisez la version actuelle du tutoriel pour effectuer votre réparation.

Ce dont vous avez besoin

  1. , Boîtier inférieur: étape 1, image 1 de 1
    • Ôtez les dix vis suivantes, qui fixent le boîtier inférieur au boîtier supérieur :

    • Deux vis Pentalobe P5 de 2,3 mm

    • Huit vis Pentalobe P5 de 3,0 mm

    • Tout au long de cette réparation, prenez note de l'emplacement de chaque vis, et assurez-vous qu'elle retrouvera sa place initiale pour éviter d'endommager votre appareil.

  2. : étape 2, image 1 de 1
    • Glissez vos doigts entre le boîtier inférieur et le boîtier supérieur.

    • Séparez avec précaution les deux boîtiers, soulevez et retirez le boîtier inférieur.

  3. : étape 3, image 1 de 2 : étape 3, image 2 de 2
    • Le boîtier inférieur est attaché au boîtier supérieur par deux attaches en plastique au milieu.

    • Lors du remontage, appuyez doucement sur le milieu du boîtier inférieur pour que les deux attaches s'enclenchent à nouveau.

  4. , Connecteur de batterie: étape 4, image 1 de 1
    • Si nécessaire, retirez le cache en plastique couvrant la carte de contact de la batterie.

  5. : étape 5, image 1 de 2 : étape 5, image 2 de 2
    • Avec l'extrémité plate d'une spatule (spudger), tirez le connecteur de la batterie tout droit hors de sa prise sur la carte mère.

    • Assurez-vous de faire levier uniquement sur le connecteur et non pas sur sa prise, sinon vous risquez d'endommager irréversiblement la carte mère.

  6. : étape 6, image 1 de 1
    • Pliez le connecteur de la batterie vers le haut afin d'éviter tout contact accidentel avec la prise pendant la réparation.

  7. , Haut-parleur droit: étape 7, image 1 de 1
    • Dévissez les deux vis Torx T5 de 2,1 mm fixant le support de la nappe de la carte E/S du côté de la carte mère.

  8. : étape 8, image 1 de 1
    • Saisissez le support de la nappe de la carte E/S avec une pincette et retirez-le du Macbook.

  9. : étape 9, image 1 de 2 : étape 9, image 2 de 2
    • Utilisez l'extrémité plate d'une spatule (spudger) pour ôter le connecteur de la carte E/S de sa prise sur la carte mère.

    • Veillez à faire seulement levier sur la nappe de la carte E/S et non sur la prise elle-même, vous risqueriez d'endommager la carte mère.

  10. : étape 10, image 1 de 2 : étape 10, image 2 de 2
    • Saisissez la nappe de la carte E/S par son extrémité du côté de la carte mère et soulevez-la et pliez-la pour qu'elle ne vous dérange pas.

    • Pour éviter d'endommager la nappe, pliez-la seulement au niveau du coude à l'extrémité de la nappe la plus proche de la carte E/S.

  11. : étape 11, image 1 de 2 : étape 11, image 2 de 2
    • Insérez délicatement l'extrémité pointue du spudger sous la nappe du haut-parleur droit à proximité du connecteur. Ensuite soulevez-la afin de la déconnecter de sa prise sur la carte mère.

  12. : étape 12, image 1 de 3 : étape 12, image 2 de 3 : étape 12, image 3 de 3
    • Soulevez délicatement la nappe du haut-parleur droit hors du boîtier supérieur.

  13. : étape 13, image 1 de 1
    • Enlevez les vis suivantes, fixant le haut-parleur droit au boîtier supérieur :

    • Une vis Torx T5 de 5,7 mm

    • Une vis Torx T5 de 6,5 mm

    • Une vis Torx T5 de 3,8 mm

  14. : étape 14, image 1 de 3 : étape 14, image 2 de 3 : étape 14, image 3 de 3
    • Soulevez le haut-parleur droit à l'endroit où se situe la nappe et enlevez-le du boîtier.

  15. , Haut-parleur gauche: étape 15, image 1 de 2 , Haut-parleur gauche: étape 15, image 2 de 2
    • Insérez la pointe d'une spatule (spudger) sous la nappe du haut-parleur gauche au niveau du connecteur et débranchez la nappe de sa prise sur la carte mère.

  16. : étape 16, image 1 de 1
    • Dévissez les vis suivantes, fixant le haut parleur gauche au boîtier supérieur :

    • Une vis Torx T5 de 5,7 mm

    • Une vis Torx T5 de 6,5 mm

    • Une vis Torx T5 de 3,8 mm

  17. : étape 17, image 1 de 3 : étape 17, image 2 de 3 : étape 17, image 3 de 3
    • Soulevez le coin du haut-parleur gauche. Faites-le glisser pour le dégager de la batterie et le faire sortir du boîtier.

    • Veillez à ne pas accrocher la nappe du haut-parleur au trou de vis sur le bord du boîtier.

  18. Cette étape n’est pas traduite. Aidez à la traduire

    : étape 18, image 1 de 1
    • Remove the five 3.7 mm T5 Torx screws securing the battery to the upper case.

  19. Cette étape n’est pas traduite. Aidez à la traduire

    : étape 19, image 1 de 1
    • The liquid adhesive remover provided in your iFixit battery replacement kit can affect the antireflective coating on your MacBook Pro's display.

    • To protect your display, place a sheet of aluminum foil between the display and keyboard and leave it there while you work.

  20. Cette étape n’est pas traduite. Aidez à la traduire

    : étape 20, image 1 de 2 : étape 20, image 2 de 2
    • If you have an iFixit battery kit with liquid adhesive remover, it's time to get it prepped.

    • Alternatively, if you are using the hot iOpener method, skip the following three steps.

    • iFixit adhesive remover contains acetone, a mild skin and eye irritant.

    • Wear eye protection when handling and applying the adhesive remover. (Eye protection is included in your kit.)

    • Do not wear contact lenses without eye protection.

    • Protective gloves are also included in your kit. If you are concerned about skin irritation, put your gloves on now.

  21. Cette étape n’est pas traduite. Aidez à la traduire

    : étape 21, image 1 de 2 : étape 21, image 2 de 2
    • Open your container of adhesive remover.

    • Fill the syringe included in your kit with a small amount (approximately 1-2 milliliters) of adhesive remover.

    • It's best to fill the syringe with no more than about 1-2 milliliters of adhesive remover at a time, so as to avoid accidentally applying too much.

    • Refill your syringe as needed throughout the rest of this procedure.

  22. Cette étape n’est pas traduite. Aidez à la traduire

    : étape 22, image 1 de 1
    • Apply a small amount of adhesive remover (approximately 1 ml) evenly under the edge of the rightmost battery cell.

    • Wait 2-3 minutes for the liquid adhesive remover to penetrate underneath the battery cell before you proceed to the next step.

    • Do not apply more than 1 ml of the adhesive remover at a time. Using too much can allow the adhesive remover to make its way to the backside of your keyboard and potentially damage it.

  23. Cette étape n’est pas traduite. Aidez à la traduire

    : étape 23, image 1 de 2 : étape 23, image 2 de 2
    • If you don't have a liquid adhesive remover, you'll be using a hot iOpener to warm and soften a section of the adhesive securing the battery to the upper case, and then carefully prying at that point.

    • Use the hot iOpener to cover half of the two right-most battery cells.

    • After about a minute, reheat the iOpener and move it to cover the other half of the right-most battery cells.

  24. Cette étape n’est pas traduite. Aidez à la traduire

    : étape 24, image 1 de 2 : étape 24, image 2 de 2
    Outil utilisé dans cette étape :
    Plastic Cards
    $2.99
    J'achète
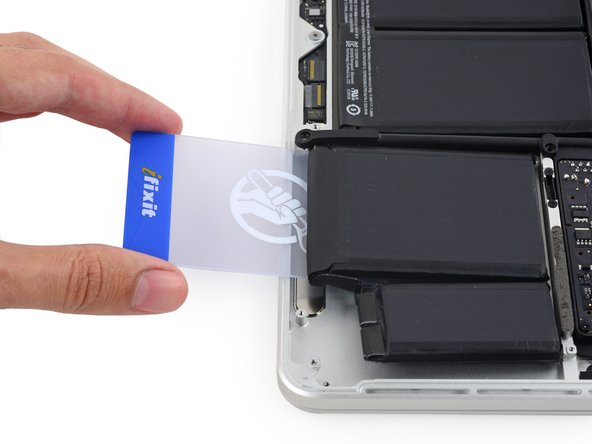
    • Push a plastic card between the right-most battery cell and the upper case, cutting the adhesive between the two.

    • Throughout this procedure, be careful not to damage any of the battery cells with your tools. A damaged lithium-ion battery may leak dangerous chemicals and/or catch fire. Use only plastic pry tools.

    • When using the hot iOpener method, if you encounter significant resistance to prying, stop and use the iOpener to reheat the section you're working on.

  25. Cette étape n’est pas traduite. Aidez à la traduire

    : étape 25, image 1 de 2 : étape 25, image 2 de 2
    • Use the plastic card to pry the right-most battery cell up from the rear case.

  26. Cette étape n’est pas traduite. Aidez à la traduire

    : étape 26, image 1 de 3 : étape 26, image 2 de 3 : étape 26, image 3 de 3
    • Repeat this procedure with the adjacent battery cell:

    • Apply a small amount (about 1 ml) of liquid adhesive remover under the battery cell, and wait 2-3 minutes for it to penetrate and soften the adhesive.

    • Alternatively, re-heat this section with your iOpener if needed.

    • Push a plastic card about an inch between the battery cell and the upper case, and slowly pry the cell up to separate all of the adhesive.

  27. Cette étape n’est pas traduite. Aidez à la traduire

    : étape 27, image 1 de 3 : étape 27, image 2 de 3 : étape 27, image 3 de 3
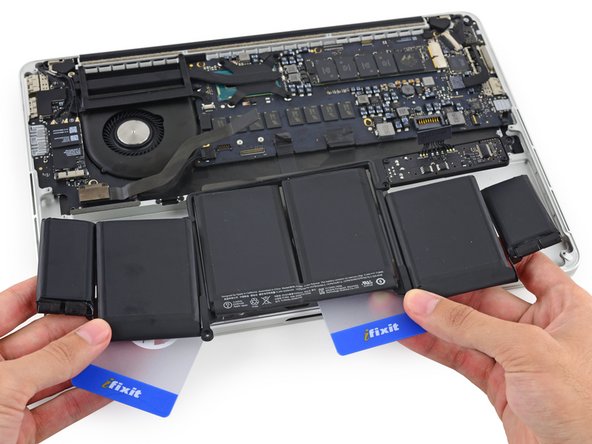
    • Temporarily leave your plastic card underneath the two rightmost battery cells to prevent them from re-adhering to the upper case.

    • If using an iOpener, reheat it and reapply it, this time to the left-most battery cells.

    • Again, leave the iOpener in each position for about a minute, reheating in between, to heat each half of the left-most battery cells.

  28. Cette étape n’est pas traduite. Aidez à la traduire

    : étape 28, image 1 de 3 : étape 28, image 2 de 3 : étape 28, image 3 de 3
    • Repeat the above procedure to separate the two leftmost battery cells from the upper case.

    • Remember to apply a small amount (about 1 ml) of adhesive remover to each battery cell, and wait 2-3 minutes for it to penetrate and soften the adhesive.

    • Use a second plastic card to separate the two leftmost battery cells from the upper case.

  29. Cette étape n’est pas traduite. Aidez à la traduire

    : étape 29, image 1 de 1
    • Leave the second card in the corner between the two left cells.

    • In the following steps, you can either use a third card, or the card from the right corner. The right corner adhesive should be dry/cool enough that the cells can easily be pulled up again when needed.

  30. Cette étape n’est pas traduite. Aidez à la traduire

    : étape 30, image 1 de 2 : étape 30, image 2 de 2
    • To separate the adhesive securing the final two, middle battery cells, apply another 1 milliliter or so of liquid adhesive remover (or your iOpener) to each cell.

    • It may help to elevate one side of your MacBook Pro a few inches so that the adhesive remover flows in the correct direction, underneath the battery cells. You can use a sturdy book or foam block to prop up one side of your MacBook Pro while you work.

    • Insert the card about an inch between the left-center battery cell and the upper case, separating the adhesive between the cell and the case.

  31. Cette étape n’est pas traduite. Aidez à la traduire

    : étape 31, image 1 de 2 : étape 31, image 2 de 2
    • Pull the card back out and insert it about an inch between the right-center battery cell and the upper case, separating the adhesive between the cell and case.

  32. Cette étape n’est pas traduite. Aidez à la traduire

    : étape 32, image 1 de 2 : étape 32, image 2 de 2
    • By this point, the outer cells should be free, and you should only encounter resistance from the two center cells. If this is not the case, go back and completely loosen the four outer-most cells from the upper case.

    • Pry up on the two center cells to separate the last of the adhesive and lift the battery from the device.

  33. Cette étape n’est pas traduite. Aidez à la traduire

    : étape 33, image 1 de 2 : étape 33, image 2 de 2
    • Remove the battery.

    • Before installing your new battery, remove all the old adhesive from the MacBook Pro's case.

    • With a little luck, you can slowly pull out each strip of adhesive with your fingers.

    • Otherwise, soak each section of adhesive with a bit of adhesive remover for 2-3 minutes, and then scrape it out with an opening pick or one of the other tools in your kit. This can take quite a bit of work, so be patient.

    • Mop up any remaining adhesive remover and give your MacBook Pro a few minutes to air dry.

    • The replacement battery included in your iFixit kit comes with adhesive pre-installed. Test the battery's fit and alignment carefully before peeling off the film covering the adhesive, and then press each cell firmly into place. If any additional films/liners are present that weren't on your original battery, remove them now.

    • Calibrate your battery before using it: allow it to drain overnight, then charge it to 100% and drain it again until your MacBook Pro shuts down automatically. Charge it again and use it normally.

    • If you notice any unusual behavior or problems after installing your new battery, you may need to reset your MacBook Pro's SMC.

Ligne d'arrivée

2 autres ont terminé cette réparation.

Sam Goldheart

Membre depuis le 10/18/12

465 927 Réputation

538 tutoriels rédigés

Équipe

iFixit Membre de l'équipe iFixit

Staff

135 membres

17 269 tutoriels rédigés

0 commentaires

Ajouter un commentaire

Nombre de vues :

Dernières 24 heures : 1

7 derniers jours : 11

30 derniers jours : 26

Total : 1,279