Cette version peut contenir des modifications incorrectes. Passez au dernier aperçu vérifié.
Ce dont vous avez besoin
-
-
Utilisez vos doigts pour pousser les deux onglets de libération de la batterie et retirez la batterie de l'ordinateur.
-
-
-
Retirez les quatre vis Phillips 3,4 mm identiques à partir de la trappe de la mémoire. Ces vis ont 4 mm de diamètre de tête au lieu de 3 mm sur les vis du corps.
-
-
-
Retirez les trois vis cruciformes situées dans le compartiment de la batterie, près du loquet. Apple a eu la gentillesse d'incliner légèrement ces vis pour les rendre plus faciles à retirer. Sur le A1261, ces vis ont des têtes de 4 mm de diamètre au lieu des têtes de 3 mm des vis restantes.
-
-
-
Déconnectez la nappe orange SuperDrive de la carte mère, en retirant le ruban adhésif si nécessaire.
-
-
-
Cette étape n’est pas traduite. Aidez à la traduire
-
Disconnect the ten indicated connectors from the logic board.
-
-
Cette étape n’est pas traduite. Aidez à la traduire
-
Rotate the large display data cable to the left and disconnect the small right thermal sensor cable beneath.
-
-
Cette étape n’est pas traduite. Aidez à la traduire
-
Remove the single black 4 mm T6 Torx screw securing the clear plastic shield over the right ambient light sensor.
-
Lift the clear plastic shield off the right ambient light sensor.
-
-
Cette étape n’est pas traduite. Aidez à la traduire
-
Peel up the orange Kapton tape securing the left thermal sensor cable to the logic board.
-
-
Cette étape n’est pas traduite. Aidez à la traduire
-
Remove the following twelve screws:
-
Seven 6.5 mm T6 Torx screws.
-
Two shanked 7.6 mm T6 Torx screws securing the battery connector to the lower case.
-
Three 7.8 mm T6 Torx screws.
-
-
Cette étape n’est pas traduite. Aidez à la traduire
-
Lift up the left side of the logic board and disconnect the multi-colored power connector from the bottom of the board.
-
-
Cette étape n’est pas traduite. Aidez à la traduire
-
Grasp the logic board at the left side and at the thin section near the right fan, and rotate the logic board out of the lower case.
-
-
Cette étape n’est pas traduite. Aidez à la traduire
-
If the right speaker assembly remains attached to the logic board, hold the logic board with one hand and slide the speaker up slightly to free it from the logic board.
-
To properly reassemble your MacBook Pro, you'll have to clean off and replace the thermal compound from the three chips on the underside of the logic board. Use our Applying Thermal Paste Guide to prepare the processor and heat sink surfaces.
-
-
Cette étape n’est pas traduite. Aidez à la traduire
-
Disconnect the two antenna cables attached to the AirPort Extreme card.
-
-
Cette étape n’est pas traduite. Aidez à la traduire
-
Remove the single black 4 mm T6 Torx screw from the top right corner of the AirPort Extreme card.
-
-
Cette étape n’est pas traduite. Aidez à la traduire
-
Lift the AirPort Extreme card up and slide it out of its connector.
-
-
Cette étape n’est pas traduite. Aidez à la traduire
-
Remove the two 7.8 mm silver T6 Torx screws from the top left and bottom right corners of the left speaker assembly.
-
-
Cette étape n’est pas traduite. Aidez à la traduire
-
Lift up on the left speaker assembly and rotate it slightly. It is not possible to entirely remove the speaker yet, as it is still connected to the left I/O board beneath.
-
-
Cette étape n’est pas traduite. Aidez à la traduire
-
Disconnect the right speaker from the left I/O board. Make sure to pull on the top section of the white connector, not the cable itself.
-
-
Cette étape n’est pas traduite. Aidez à la traduire
-
Lift the right speaker assembly out of the computer.
-
-
Cette étape n’est pas traduite. Aidez à la traduire
-
Disconnect the two cables attaching the left speaker assembly to the left I/O board.
-
-
Cette étape n’est pas traduite. Aidez à la traduire
-
Peel up the iSight and inverter cables which are attached with a mild adhesive above the left fan.
-
-
Cette étape n’est pas traduite. Aidez à la traduire
-
Remove the five 7.8 mm T6 Torx screws securing the fans to the lower case.
-
-
Cette étape n’est pas traduite. Aidez à la traduire
-
Lift the heat sink and attached fans out of the computer.
-
Now is a good time to lean the fans back and clean out any dust bunnies from the grill. Also clean any dried thermal paste from the heat sink contact pads.
-
-
Cette étape n’est pas traduite. Aidez à la traduire
-
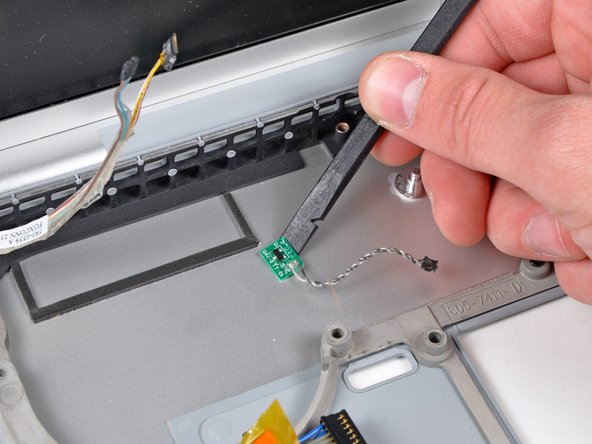
Peel up the orange Kapton tape covering the left thermal sensor.
-
Use a spudger to pry the left thermal sensor off the lower case.
-


Annulation : je n'ai pas terminé ce tutoriel.
2 autres ont terminé cette réparation.
