Il est possible que cette traduction ne reflète pas les dernières mises à jour du tutoriel source. Aidez à mettre à jour la traduction ou bien consultez le tutoriel source.
Introduction
Ce guide vous montrera comment remplacer le port de charge de votre Motorola Moto G 3e génération. La réparation est rapide et simple mais peut nécessiter un décapeur thermique.
Ce dont vous avez besoin
-
-
Utilisez votre ongle afin de retirer la coque arrière en vous aidant de l’encoche en bas de l'appareil.
-
-
-
Chauffer uniformément les cotés de l'écran tactile afin de détacher l’adhésif. Passez à l'étape 3 lorsque les bords de l'écran sont chaud au toucher.
I kept my phone on the radiator for 10min and loosened it enough to open (felt safer than a heat gun).
-
-
-
Comme l'adhésif se décolle, soulevez un bord de l'écran avec un outil d'ouverture en plastique ou des "médiators". Une ventouse peut également être utile ici.
-
Insérez les médiators autour de l'écran et effectuez un léger mouvement afin de décoller l'écran. Si vous utilisez une ventouse, placez la au milieux de l'écran et tirez avec précaution. Appliquez plus de chaleur autour de l'écran si besoin.
What width of adhesive is appropriate to buy to replace the existing one? I can see 1mm, 2mm etc for sale
The width of the adhesive tape that goes around the rim is 2mm. But rather than buying generic 2mm tape, which won't seal well at the corners because it would be bent pretty sharply, it's best to get a precut adhesive that is made for this specific phone and that comes with the corners (and everything else) already pre-shaped: it's cut into a phone-shaped sheet, most of which you'll be discarding. Such sheets are available on ebay.
-
-
-
Utilisez un outil d'ouverture en plastique pour soulever le verrou du connecteur de l'écran (voir photo)
-
Tirez le câble de l'écran pour le déconnecter de la carte mère.
This part was actually the trickiest of the whole (replacing battery) process. Putting it back together here is tough… well would have been better had I not left my glasses in work.
[English below]
Wer das Gerät während des Displaywechsels eingeschaltet lässt, sollte es dennoch einmal neustarten, wenn es fest verklebt wurde. Wie ich auf die harte Tour herausfand, kalibriert sich der Annäherungssensor erst bei einem Neustart neu und geht nach einem Wechsel (Display abgenommen = niedrigerer Wert) davon aus, dass das Handy dauerhaft in der Tasche/am Ohr ist.
Ein kurzer Neustart verschafft Abhilfe.
.
[English]
For those not powering off the device while changing the display (i.e. to test the functionality) I recommend to restart the device after the repair is done and the display is glued in.
As I found out the hard way, the proximity sensor recalibrates at the restart and without the display it sets lower values as a minimum (since there are no obstacles in the way). After the display change it will think that the phone is in your pocket or at your ear all the time.
A restart solves that problem.
I am using a Moto G3 phone as my backup phone and it’s screen is cracked but it is working fine. After watching your video I removed the screen carefully, bought a new digitized screen and fixed it. Now I am in a big trouble because the touch pad doesn't work. Even I couldn't switch off it. I complained the seller and he gave me another screen thinking the previous is having an issue. Unfortunately after fixing it the problem remains. How to solve the touch pad issue please?
I agree this is extremely tough, to take off or put on. Taking it off is hard enough ( the lever is tiny and opens up). Connecting it back up is tough because the position is so awkward.
-
-
-
-
Enlevez les dix vis T4 de 2,4 mm des bords de la carte mère.
-
Enlevez les quatre vis T4 de 4,5 mm en haut et en bas de la carte mère.
Can you telll motherboard price and like plzzz
These are T5 screws
They were all T4 for me.
-
-
-
Si les résidus d'adhésif maintiennent la carte mère en place, utilisez un Jimmy pour couper l'adhésif entre la carte mère et l'arrière du téléphone.
-
Soulevez avec précaution le bord droit de la carte mère du téléphone.
When taken battery out I took it out wrong and now the new battery plugging into old area is not possible is there a repair part where the battery connects to the logic board Mahalo.
-
-
-
Utilisez un outil d'ouverture en plastique pour débrancher les fils de la batterie de la carte mère.
troquei a bateria e o cellular não liga mais..
Replacing this battery connection is the single hardest connection I have done on any phone or laptop in my experience! The border walls break very easily and the connection itself breaks off the board very easily. I am still not sure how to slide the plug into place without breaking off a border wall.
Yup, this is where it ended for me. I appears some connectors broke of (I’d say 1/2 mm by 1/2mm small) which I have nor tools nor knowledge to repair. I did have to use some force to get break the connection but I think I was well within margins. (This was the first phone I tried to repair however)
-
-
-
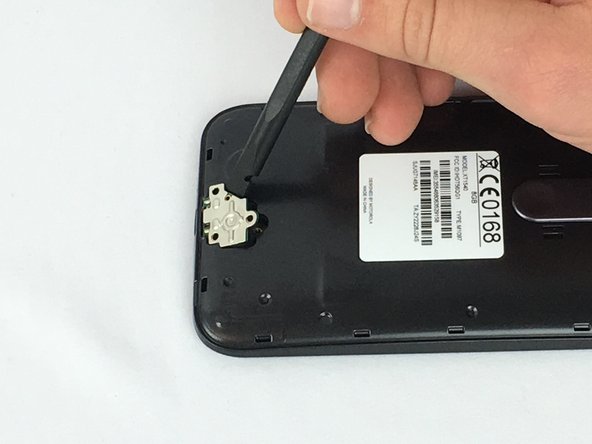
Retirez les trois vis T4 de 3,0 mm du couvercle du port de charge.
-
Retirez le couvercle du port de charge.
-


Pour remonter votre appareil, suivez ces instructions dans l'ordre inverse.
Pour remonter votre appareil, suivez ces instructions dans l'ordre inverse.
Annulation : je n'ai pas terminé ce tutoriel.
16 autres ont terminé cette réparation.
Merci à ces traducteurs :
85%
[deleted] nous aide à réparer le monde ! Vous voulez contribuer ?
Commencez à traduire ›
Équipe

USF Tampa, Team 1-3, Nance Spring 2016 Membre de l'équipe USF Tampa, Team 1-3, Nance Spring 2016
USFT-NANCE-S16S1G3
4 membres
21 tutoriels rédigés
21 commentaires
Is all this necessary? There is a youtube teardown that states the usb port should be replaceable from just the 3 screws, so no glue gun, no screen removal etc. So just step 9.
So is this repair accurate?
Step 10 tells you to push out the charging port from inside the case, which would require first removing the screen. Maybe it's possible to just remove the charging port from outside the case like in the video, but it may require a lot of force and pushing it out from inside is just easier.
I mean I replace my charging port every 6 months now and I the only thing I do is unscrew the charging port area and get a tiny flathead bit after applying heat and pull off the metal plate. After that, I insert the flathead into the bottom of the charging port from where it plugs and push it outwards.
No, it’s not I did sucesfullz replaced microusb port in mz G3 simplz bz removing screws, pulling port from the outside with ?a?little? more force, replacing it and screwing back. 5 minutes, nothing but T4 torx screwdriver.
MarcinEs -
strange issue
my phone doesnt charge..
it always show charging symbol.
now im charging by switching off phone then connecting charger, after it shows charging then i will turn on phone..
it will charge slowly.and it will discontinue if charging cord is moved...
tried using different chargers,cords but still same issue.
cant able to decide wheiter it is a charging port problem or battery or software..
any suggestions???
please mail me...
hamedliar@gmail.com
Facing exactly the same issue as Hamed Khan.
@Hamed - Do you know how to fix this? Or have you received any tips. If yes, please forward me too. BTW, a technician told me that this could be the problem with the mother board but I don't trust him.
Facing same problem, please please let me know who to fix it?
@hamed Khan have you found any solution, I am facing same problem, don't know the problem is about charging port or motherboard, please help me , let me know what you did with your phones problem.
hello,
does your phone shows charging symbol even it is not connected with charger?
just let your battery drain to zero percent.
don't charge your phone till 1 hour.
try to start your phone with empty battery..
it will show a symbol to connect charger,,
then connect the charger.
hope this solves your problem...
same problem for me like strange issue. Please give the solution
Too many unnecessary steps in this guide. Every guide I've found has the whole phone coming apart, but you don't need to do any of that. I changed the port last night in less than 7 minutes.
Pulled the little door off then briefly ran a heat gun over the metal plate on the USB board to loosen adhesive
Using a thin flathead micro-driver and a dental pick, I pulled the board off the back in less than 5 minutes. Put the new one in after migrating the metal plate and some of the adhesive and it worked great.
Is this same for Moto G (1st gen) too?
No it different charging Dock
Thanks for the instructions! they were super helpful!
Hi, I didn't want to dismantle the whole phone, and tried to look for an alternative.
I found this video: https://www.youtube.com/watch?v=wkTd_nsD...
which just removes the back cover, three screws, heats the piece and takes it out ready to be replaced.
It took me 10min.
Just change the port and the will solve the problem..!! Coz faulty capacitor on the port pcb sometimes cause this problem!!
My moto g3 battery died went to put it on charge and nothing no LED light to show its charging I've left it on charge for half hour and still nothing. Help
Can someone Link me some replacement parts for the t4 screws used in the port? are there replacement parts?
It too lengthy process just 3 screw with gentle heat
This repair is much, much more difficult than it appears. The LCD connection and the battery connection are borderline impossible. Everything else is simple or nearly simple. The glue is about a tenth as tough as Samsung phones.
Thomas Hayes - Réponse