Aller au contenu principal

PS4 Case Opening Procedure for Cleaning

Conditions préalables uniquement
Ce tutoriel est uniquement destiné à être utilisé comme prérequis d'autres tutoriels. Il ne se suffit pas à lui-même.

Ce dont vous avez besoin

  1. PS4 Case Opening Procedure for Cleaning, Flip over the PS4: étape 1, image 1 de 1
    • Flip your PS4 upside-down with the back side facing towards you.

  2. PS4 Case Opening Procedure for Cleaning, Remove the rear stickers: étape 2, image 1 de 3 PS4 Case Opening Procedure for Cleaning, Remove the rear stickers: étape 2, image 2 de 3 PS4 Case Opening Procedure for Cleaning, Remove the rear stickers: étape 2, image 3 de 3
    • Stickers cover the screws securing the PS4's outer case.

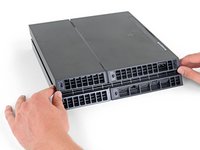
    • Use a pair of tweezers to remove the sticker in the center of the back of the PS4, exposing the first screw.

    • Remove the two stickers at the outer edges, exposing two more screws.

  3. PS4 Case Opening Procedure for Cleaning, Remove the rear case screws: étape 3, image 1 de 1
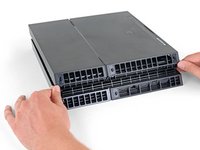
    • Remove the three 7.2 mm-long TR8 Torx security screws on the back of the PS4.

  4. PS4 Case Opening Procedure for Cleaning, Remove the lower case: étape 4, image 1 de 2 PS4 Case Opening Procedure for Cleaning, Remove the lower case: étape 4, image 2 de 2
    • Use your thumbs to lift the lower case up and off the PS4.

    • In addition to the three rear screws, the lower case is held in place by plastic clips. You may need to use significant force to release the lower case.

  5. PS4 Case Opening Procedure for Cleaning, Disconnect the power supply: étape 5, image 1 de 2 PS4 Case Opening Procedure for Cleaning, Disconnect the power supply: étape 5, image 2 de 2
    Outil utilisé dans cette étape :
    Small Needle Nose Pliers
    $6.99
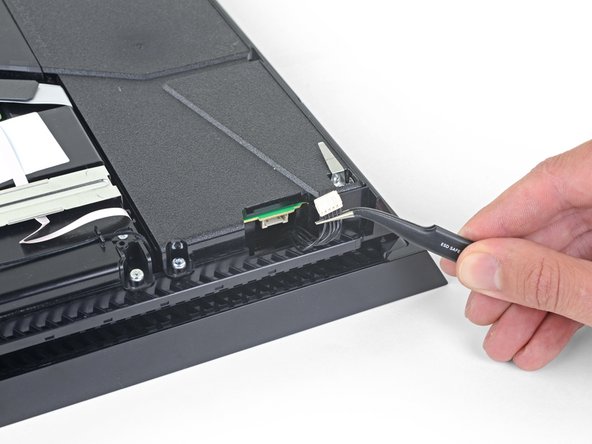
    • Use a pair of tweezers to pull the power supply cable straight out to disconnect the power supply unit from the motherboard.

    • Depending on the age of your console, this cable might be very firmly connected. If it feels stuck, don't pull on the cables themselves with much force.

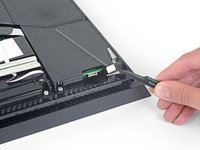
    • Use your fingers to grab the white connector head, and wiggle or "walk" the connector out of its socket to disconnect it.

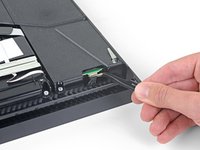
    • In extreme cases, you might need to use needle nose pliers to get a good grip on the connector.

    • Go slow: pulling on the cables themselves might rip them out of the connector.

Conclusion

To reassemble your device, follow these instructions in reverse order.

Carsten Frauenheim

Membre depuis le 03/10/20

135 512 Réputation

371 tutoriels rédigés

Équipe

iFixit Membre de l'équipe iFixit

Staff

118 membres

19 410 tutoriels rédigés

0 commentaires

Ajouter un commentaire

Nombre de vues :

Dernières 24 heures : 0

7 derniers jours : 0

30 derniers jours : 0

Total : 9