Aller au contenu principal

Razer BlackShark V2 Speaker Replacement

Ce dont vous avez besoin

  1. Razer BlackShark V2 Speaker Replacement, Ear Cushion: étape 1, image 1 de 1
    • Place the headset so that the left side is facing you.

    • The left side of the headset has the cable attachment and the volume control knob.

  2. Razer BlackShark V2 Speaker Replacement: étape 2, image 1 de 1
    • Scoop your middle and ring finger underneath the top or bottom inner portion of the ear cushion.

    • You should feel a hard plastic ridge.

    • Pull from the hard plastic ridge, being sure not to pull from the soft cushion.

    • Slowly apply pressure to prevent damage.

  3. Razer BlackShark V2 Speaker Replacement: étape 3, image 1 de 1
    • Pull from the hard plastic ridge, being sure not to pull from the soft cushion.

    • Slowly apply pressure to prevent damage.

  4. Razer BlackShark V2 Speaker Replacement: étape 4, image 1 de 2 Razer BlackShark V2 Speaker Replacement: étape 4, image 2 de 2
    • Once the cushion is removed, make sure the hard plastic base with the clips is attached to it.

    • If you are replacing both ear cushions, repeat Steps 1-4 for the other side. Then, insert the new ear cushions by lining up the clips in their respective holes and applying even pressure until they audibly click.

  5. Razer BlackShark V2 Speaker Replacement, Speaker: étape 5, image 1 de 2 Razer BlackShark V2 Speaker Replacement, Speaker: étape 5, image 2 de 2
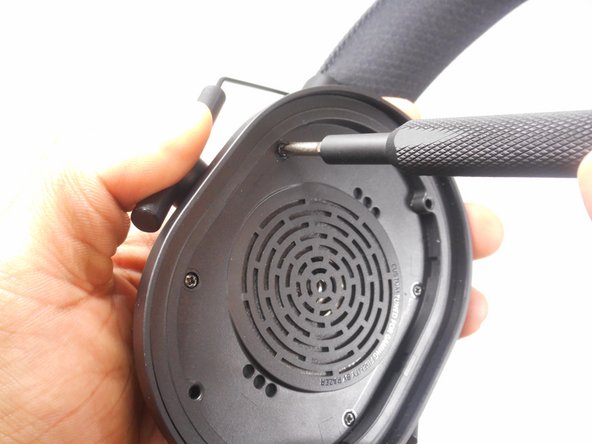
    • Remove the four screws holding the speaker in the headset using a Phillips #1 screwdriver.

  6. Razer BlackShark V2 Speaker Replacement: étape 6, image 1 de 2 Razer BlackShark V2 Speaker Replacement: étape 6, image 2 de 2
    • Gently grab the headset and slowly apply pressure to the speaker cover; it will come off.

    • Be careful of the wires that are attached to the back of the speaker to ensure they won't be damaged when removing the speaker and its cover.

  7. Razer BlackShark V2 Speaker Replacement: étape 7, image 1 de 3 Razer BlackShark V2 Speaker Replacement: étape 7, image 2 de 3 Razer BlackShark V2 Speaker Replacement: étape 7, image 3 de 3
    • After disconnecting the speaker from the headset, it is still connected by the wires that power the speaker itself.

    • With heat or with a sharp tool, remove the glue around the wires that connect the speaker to the headset.

    • Using the new speaker, you can reattach the wires soldering them in with existing glue.

    • If replacing internal components and NOT the speaker, you can do so without severing any wire connections; operate carefully to not sever them unnecessarily!

Conclusion

To reassemble your device, follow these instructions in reverse order.

Une autre personne a terminé cette réparation.

BlakeB

Membre depuis le 03/08/23

470 Réputation

3 tutoriels rédigés

Équipe

Un commentaire

I am looking for some solution to my problem of one channel cut-off when I turn the volume knob.

Jaro - Réponse

Ajouter un commentaire

Nombre de vues :

Dernières 24 heures : 4

7 derniers jours : 28

30 derniers jours : 124

Total : 1,517