Introduction
Après plusieurs années d'utilisation, l'afficheur LCD de votre machine Saeco Intelia pourrait ne plus afficher correctement les statuts colorés (vert, jaune et rouge). Dans ce guide, nous verrons comment remplacer l'afficheur LCD de la machine.
Ce dont vous avez besoin
-
-
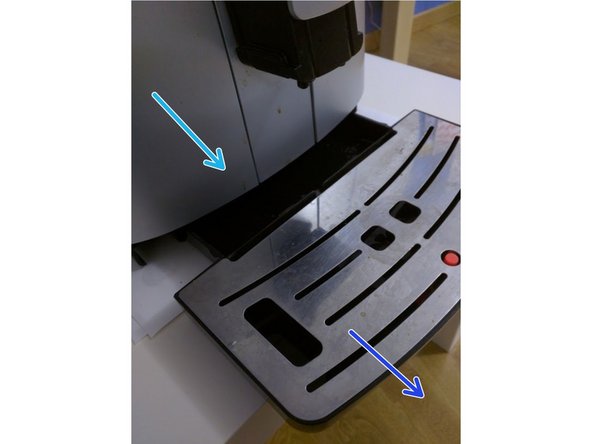
Retirez la vis du protecteur situé au milieu du collecteur de grains
-
Retirez les trois vis du collecteur de grains.
-
Vous pouvez maintenant retirer le cadre supérieur délicatement.
Someone put a special security tork (torque) screw into my machine. (I suppose they thought it would keep his customers from doing DYI repairs). This screw has a tiny raised metal rod in the center of the opening so that a normal torque screwdriver will not fit into the middle groove. You have to buy a $5 set of security screws on ebay. ugh.
Next and most IMPORTANTLY, after you lift the clear plastic bean bowl (name?) take off the metal warming pad (name?) so that it MOVES TOWARDS THE REAR. Why? Because there are tiny clips on the front you cannot see hooking under the lip of the front to hold it down and they will snap off the lip where they are holding the metal cover down. DON'T USE ANY FORCE AT ALL! This is the first landmine. Obviously when you reassemble it - and you can see the clips since they're out so this wont be hard - slide the metal warmer towards the front from the rear so the clips slide in under the lip that holds the metal top down. Id post pictures but this website doesn't allow comments with pictures.
-
-
-
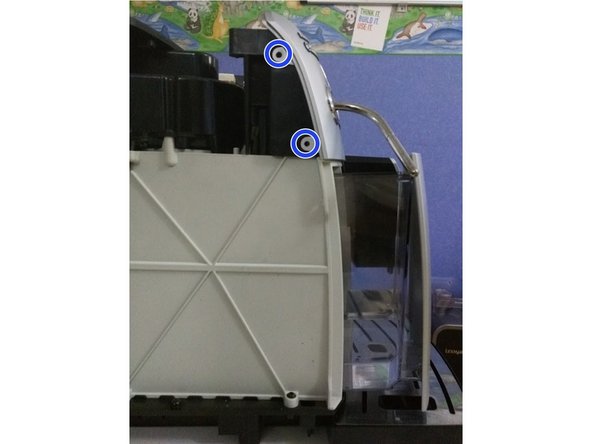
Retirez les deux vis sur le haut du panneau latéral gauche.
-
Retirez le plateau récolte gouttes.
-
Retirez le réservoir d'eau.
-
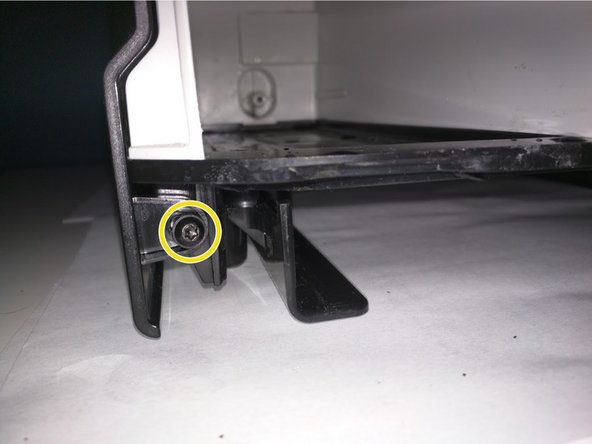
Sous l'emplacement du réservoir d'eau, retirez la vis inférieure du panneau latéral gauche.
-
Retirez le panneau latéral gauche en le tirant délicatement. Prêtez attention à l'encoche située au milieu du panneau (au dessus de la vis cerclée de jaune).
-
-
-
-
Si le Pannarello est présent, retirez le d'abord du distributeur d'eau chaude en le tirant fermement vers le bas. Ensuite, ouvrez la porte de service située à droite de l'appareil.
-
Retirez les deux vis à droite du panneau avant argenté.
-
Retirez les deux vis du panneau avant argenté.
-
Séparez les panneau avant argenté de l'unité principale en le tirant délicatement.
-
Dé-serez ou retirez les deux vis du distributeur d'eau chaude.
-
Retirez le panneau avant argenté. Prêtez attention au distributeur d'eau chaude et aux attaches situées à gauche et à droite du panneau.
Another landmine: On the Intelia with external milk carafe ( HD8753/87?), the silver front panel has a lip that fits under the adjacent panel. That panel which is about 2"x 3" and has a hole for the carafe MUST BE LOOSENED so that the lip from the front panel can slide in and out without snapping off the upper panel's lower lip. Also, inside are two tabs that must fit perfectly in their slots/holes or they will snap off. These tabs are tiny and will easily break So please loosen the lower panel before moving the front panel, slide the front panel on and off gently.
-
-
-
Retirez les trois vis du cadre du panneau de commandes.
-
-
-
Retirez le cadre plastique noir de l'afficheur LCD. Il est simplement posé sur deux attaches.
-
-
-
Retirez les deux vis de chaque côté de l'afficheur LCD.
-
Déconnectez le connecteur d'alimentation.
-
Déconnectez la limande.
-
Pour déconnecter la limande, vous devez soulever le rabat qui la retient en place.
Observation: The screen's power cable is longer and stronger than the data cable (ribbon) . Take the power out last and put it in first, because you want to be super gentle with the data ribbon which slides into the holder and is clamped down by a tiny black plastic tab at the bottom of the clamp. You've seen the clamp before if you've opened a phone or anything requiring a tiny data ribbon. Of course, don't pull the power cable up by the wires. I used a fork from the kitchen both to pull up the power cable and to flip up the data ribbon black clamp tab. The fork was also handy in separating the screen from its frame, because the clear plastic tabs holding it onto the frame will be easily snapped off if you just pull them apart.
-
-
-
Désassemblez l'ancien afficheur LCD du cadre support.
-
Clipsez le nouvel afficheur LCD sur le cadre support.
-
Reconnectez le câble d'alimentation de l'afficheur et la limande (bus de données).
-
-
-
Reconnectez le cordon d'alimentation et allumez l'appareil. Les couleurs de l'afficheur (jaune, vert, rouge) devraient être de retour :)
First, I want to thank the person who posted this EXCELLENT guide that gave me the confidence to go ahead and try repairing my $1300 coffee machine. I have some additional cautions & preparations for anyone else trying this easy repair. In general, this machine is sensitive and fits together perfectly on some fragile joints, like a Ferrari, and to be careful and not to use more force than you think is required. It is easy to snap off barriers and other lightly constructed parts of the molded plastic, an error that once made you will regret. My machine had been opened and lightly broken in a few places that I tried to repair. So above I've added comments to show you what I noticed inside. While reassembling the machine, if a part doesn't slide into place, you're not putting it in right.
-


Pour ré-assembler votre appareil, suivez les instructions dans l'ordre inverse.
Pour ré-assembler votre appareil, suivez les instructions dans l'ordre inverse.
Annulation : je n'ai pas terminé ce tutoriel.
18 autres ont terminé cette réparation.
Merci à ces traducteurs :
100%

Jean T nous aide à réparer le monde ! Vous voulez contribuer ?
Commencez à traduire ›

37 commentaires
Great ! :) Thank you.
You're welcome :)
Jean T -
Jean, can you please look at my inline comments and include them in your main instructions? They are hidden to the user and they wont see these precautions until it too late. Again, thank you for this excellent super helpful guide with great pictures. I took a few of my repair Id be happy to send to you. I would have posted them but this site doesn't allow commentators to post pictures.
Hi Paul,
Thanks for your comments :) I have included some of them into the guide.
Jean T -
Very good Description! Trank you!!!
Hi Rainer,
Glad I could help you :)
Jean T -
hallo . i have a problem with my coffe mashine . my display not work . how can I order display and have warranty for that ? what you need to do now ? plase creat me . my email djaih_@abv.bg my name is Alexandar . my coffe mashine saeco intelia !!!
Hello Alexandar,
Doing "unauthorized" maintenance on your Saeco Coffee Machine will void your warranty. If you do not want to do this repair by yourself or want to have warranty, you need to contact Philips/Saeco by email at http://www.philips.bg/content/B2C/bg_BG/... or by phone at +359 2 4916274
Otherwise, if you want to do this by yourself, you can buy a replacement display at https://rounded.com/philips-saeco-inteli... (they send parts worldwide) and follow my step by step guide.
Jean T -
Thanks for the clear explanation. We are able to see which coffee we choose :-)
Marco
Dear Jean, I have meticulously followed your instructions but I'm stuck at STEP 4: Remove the two left screws of the silver front panel.
Separate the silver front panel from the main unit by pulling it gently.
I have removed the screws but I can't separate the silver front panel by simply pulling it. It seems to be stuck. Can you help me out please? Merci d'avance! Alex
Sorry, just solved my problem. Just needed to try harder :-)
Hi Jean,
Thank you for your extended manual. Just your thoughts, our Saeco Intelia HD8752 has a defect display, but I am unsurif the default lays in the display or the display panel (electronics).
The behaviour is as follows, the machine is working, but nothing to see on the display. All buttons are working and the panel backlight is also working (green / red etc) but the display stays blanc/there is nothing to see.
So I am questioning whether I need a new display or a new panel/eletronics. What are your thoughts?
Hi Reinder,
If the machine works properly, I think there is good chances that it is the display that is defective. I think that the display is composed of two "parts", the LCD display itself (which displays the symbols) and color LEDs (red, yellow and green) on each side. Replacing the display should work. In my opinion, if it was the microcontroller/main electronic board, the machine wouldn't work anymore.
Good luck !
Jean T -
I had the exact same observations as Reinder Sanders. Prior to purchasing a new screen, remove ribbon connector and clean the ribbon contacts lightly with an eraser, reinstall ribbon connector and try it out. Mine worked perfectly after cleaning. I had a problem where steam was leaking from the steam tube swivel connecter O rings. Steam was getting into the electronics section and I assume some light corrosion on the ribbon connector occurred.
Geehaw -
Thanks-a-million. Ordered the part and was easily installed with your directions!
Glad to have been able to help you :)
Jean T -
Great guide, really helped me out.
Glad to have been able to help you :)
Happy repairing !
Jean T -
Thanks for sharing your love Aldo :p
Jean T -
Hi. One question. I have a Saeco Syntia. It works fine, but it doesn't appear “menú" mode on standby, like it shown in manual. Do you know something about this problem?
@rafaledesma When you are in stand by mode in the Syntia machine, you should be able to access the menu by pressing the right bottom key of the machine (the one with a coffee bean and a coffee spoon). This does only work when the machine is in standby mode (powered on). If on stand by, the screen should print a big standby icon in the center and on the bottom right of the screen, it should be written “MENU >“ (the arrow after menu pointing the button to press). If this button does not work in standby mode, assure you that it does work when not in standby (when pressing it not in standby mode, it should allow you to change the aroma strength of the coffee or use ground coffee and each press should be reflected in the LCD screen) ;)
@espresso1 Please check or re-check that both connectors/cable are well connected in step 7 of the tutorial (picture 2 and 3) ;) I suspect that one cable is for the power (= screen is illuminated) and the other for the data. Do not know which cable is responsible for what but I suspect that the thin brown one is the Data cable (double check that it is correctly connected and that both the cable and the connector are clean).
Hi
already replaced key panel board to solve problem thank you
gtzur -
@espresso1 Great, thanks for letting us know :) And sorry for my late reply :/
Jean T -
@espresso1 Also check this comment from @geehaw : Cleaning the ribbon connector could help …
Hi Jean,
Thanks a lot for your guide. I’m trying to fix my machine, its a similar model (Syntia Capaccino) with automatic milk frother.
The display doesn’t work at all. I’ve measured voltages on the board. There are 4 zeners, 2 of them are just below 2.7V, one is just over 2.7V, the 3rd is 3V (seems directly for the display, same with one of the 2.7V one).
I can’t find the datasheet for this display, but reading the datasheet for Winstar displays, they need at least 3V, preferably 3.3V.
I thought maybe zeners have different tolerances and swapped the 3V and 2.7V, but didn’t make a difference in their voltages. All voltages have 5V coming from the main board at the back, so this must be pull up resistors. I still have to look at it further.
I’ll have to make a schematic for the small board. I know that some voltages will be for the buttons and hall sensors for the front selector, and ones for the display may be pulled up and down for enable signals.
Is anyone able to find a datasheet? I’ve asked the seller
Hi all,
I had a look over the previous comments and thought I’d add what happened and things I tried.
At times, steam would get into the display area and fog it up a little. When I saw the display wasn’t working, I could still make coffee as normal (but has to remember to press the button to confirm for cleaning the milk jug and pipe).
When I looked at the LCD board, the first 2 pins (closest to red connector which comes from main board) were corroded to each other (looked like brown rust). I assumed cleaning this would fix it, I think previously the display was clear, then it became black (natural state without power).
So cleaning didn’t fix it, I’ve also cleaned the main board and looked around for issues. I’ve added flux and resoldered all components on the display/button board and the ones around the connector on the main board at the back of the machine.
So, it seems most likely that if the display is working, its voltages pulled below 3V.
c est tres bien expliqu" sauf que je ne sait pas ou trouver l aficheur lcd merci de me renseigner je vais alle a darty voir ce qu ils me disent sinon tres bien l explication est tres complete merci !!
See below my introductory comment that I appreciate this excellent guide. I'm just going to add some inline additional observations from my repair which may help you. Here, for instance, I left the machine plugged in, because once you have the screen connected it makes sense to test that the screen works before reassembling the machine. Also, I retested the old broken screen a few times while it was open just to be certain that it was not a connection or short circuit that caused the outage.
Paul Tast - Réponse