Introduction
Quand une Dreamcast demande la date et l'heure à chaque fois que vous démarrez votre système, votre pile CMOS est morte. Ce tutoriel va vous montrer comment remplacer la pile CMOS.
Ce dont vous avez besoin
-
-
Repérez et retirez les quatre vis cruciformes noir n° 02 de l’autre côté de la console.
-
-
-
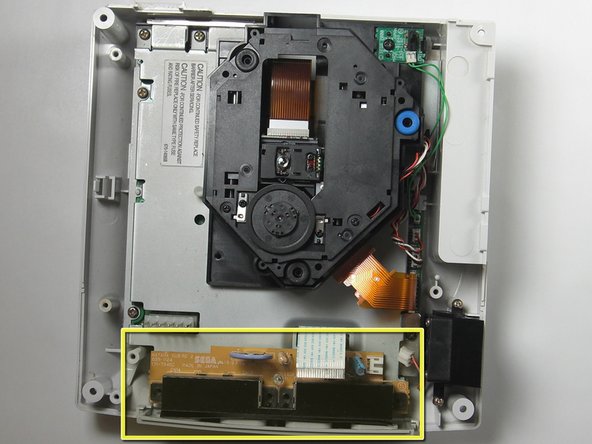
Débranchez le câble blanc du contrôleur en tirant doucement sur le câble tout en le faisant pivoter vers l'arrière jusqu'à ce qu'il se détache de la carte électronique de contrôle des ports manette.
Note that on some Dreamcasts the power board (on the left) overhangs slightly over the controller board, meaning one must also remove the power board at this stage. This is relatively straightforward, fortunately. Remove a screw each at the top left of the power board and at the bottom left of the power board, remove the white clip at the top left, pop out the white clip on the left of the power board and lift the power board out from the front where you have the white block containing eight pins that connect the power board to the sub board. Then proceed per the rest of this guide. Hope this helps.
-
-
-
-
Déconnectez la fiche blanche du ventilateur depuis la carte électronique de contrôle des port manette.
Perhaps list the battery type an battery holders that allow for easy replacement in the future?
-
-
-
Notez où sont les pattes positive et négative.
-
Dessoudez l’ancienne pile CMOS de la carte électronique de contrôle.
-
-
-
Remettez en place la carte électronique de contrôle.
-
Attachez le support de la pile à l’intérieur avec un peu d'adhésif, tel que du ruban adhésif double face.
-
Insérez la pile à l’intérieur du support de pile.
-
Suivez les étapes du tutoriel de démontage dans l'ordre inverse pour remonter votre Dreamcast.
-
Une fois votre Dreamcast remonté, branchez la Dreamcast à votre télé ou moniteur, démarrez la et réinitialisez l'horloge.
-


Pour remonter votre appareil, suivez ces instructions dans l'ordre inverse.
Pour remonter votre appareil, suivez ces instructions dans l'ordre inverse.
Annulation : je n'ai pas terminé ce tutoriel.
16 autres ont terminé cette réparation.
Merci à ces traducteurs :
100%


Ces traducteurs nous aident réparer le monde ! Vous voulez contribuer ?
Commencez à traduire ›
9 commentaires
Something that should be noted, even if the pictures kind of hint at it, is that the power board - the large board to the left of the console in Step 3, picture 1 - needs to be removed BEFORE the controller board can be taken out. On my DC the pins that connect the power board to the motherboard have a surprisingly strong grip, so I needed to pull up on that end with some force to get it off. Definitely something to be careful with, as you don't want those pins getting bent out of shape, never mind broken.
Dont use non rechargeble batteries. you can replace it with the little square batteries you found in chinese mp3 headphones… they’re 3.7v, 2000mah and are perfect for the console. This kind of lithium polimer batteries tend to hold charge for as much as six months according to my experience. And they’re easy available, if you can’t find one, just purchase those little chinese micro SD mp3 players/headphones , they’ll have one of this kind inside. Be sure the voltage is 3.7 at a maximum 2.000 mah
Yes I know this guide is out of date as it was very long ago. I am making changes and later updating the pics.
is it not possible to replace the battery without desoldering and replacing the holder? i don’t see why the holder has to be replaced if it’s just the battery that’s bad.
It's because the original holder in the dreamcast (from the looks of it based on the pictures) is actually also soldered to the battery itself.
The original Dreamcast backup battery holder is spot welded directly to the battery. And the battery holder is soldered to the Dreamcast mainboard.
Brendan -