Introduction
Mettez à niveau votre RAM et optimisez instantanément la vitesse.
Ce dont vous avez besoin
-
-
Retirez les dix vis suivantes par lesquelles le boîtier inférieur est fixé au boîtier supérieur :
-
Sept vis Phillips 3 mm.
-
Trois vis Phillips 13,5 mm.
-
-
-
-
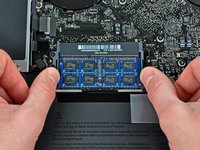
Écartez les deux clips de chaque côté du module de RAM simultanément pour libérer ce dernier.
-
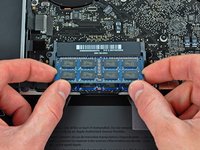
Saisissez le module de RAM par les côtés et sortez-le de son emplacement en le levant bien droit.
-


Pour remonter votre appareil, suivez les mêmes instructions dans l'ordre inverse.
Annulation : je n'ai pas terminé ce tutoriel.
160 autres ont terminé cette réparation.
Merci à ces traducteurs :
100%


Ces traducteurs nous aident réparer le monde ! Vous voulez contribuer ?
Commencez à traduire ›

5 commentaires de tutoriel
I bought and installed 4GB x2 RAM for my Mid 2009 15 inch MacBook Pro and it was easy and is working great. Before this I had 4GB and it was being maxed out. It was very easy. I did purchase the required tools which made it simple. I also swapped the battery at the same time. I am writing this from the same computer and it is working well. Good luck!
I had no trouble installing the 4 GB RAM I bought for my Mid 2009 15 Inch MacBook Pro. The mistake I made though was not realising that my machine has two RAM slots. I only bought one chip! So now I have to buy another one.
If you read this before you buy some RAM, make sure you check how many slots your computer has!
Also, I must say the customer support from ifixit is great. I messaged them about this and some other issues I was having and I got a detailed response from them within a couple of days. Thanks guys!
I replaced my original 2x 2gb ram with 2x 4gb RAM following your instructions. However, upon boot up, it’s only showing 1 of the 2 4gb chips. Any tips on how to get both seated correctly?
Never mind. I was able to pop the second chip back out and get it seated properly.