Introduction
Utilisez ce tutoriel pour remplacer la batterie CMOS.
Avant de commencer tout travail sur votre Mac Pro :Débranchez l'ordinateur et maintenez le bouton d'alimentation enfoncé pendant dix secondes pour décharger les condensateurs de l'alimentation.
Soyez très prudent de ne pas toucher les câbles du condensateur ou les joints de soudure exposés à l'arrière de l'alimentation. Manipulez le tableau par les bords.
Ce dont vous avez besoin
-
-
Basculez l'interrupteur de verrouillage vers la droite en position déverrouillé.
-
-
-
Enlevez cinq vis Torx T10 de 5,1 mm autour du périmètre extérieur de l'ensemble du ventilateur.
Fat Mango is correct. That said. If you do pull the fan assembly note that the screws are all held in with blue Permatex and breaking them free takes a fair amount of effort. Getting a good set of Torx screwdrivers is a must.
Hey guys, what would happen if you only replace one card.. I have a D300 but the plan is to upgrade to D500 or D600. So If I can afford and install one instead of the pair would it increase something? or will it cause any conflict? I guess I don’t understand if I the Mac Pro has 2 D300 graphic cards that means each has 1GB? Same as If I would Install 1 D600 that would increase 3GB only? Thanks.
D300 = 2GB each card. Very few apps uses two cards at the same time.
Gio Cas -
The (5) Screws are Apple part number 923-0713
-
-
-
Tout en soutenant l'ensemble du ventilateur d'une main, desserrez les deux vis captives T8 dans le support de la nappe du ventilateur.
On my machine, a TR7 worked to remove them due to the weird angle.
-
-
-
Enlevez cinq vis Torx T10 de 5,1 mm du périmètre extérieur du boitier inférieur.
-
-
-
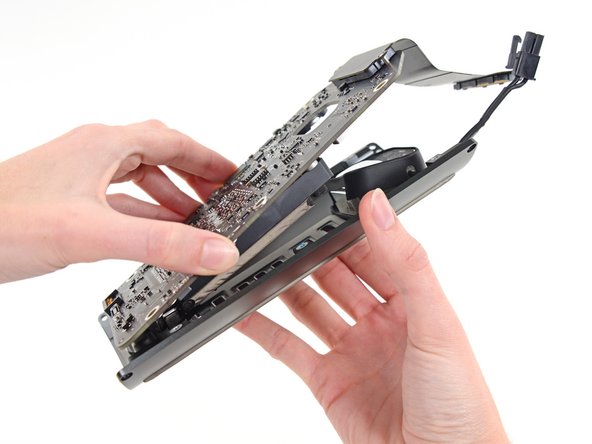
Utilisez l'extrémité plate d'une spatule (spudger) et un mouvement de torsion pour séparer délicatement un côté de la connexion de données de la carte graphique.
-
-
-
-
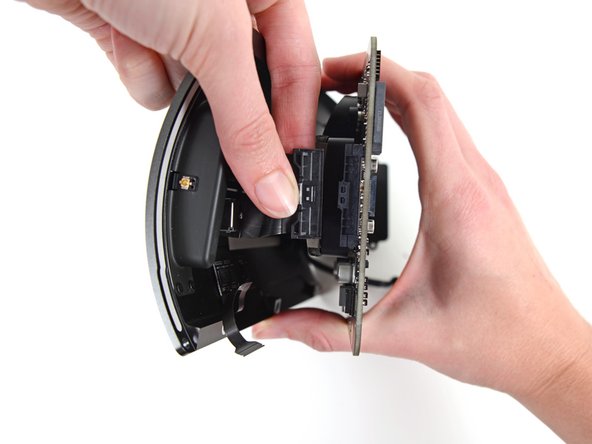
Retirez les deux vis Torx T7 de 6,0 mm fixant la plaque d'interconnexion au dissipateur de chaleur.
Ended up being T9 screws for me.
T8 screws for me, i did and edit to this step
Ended up being T15 screws on my machine
-
-
-
Retournez le Mac Pro et posez-le délicatement sur une surface plane.
-
-
-
Utilisez l'extrémité plate d'une spatule (spudger) pour débrancher le connecteur de la sortie d'alimentation de sa prise sur la carte E/S.
-
Utilisez la pointe d'une spatule (spudger) pour débrancher la nappe des données de l'alimentation de sa prise sur la carte E/S.
Need to add T9 Torx Screwdriver to list of tools at the beginning of this article.
-
-
-
Retirez les quatre vis Torx argentées T10 de 9,0 mm des côtés du bloc d'alimentation.
awesome. thank you for the tip!!
-
-
-
Retirez les deux vis Torx argentées T10 de 9 mm fixant la carte E/S au bouclier E/S.
On reassembly, before tightening these 2 9.0mm T10s, make sure the other 4 holes line up. Otherwise you might be setting yourself up for cross threading the 4 remaining 9.0 mm T10 that are already in a bad spot for torquing.
Might not be a bad idea to put the other 4 halfway in to be sure no resistance, then tighten the 2 in this step, then remove the other 4.
-
-
-
Utilisez la pointe d'une spatule (spudger) pour défaire le clapet de retenue sur le connecteur ZIF de la nappe bouclier du E/S.
-
Débranchez la nappe bouclier du E/S.
-
-
-
Serrez et retirez le connecteur de la nappe du jack audio de la carte E/S.
-
-
-
Utilisez la pointe d'une spatule (spudger) pour retirer la batterie CMOS de sa prise.
-


Pour remonter votre appareil, suivez ces instructions dans l'ordre inverse.
Pour remonter votre appareil, suivez ces instructions dans l'ordre inverse.
Annulation : je n'ai pas terminé ce tutoriel.
26 autres ont terminé cette réparation.
Merci à ces traducteurs :
100%

Ces traducteurs nous aident réparer le monde ! Vous voulez contribuer ?
Commencez à traduire ›

11 commentaires
A very good guide. I have a few notes from my experience replacing my battery.
In step 13 the torx screws securing the interconnect board to the heat sink were T-8 on my Mac but T-7 worked.
In step 23 a short arm Torx key would be helpful. Getting them out tore up the heads of the screws and getting back in was difficult without cross threading some of them. Bondhus (model no. 31832) sells a set that might help.
In step 29 if you don't reconnect the power supply data cable completely your Mac fan will run full speed and the processors will max out.
Yeah, could somebody please post the specifications for the replacement battery and maybe a source for it?
From the tear down, it's a Long-life BR-2032... I got mine at: https://www.amazon.com/PANASONIC-BATTERI.... Good luck! Great machine!
Yes, the BR2032.
The difference between it and the CR2032 medical battery is the wider heat tolerance range, both extreme heat and cold of the BR. As these are known to get quite hot, get the BR2032.
The batteries in most Macs are easy to replace so substituting the common CR2032 works fine. Electrically, they are identical. The Mac Pro and the late 2009-2010 iMac are a bit time consuming (2009–10 iMacs have the battery on the back of the motherboard) so use the same one that Apple uses.
The best price on the BR2032 is this 3-pack.
<url>https://www.amazon.com/Panasonic-Battery...</url>
Could anyone explain what issues they are seeing with a dead CMOS battery?
I’ve had a problem booting for a while, having to reset pram and smc every time and try multiple reboots, uugh, I changed CMOS battery thinking it was that and tested the old one which was lo and behold dead. I thought this would fix the issue but it hasn’t. Just FYI I have the same problem with or without a battery in there.
Hi there. The same for me here, how did you solve this problem ?
Changed for new battery although it is not turning on yet.
Ebd -
Thank You for very good detailed guide but I have problem after reassembly, fan running on maximum speed. I have try SMC reset (1)Shut down Mac, 2) Unplug power cord, 3) Wait 15 sec., 4) Plug in power cord, 5) Wait 5 sec., 6)Turn On Mac) and not worked for me, all is without changes. Mac very lagging and is very slow. I disassembled the mac again, checked all the flex cables and dont’t find any problem with this. Please, is any way how can I fix this? I have searching and testing guides 2 days and now I'm absolutely frustrated, nothing worked. :-( Thank You very much.
Thank you for an excellent guide to a tricky enough operation. Phew! Good job that coin cell lasts a few years! As someone else has said, I highly recommend chasing down the BR2032 version that Apple install as OEM, rather than using the more common CR2032. There are good reasons for this - the BR2032 has increased temperature stability and holds voltage better over lifetime. UK folk can get a supply at RS Components here: https://uk.rs-online.com/web/p/button-ba...
One other comment - in the reverse of Stage 23 when re-assembling, please take care aligning those 4 x 9mm T10 screws bolting down the PSU to the IO board. They came out fairly easily, but picking up the thread again properly when putting them back I found very tricky, mainly due to the overhang, and there is a risk of stripping if they don’t go in vertically.