Il est possible que cette traduction ne reflète pas les dernières mises à jour du tutoriel source. Aidez à mettre à jour la traduction ou bien consultez le tutoriel source.
Introduction
La batterie de ce téléphone se situe sous la carte mère et nécessite le retrait de l’écran, de quelques vis, connecteurs et composants en plastique.
Ce dont vous avez besoin
-
-
Utilisez un outil d'ouverture en plastique, pour parcourir et glissez tout le long du tour de l'appareil en soulevant délicatement l'écran.
-
-
-
Une fois que l'affichage est complètement détaché du son cadre, soulevez-le avec précaution et localisez le connecteur d'affichage.
-
À l'aide du même petit outil en plastique, retirez soigneusement le ruban jaune du connecteur.
-
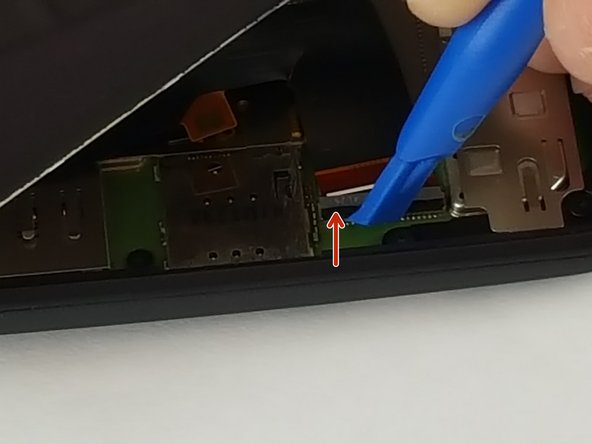
Maintenant, déconnectez soigneusement le verrouillage du connecteur noir en le soulevant dans le sens indiqué par la flèche rouge.
-
Enfin, sortez le câble d'affichage hors du connecteur. Il devrait être facilement enlevé, sinon assurez-vous que son socle de verrouillage noir soit complètement déverrouillé.
Very well put together. Worked fine for me.
A guitar pick will work as well as the plastic tool, but it might be a little harder to work with.
-
-
-
Maintenant que l'écran est retiré, démontez le blindage en aluminium de la carte mère.
-
Dévissez la vis unique de 4 mm située sur le dessus en utilisant un tournevis Torx T4.
-
Une fois la vis sortie, retirez doucement le bouclier en aluminium de la carte mère.
-
-
-
-
À l'aide de l'outil métallique, retirez très soigneusement l'écouteur en le faisant glisser doucement sur le côté droit puis vers le bas.
You can see a plastic clip on the right, so I understand the justification for prying on the right first. However, when I tried prying on the right, it separated the two halves of the speaker, ruining it. There was also a pad of foam, double sided tape under mine.
If you see in the other side the plastic clip is smaller , I was able to release this clip (the left side one) and in the bottom part of the speaker you can see a little gap when i put my pointy metal spudger and help the speaker slowging going up, it fells a little hard to push because of the magnet in it.
I found I did not need to remove the speaker. I was able to (just barely) reach the screw behind it without removing it. After removing all of the other screws, I loosened that one a little bit at a time while gently prying the motherboard out of the case. Eventually it was all the way removed and I was able to take out the motherboard.
Great tip about not removing the speaker. I, too, managed to remove that screw behind the speaker. I didn’t even need to pry out the motherboard while doing it.
Keith R -
Sir need track diagram for this………… speakers track might be cut….
-
-
-
Dévissez les vis restantes de 16 à 4 mm à l'aide d'un tournevis Torx T4.
-
-
-
Une fois que le câble de la batterie est débranché de la carte mère, utilisez l'outil métallique et insérez-le vers la petite ouverture située vers le haut-parleur et soulevez la carte mère suffisamment, afin de pouvoir utiliser votre doigt pour soulever la carte mère hors du cadre du téléphone.
-
Maintenant, soulevez doucement la carte mère, en commençant par le haut et en poursuivant vers en bas du boitier du téléphone.
-
-
-
Utilisez un spudger pour délicatement soulever la batterie
-
Si vous avez une batterie de rechange , sécurisez-la dans le boîtier en plastique en utilisant un adhésif double face ou ce qui est fourni avec la nouvelle batterie.
Where did you get a replacement battery? i can't seem to find a retailer that has them
-


Pour remonter votre appareil, suivez ces instructions dans l'ordre inverse.
Pour remonter votre appareil, suivez ces instructions dans l'ordre inverse.
Annulation : je n'ai pas terminé ce tutoriel.
39 autres ont terminé cette réparation.
Merci à ces traducteurs :
80%


Ces traducteurs nous aident réparer le monde ! Vous voulez contribuer ?
Commencez à traduire ›
Équipe

USF Tampa, Team 12-3, Eyestone Spring 2016 Membre de l'équipe USF Tampa, Team 12-3, Eyestone Spring 2016
USFT-EYESTONE-S16S12G3
3 membres
14 tutoriels rédigés
9 commentaires
My bettri chanj
My bettri chanj ani problam
my mobile auto shutdown currunt working
Thank you for excellent instructions, especially the photographs.
My screen was already mostly detached due to a ‘puffed’ battery. Where unaffected by dust the original tape secured the screen. I think I will be adding some super glue.
I found a T5 was a snug fit in the screws, snug enough that the screw could be offered up without falling off of the bit.
Step 9: Note the small metal tab that latches under the case - pry this towards the bottom end of the ‘phone and the motherboard falls out.
I am having trouble removing the speaker/earpiece. I am concerned about how much pressure to apply with the spud. Any suggestions?
The information is quite good overall. I am disappointed with how difficult Motorola made it to remove a battery that only lasted three years. Throwing the phone away does not encourage me to buy another Motorola product.
Thanks for any help. C. Finch gpcoffg@gmail.com
Dumbest phone design. Battery replacement should always be easy. Good instructions. However, step 5 needs better photos to describe the delicate step. Pretty sure I tore up the speaker. Closer detail on where to pry is needed.