Introduction
L'accès et le retrait du bloc d'alimentation sont relativement simples et nécessitent un tournevis hexagonal de 2 mm.
Ce dont vous avez besoin
-
-
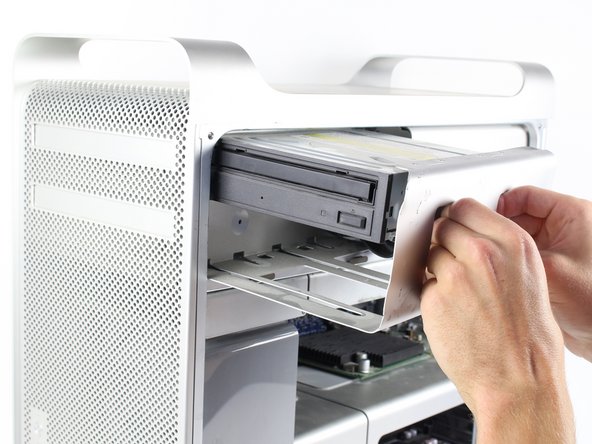
Saisissez fermement le compartiment du lecteur optique et tirez pour enlever le compartiment du lecteur.
-
-
-
-
Retirez les deux connecteurs retirez-les de leurs prises respectives.
-
-
-
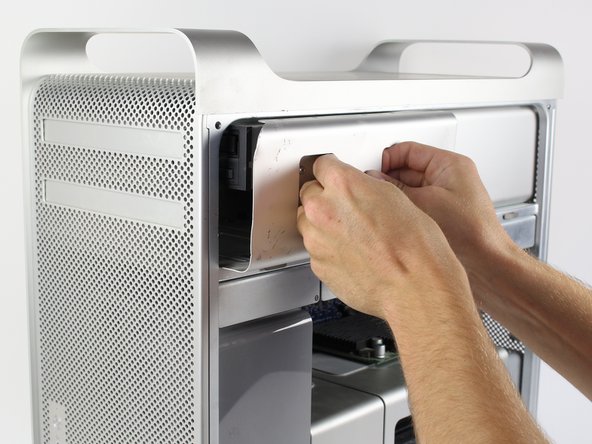
Retirez les 4 vis hexagonales 6-32 marquées avec un tournevis cruciforme hexagonal de 2 mm.
-
-
-
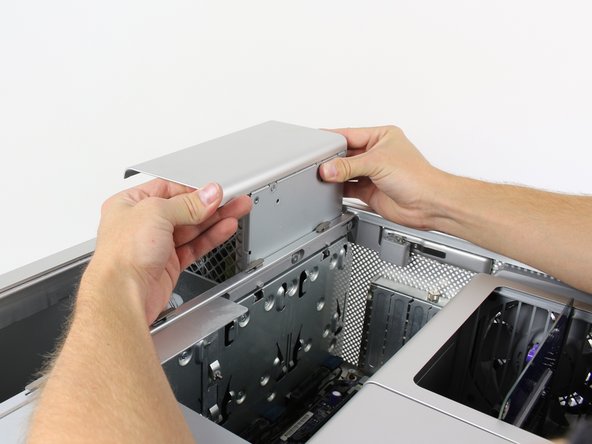
Saisissez la poignée sur le côté gauche du boîtier du bloc d'alimentation tout en saisissant le côté droit du boîtier du bloc d'alimentation et tirez fermement vers le haut pour le retirer.
This is not correct for the Mac Pro (Early 2008), a.k.a. MacPro3,1
In the MacPro3,1, the power supply screws are 2.5mm hex, not T-10.
Also, there is a cover plate behind the superdrive that has to be removed (2 phillips screws) to expose the power cable connections and those connectors must be detached before the power supply can be removed.
ty for this.
My Mac Pro (Early 2008) had the cover plate over the connectors, but the 4 screws were 2.0mm hex rather than 2.5mm hex. Seems they didn't standardize on a single size.
-
-
-
Pour les mac pro de 2008/9 les vis du boitier d'alimentation sont de 2,5 mm hexagonales et non T-10. Il y a également une plaque derrière le lecteur optique à enlever pour exposer les câbles du boitier d'alimentation. Ces câbles doivent êtres détachés et glissés sous le ventilateur avant que l'alimentation puisse être retirée.
Absolutly right.i've tried that and it works.I'm satisfied
-
-
-
Localisez les 4 câbles marqués.
-
Appuyez sur le clip situé au-dessus de chaque connecteur de câble tout en saisissant fermement chaque connecteur et tirez chacun d'eux vers l'arrière pour retirer chaque clip.
Super. Merci.
Super. Merci. J'ai pu l'enlever facilement.
-


Pour remonter votre appareil, suivez ces instructions dans l'ordre inverse.
Pour remonter votre appareil, suivez ces instructions dans l'ordre inverse.
Annulation : je n'ai pas terminé ce tutoriel.
76 autres ont terminé cette réparation.
Merci à ces traducteurs :
100%


Ces traducteurs nous aident réparer le monde ! Vous voulez contribuer ?
Commencez à traduire ›
Équipe

Cal Poly, Team 6-24, Maness Fall 2014 Membre de l'équipe Cal Poly, Team 6-24, Maness Fall 2014
CPSU-MANESS-F14S6G24
4 membres
13 tutoriels rédigés
23 commentaires
15 min power on after off
Doesn't work for a micron. Step 6 is impossible. Can't get the power supply out of its place more than a few centimeters. The side closest to the backplate of the casing can't come up only some millimeters, while also the fixed!! power cord is a serious obstruction.
Moreover there are nowhere cover plates left, so this is not a comparable situation as described in step 7.
My last remark should be forgotten. The power cord has been connected to the Mac pro to give the impression that it's mounted fixedly to the power supply. But if you pull with very much force (an attempt of despair), it then again appears to be a 3-hole connector like is the case for common computers. If you don't know these systems, this is very treacherous.
But now for something completely different:
Is there somebody who can tell, how you get the power supply out of its case? I removed 9 screws (these are accessible from the outside) but the power supply doesn't come out of its frame. It remains hidden into the aluminum case, and nothing can be examined.
You are awesome. The instructions were so clear that I would post the difficulty as low to moderate. I took out the power supply, wrote down the info, ordered another, cleaned fans, power supply unit, interior, etc. , replaced the original power supply, and it runs quietly and better than ever. I now have a back-up, and have a clean machine and some dust bunnies I am fostering. Any interest to adopt the dust bunnies please contact www.bunnydust.de. That's a dumb joke and not an endorsement
MrBuxley
Hoi fixed in aprox 35 minutes works perfect
It was a bit difficult and I have newer mac pro but i did it. Rejoice. Anybody still having problem let me know and I’ll tell how in better detail.
The screws are thee worst part. Really awkward. I’ll come back later sometime to check if any in distress.
Mine is Generation 5.something. I would say it is easier than this one, now that I have done it. But 20 to 25 minutes yea sure if you are an Apple genius but to Joe in the street it is rocket science.
Awesome Dude, you are! Thank you very much!
Where can i get a MacPro 1.1 power supply in good working condition to replace my unit? APPLE PART NUMBER IS: 614-0383
Hi Eric, Thanks for posting this. Im looking at replacing my early 2008 macpro power supply due to random restart issues. I’ve been told that the screws require torx not hex, and I see some folks saying that 2.5 mm hex didn’t work. If you or anyone else can clarify I’d really appreciate it.
Thanks -
Seriously , To remove the 4 marked 6-32 hex screws was a pain!!!! TIP: I was almost trowing thetower when my wife suggested me to cut a little peace of rubber from an old rubber glove from the kitchen and use it as a cushion to tight the connection between the hole of the screw and the screwdriver. I must tell you all, I managed but it was not ease!!! :-)
where can i get the power supply fan for my 2009 Mac Pro? Mine is not working well. Makes a terrible sound…..
I have a problem with my MAc pro 3.1 not always starts, (when it starts runs perfect) it seems the power supply, this is I’m here, nut I’m not sure that is the real propblm and I don’t want to waste money!
Fairly easy install. Hardest part was getting the cover plate behind the DVD drive back in place. My hands are too big to fit in there and it takes a very long screwdriver to reach.
My cable connectors were held in place by velcro. Found it much easier to remove the cover plate, unplug the connectors, then pull the power supply out.
I have reconnected all the cables correctly i hope, but my unit doesn't want to go all the way in. Izit the way the wires are bundled at the bottom of it? And how can i flatten it a bit so it doesn't for a heap at the bottom? It stick out about 5-8cm above the flush surface..
The PSU screw threads are partially coated with a very tough locking compound making them very stiff to remove. I removed this with a mixture of rubbing alcohol and light machine oil. Much easier to reinstall and not too worried about them coming loose in my lifetime😎
Like Timo above I found that none of the recommended bit sizes were a proper tight fit. Easy to strip the screw head. Another good reason to remove the locking compound.