Introduction
Vous avez du mal à lire des disques? Ce guide est pour vous!
Ce dont vous avez besoin
-
-
Placez la PSP face vers le bas, de sorte que le lecteur UMD soit orienté vers le haut.
-
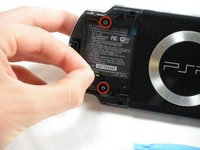
Localisez le couvercle de la batterie et ouvrez-le.
-
Retirez la batterie de l'intérieur.
-
-
-
Localisez l'autocollant dans le compartiment à piles intitulé: "Fr: Garantie annulée si le joint est endommagé."
-
Retirez l'autocollant à l'aide des outils d'ouverture PSP.
-
-
-
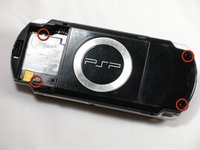
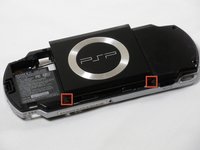
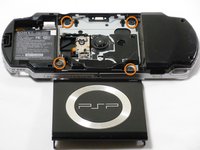
Retirez les vis suivantes autour du cadre:
-
Deux Phillips de 4 mm
-
Un Phillips 5 mm
Beware that some models of PSP 2000 (mine is a limited edition Crisis Core FF7 silver version, so I suppose it is related to it being a japanese PSP) have 2 minute TORX screws (T1? T2?) instead of the 2x 4mm Phillips pointed in orange around the USB port.
-
-
-
-
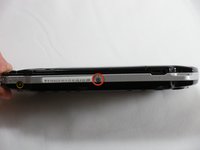
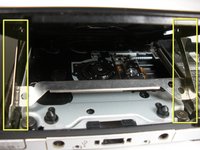
Retirez la barre d'accueil en faisant doucement levier sur les côtés gauche et droit avec les outils d'ouverture. Soulevez la barre de l'appareil.
Theres a latch you have to pry on the other side of the console through the small hole in order to remove home menu bar
-
-
-
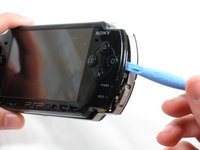
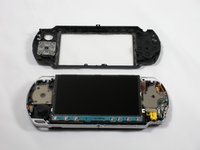
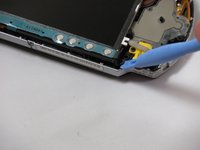
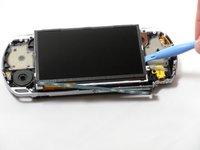
Avec la barre d'accueil à l'écart, soulevez doucement l'écran à l'aide des outils d'ouverture.
-
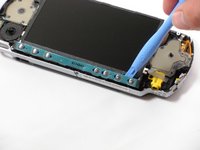
Soulevez les languettes noires des connecteurs de câble ruban à l'aide d'un outil d'ouverture. Tirez les rubans vers le bas de la PSP pour vous déconnecter.
-
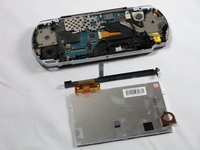
Soulevez doucement l'écran.
There are 2 ribbons connected to the screen. Both of them have to be disconnected in order to remove the screen.
Do not lift the black tab on the thin cable. That's attached to the logic board.
-
-
-
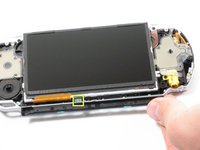
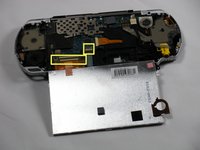
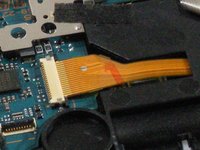
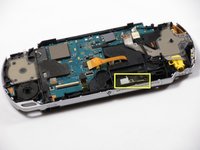
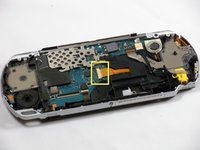
Déconnectez soigneusement le câble plat du lecteur UMD de la carte mère. Utilisez les outils d'ouverture PSP pour pousser les languettes noires du connecteur horizontalement pour libérer le câble.
-
À ce stade, il est utile de scotcher les pièces métalliques lâches avec du ruban adhésif pour qu'elles ne tombent pas pendant que vous avez la PSP dans l'autre sens.
There is a 2nd ribbon for the UMD drive that has to be disconnected sitting directly between the screen and home bar ribbons. Just lift the black tab to release it like you did for the screen and home bar ribbons.
-
-
-
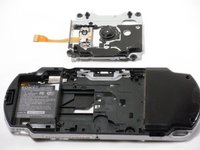
Positionnez la PSP de sorte que le périphérique UMD soit orienté vers le haut.
-
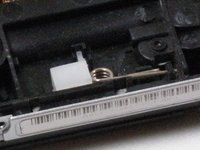
Avec le lecteur UMD ouvert, repérez le support d'éjection UMD en aluminium. Pincez les bras supérieurs vers l'intérieur pour les détacher de la porte de l'UMD.
-
Le support d'éjection UMD peut maintenant être facilement retiré.
-
Soulevez doucement sur le côté gauche de la porte UMD pour la retirer.
On the front, bottom right-hand side, next to where you remove the spring on the previous step, there is the hinge for the UMD door. You can use a plastic pry tool and move it to the left while pushing back to release the door without breaking off the plastic knobs.
Thank you for that information. I surely would have broken the knobs had you not pointed this out. Although, it took a fair bit more force to push the hinge over enough than I expected.
"Gently pry on the left side of the UMD door to remove it." This doesn't really help.
It doesn't describe where to pry it or what direction to pry it in. Might as well just say "just fix it," because this is a complete gamble on whether or not you break the hinge. If you already have knowledge on which direction is best to pop it out, why wouldn't you specify it?
The correct way to do this step is as follows:
With the PSP rear facing you, torque/bend the plastic frame slightly around the left hinge of the door by using your hands to bend the frame to the left of the pin slightly while pushing the door to the right. This will bend the plastic pin away from the door and let you get the door hinge off. The eject bracket is then trivial to remove.
It is NOT desirable or necessary to remove the UMD eject bracket first. That makes no sense as the UMD door is clearly designed to go on AFTER the bracket arms have been inserted into it.
Bending things almost never is "the correct way".
This YT video shows a method that works somewhat smooth: https://www.youtube.com/watch?v=p8ZmOK5q...
-
-
-
La porte UMD étant fermée, repérez et retirez les quatre vis cruciformes de 4 mm qui maintiennent le lecteur UMD en place.
As the comment in Step 8 says, there are TWO ribbon cables from the UMD drive to disconnect, not just one. Very important!
-


Pour remonter votre appareil, suivez ces instructions dans l'ordre inverse.
Pour remonter votre appareil, suivez ces instructions dans l'ordre inverse.
Annulation : je n'ai pas terminé ce tutoriel.
34 autres ont terminé cette réparation.
Merci à ces traducteurs :
100%
[deleted] nous aide à réparer le monde ! Vous voulez contribuer ?
Commencez à traduire ›

Équipe

Cal Poly, Team 6-3, Maness Fall 2009 Membre de l'équipe Cal Poly, Team 6-3, Maness Fall 2009
CPSU-MANESS-F09S6G3
5 membres
37 tutoriels rédigés
4 commentaires
I've used this guide multiple times and it is simply the best out there. You should simply title it "PSP disassembly" as I have used it just to take the 2000 apart and not just replace the UMD drive.
This guide was very helpful in replacing the UND drive in my 2000. Unfortunately, it turns out that the UMD drive was not causing the issue it is having.
Lots of guessing in this guide, better not use it and look up a YT video.
will this be coming back in stock??