Aller au contenu principal

Samsung Galaxy Note Headphone Jack and Earpiece Replacement

Tutoriel Archivé
Ce tutoriel est conservé uniquement à des fins de suivis historiques. Utilisez la version actuelle du tutoriel pour effectuer votre réparation.

Ce dont vous avez besoin

  1. Samsung Galaxy Note Headphone Jack and Earpiece Replacement, Battery: étape 1, image 1 de 3 Samsung Galaxy Note Headphone Jack and Earpiece Replacement, Battery: étape 1, image 2 de 3 Samsung Galaxy Note Headphone Jack and Earpiece Replacement, Battery: étape 1, image 3 de 3
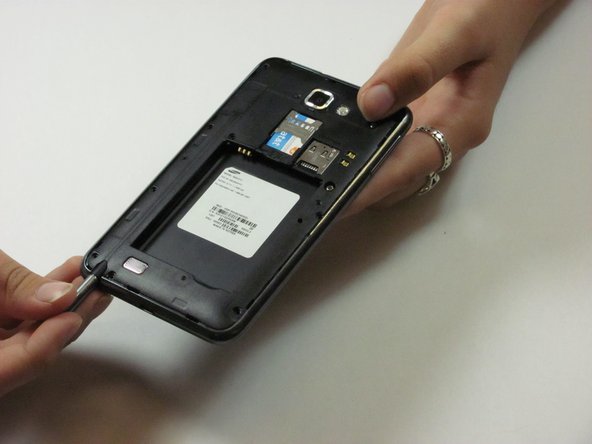
    • Make sure the screen is face-down and the camera is opposite you.

    • Insert the flat end of a spudger into the phone's top right rectangular slot.

    • Use the spudger as a lever to pry open the back of the phone.

  2. Samsung Galaxy Note Headphone Jack and Earpiece Replacement: étape 2, image 1 de 1
    • With the spudger still inserted, carefully slide the spudger down the side of the phone.

    • Gently peel off the back cover with your hand.

  3. Samsung Galaxy Note Headphone Jack and Earpiece Replacement: étape 3, image 1 de 1
    • Place the spudger in the battery's bottom right slot.

    • Gently pry to remove the battery.

  4. Samsung Galaxy Note Headphone Jack and Earpiece Replacement, Midframe: étape 4, image 1 de 1
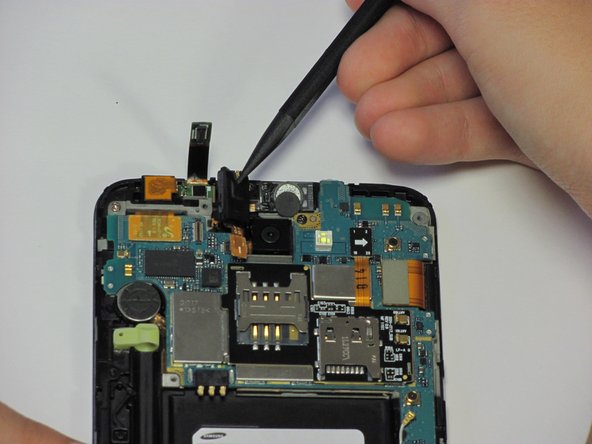
    • Remove the nine 3mm screws on the perimeter of the phone with a Phillips #00 screwdriver.

  5. Samsung Galaxy Note Headphone Jack and Earpiece Replacement: étape 5, image 1 de 1
    • Remove the stylus from the bottom of the phone.

  6. Samsung Galaxy Note Headphone Jack and Earpiece Replacement: étape 6, image 1 de 3 Samsung Galaxy Note Headphone Jack and Earpiece Replacement: étape 6, image 2 de 3 Samsung Galaxy Note Headphone Jack and Earpiece Replacement: étape 6, image 3 de 3
    • Pry all the way around the sides with a plastic pry tool and gently pop off the midframe.

    • If the cover does not come off easily, continue to pry along the phone's perimeter.

    • This step can take some patience. Prying too hard or forcing the screen off can crack or scratch the screen and break the thin plastic around the stylus case.

    • Separate the midframe from the phone. The midframe should now pull off easily.

  7. Samsung Galaxy Note Headphone Jack and Earpiece Replacement, Headphone Jack and Earpiece: étape 7, image 1 de 1
    • Use the spudger to pry up the yellow ribbon cable.

  8. Samsung Galaxy Note Headphone Jack and Earpiece Replacement: étape 8, image 1 de 1
    • Use the spudger to pry up the long, green ribbon next to the yellow one you just pried up.

    • Push the green ribbon back to access the black bracket underneath it.

  9. Samsung Galaxy Note Headphone Jack and Earpiece Replacement: étape 9, image 1 de 1
    • Use your fingers to gently lift up the black bracket and set it aside.

  10. Samsung Galaxy Note Headphone Jack and Earpiece Replacement: étape 10, image 1 de 2 Samsung Galaxy Note Headphone Jack and Earpiece Replacement: étape 10, image 2 de 2
    • Flip the spudger around and insert the pointy end into the headphone jack.

    • Lift the headphone jack directly upwards using the spudger as a lever. This will also remove the connected speaker.

    • The headphone jack and earpiece are held down with an adhesive, so removing them might take some force.

Conclusion

To reassemble your device, follow these instructions in reverse order.

David Ritter

Membre depuis le 04/14/13

758 Réputation

6 tutoriels rédigés

Équipe

Cal Poly, Team 3-45, Amido Spring 2013 Membre de l'équipe Cal Poly, Team 3-45, Amido Spring 2013

CPSU-AMIDO-S13S3G45

4 membres

7 tutoriels rédigés

0 commentaires

Ajouter un commentaire

Nombre de vues :

Dernières 24 heures : 0

7 derniers jours : 0

30 derniers jours : 2

Total : 1,069