Aller au contenu principal
Pour réparer ensemble - Je crée un compte

Samsung Galaxy Watch4 Classic Motherboard Replacement

Ce dont vous avez besoin

    1. Samsung Galaxy Watch4 Classic Motherboard Replacement, Power down your watch: étape 1, image 1 de 1
      • Before starting repairs, take your watch off the charger and power it down.

      • Remove the watch band.

      Demander à FixBot

      Ajouter un commentaire

    2. Samsung Galaxy Watch4 Classic Motherboard Replacement, Unscrew the back cover: étape 2, image 1 de 1
      • Use a Tri-point Y00 screwdriver to remove the four 4.0 mm-long screws securing the back cover.

      Demander à FixBot

      Ajouter un commentaire

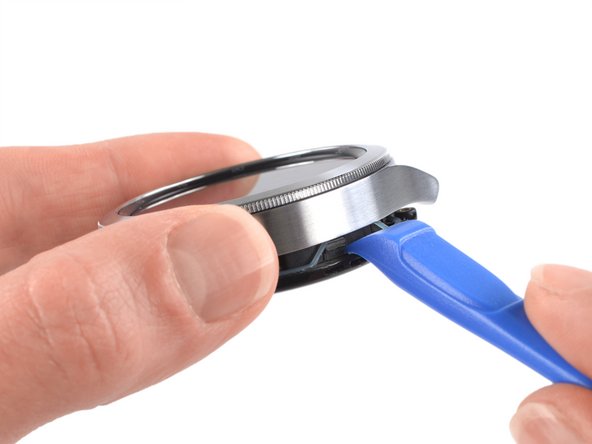
    3. Samsung Galaxy Watch4 Classic Motherboard Replacement, Pry open the back cover: étape 3, image 1 de 2 Samsung Galaxy Watch4 Classic Motherboard Replacement, Pry open the back cover: étape 3, image 2 de 2
      • Insert an opening tool into the seam between the back cover and the metal housing.

      • Twist the opening tool to create a gap.

      • Don't try to remove the back cover all the way yet. The sensor flex cable is still connected to the motherboard.

      Demander à FixBot

      Ajouter un commentaire

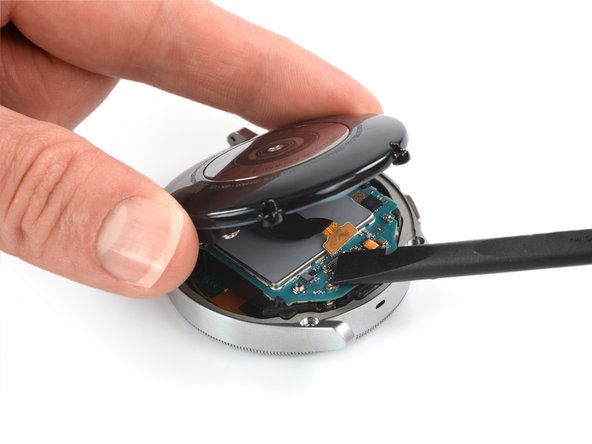
    4. Samsung Galaxy Watch4 Classic Motherboard Replacement, Disconnect the sensor flex cable: étape 4, image 1 de 2 Samsung Galaxy Watch4 Classic Motherboard Replacement, Disconnect the sensor flex cable: étape 4, image 2 de 2
      • Lay the watch face down.

      • Carefully swing open the back cover by folding it to the opposite site of the created gap.

      • Use the flat end of a spudger to pry up and disconnect the sensor flex cable from the motherboard.

      Demander à FixBot

      Ajouter un commentaire

    5. Samsung Galaxy Watch4 Classic Motherboard Replacement, Remove the back cover: étape 5, image 1 de 1
      • Remove the back cover.

      • Make sure the rubber gasket is undamaged. If damaged, replace it with a new one during reassembly to maintain proper water resistance.

      Demander à FixBot

      Ajouter un commentaire

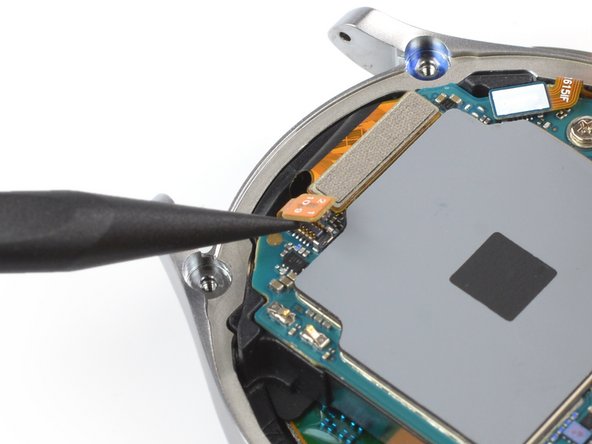
    1. Samsung Galaxy Watch4 Classic Motherboard Replacement, Disconnect the hall sensor flex cable: étape 6, image 1 de 2 Samsung Galaxy Watch4 Classic Motherboard Replacement, Disconnect the hall sensor flex cable: étape 6, image 2 de 2
      • Use the pointed end of a spudger to disconnect the hall sensor flex cable.

      Demander à FixBot

      Ajouter un commentaire

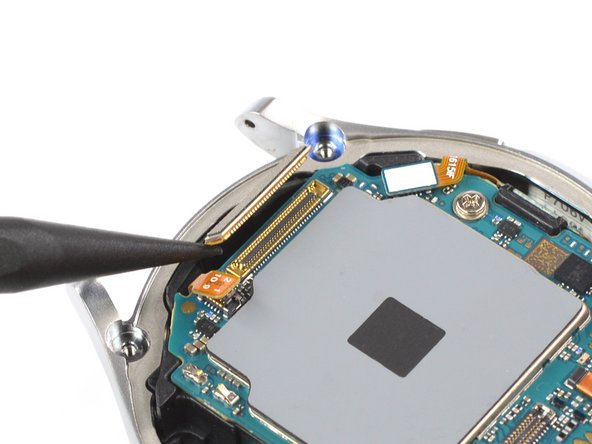
    2. Samsung Galaxy Watch4 Classic Motherboard Replacement, Disconnect the display flex cable: étape 7, image 1 de 2 Samsung Galaxy Watch4 Classic Motherboard Replacement, Disconnect the display flex cable: étape 7, image 2 de 2
      • Use a spudger to disconnect the display flex cable.

      Demander à FixBot

      Ajouter un commentaire

    3. Samsung Galaxy Watch4 Classic Motherboard Replacement, Disconnect the side buttons: étape 8, image 1 de 2 Samsung Galaxy Watch4 Classic Motherboard Replacement, Disconnect the side buttons: étape 8, image 2 de 2
      • Use a spudger to disconnect the crown button flex cable.

      Demander à FixBot

      Ajouter un commentaire

    4. Samsung Galaxy Watch4 Classic Motherboard Replacement, Unscrew the motherboard: étape 9, image 1 de 1
      • Use a Phillips screwdriver to remove the 4.4 mm-long screw securing the motherboard.

      Demander à FixBot

      Ajouter un commentaire

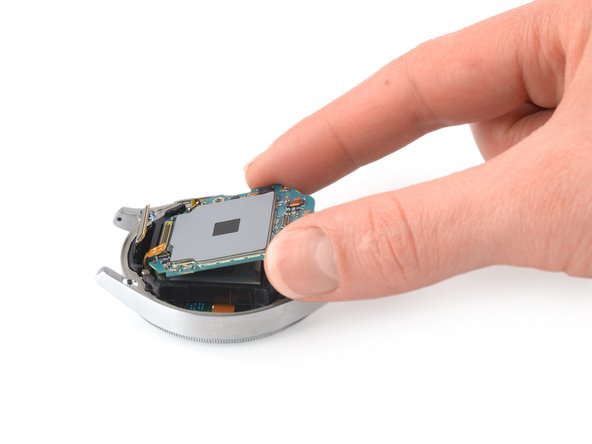
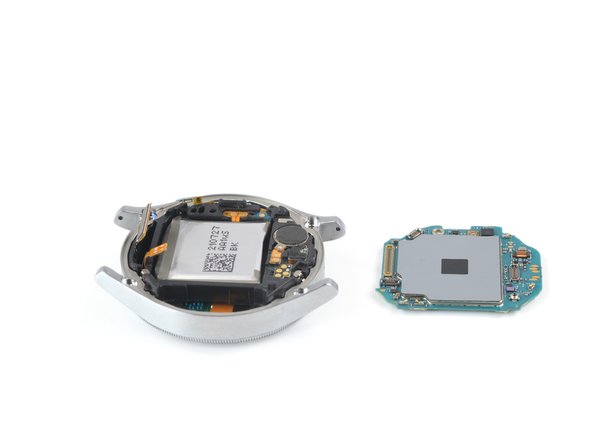
    5. Samsung Galaxy Watch4 Classic Motherboard Replacement, Remove the motherboard: étape 10, image 1 de 3 Samsung Galaxy Watch4 Classic Motherboard Replacement, Remove the motherboard: étape 10, image 2 de 3 Samsung Galaxy Watch4 Classic Motherboard Replacement, Remove the motherboard: étape 10, image 3 de 3
      • Use your fingers to lift the motherboard out from the watch assembly towards the bottom of the watch.

      • During reassembly, make sure none of the flex cables become trapped underneath the motherbaord.

      Demander à FixBot

      Ajouter un commentaire

Conclusion

If possible, turn on your device and test your repair before resealing.

To reassemble your device, follow these instructions in reverse order.

Take your e-waste to an R2 or e-Stewards certified recycler.

Repair didn’t go as planned? Try some basic troubleshooting, or ask our Answers community for help.

Annulation : je n'ai pas terminé ce tutoriel.

Adriana Zwink

Membre depuis le 12/18/19

68 729 Réputation

167 tutoriels rédigés

Équipe

iFixit Membre de l'équipe iFixit

Staff

123 membres

86 246 tutoriels rédigés

0 commentaires de tutoriel

Ajouter un commentaire

Nombre de vues :

Dernières 24 heures : 1

7 derniers jours : 21

30 derniers jours : 111

Total : 3,717