Aller au contenu principal

Sony Xperia XZ Premium Headphone Jack Replacement

Ce dont vous avez besoin

  1. Sony Xperia XZ Premium Headphone Jack Replacement, Back Panel: étape 1, image 1 de 1
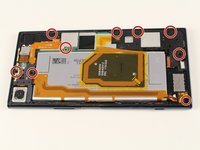
    • Place a heated iOpener on the back panel of the phone to melt the adhesive inside.

    • The iOpener or your desired heat source can be very hot and can heat up the phone, so make sure you do not burn yourself.

    • Follow this guide for directions on using the iOpener.

  2. Sony Xperia XZ Premium Headphone Jack Replacement: étape 2, image 1 de 1
    Outil utilisé dans cette étape :
    Plastic Cards
    $2.99
    J'achète
    • Slide a thin plastic card under the back panel and around the perimeter of the phone to remove the adhesive.

  3. Sony Xperia XZ Premium Headphone Jack Replacement: étape 3, image 1 de 1
    • Take hold of the back panel with your fingers and remove.

  4. Sony Xperia XZ Premium Headphone Jack Replacement, Frame: étape 4, image 1 de 1
    • Orient the phone horizontally with the front screen facing down and the camera on the bottom left corner.

  5. Sony Xperia XZ Premium Headphone Jack Replacement: étape 5, image 1 de 2 Sony Xperia XZ Premium Headphone Jack Replacement: étape 5, image 2 de 2
    • Remove nine 3.9mm Phillips #000 screws.

    • Make sure to turn carefully in the counter-clockwise direction or you may wear out the thread and shape of the screws. You will not be able to remove the screws once they are damaged!

    • When unscrewing, remember "Left Loosey, Righty Tighty!"

  6. Sony Xperia XZ Premium Headphone Jack Replacement: étape 6, image 1 de 1
    • Place the spudger under the top left corner frame piece and lift to loosen.

  7. Sony Xperia XZ Premium Headphone Jack Replacement: étape 7, image 1 de 1
    • Grab hold of the top left frame piece with your fingers and gently wiggle and lift to remove.

  8. Sony Xperia XZ Premium Headphone Jack Replacement: étape 8, image 1 de 1
    • Place the spudger under the bottom left frame piece and lift to loosen it.

  9. Sony Xperia XZ Premium Headphone Jack Replacement: étape 9, image 1 de 1
    • Grab hold of bottom left frame piece with your fingers and lift gently.

    • When dislodging the left frame piece, carefully wiggle the piece while lifting it vertically to prevent any damage to the wedges on the frame. This applies for all of the other frame pieces you will remove after this step!

  10. Sony Xperia XZ Premium Headphone Jack Replacement: étape 10, image 1 de 1
    • Place the spudger under the top right frame piece and lift to loosen it.

  11. Sony Xperia XZ Premium Headphone Jack Replacement: étape 11, image 1 de 1
    • Grab hold of the top right frame piece with your fingers and lift.

  12. Sony Xperia XZ Premium Headphone Jack Replacement, Motherboard: étape 12, image 1 de 1
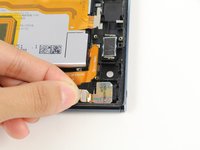
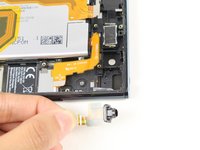
    • Insert your nail under the top left connector and push to disconnect it.

  13. Sony Xperia XZ Premium Headphone Jack Replacement: étape 13, image 1 de 1
    • Grab hold of the metal part of the connector with your fingers and lift.

  14. Sony Xperia XZ Premium Headphone Jack Replacement: étape 14, image 1 de 1
    • Insert your nail under the metal part of the bottom left connector.

  15. Sony Xperia XZ Premium Headphone Jack Replacement: étape 15, image 1 de 1
    • Push the bottom left connector with your finger to disconnect it.

  16. Sony Xperia XZ Premium Headphone Jack Replacement: étape 16, image 1 de 1
    • Insert your nail under the center topmost connector and push to loosen it.

  17. Sony Xperia XZ Premium Headphone Jack Replacement: étape 17, image 1 de 1
    • Grab hold of the top connector with your fingers and lift to disconnect it.

  18. Sony Xperia XZ Premium Headphone Jack Replacement: étape 18, image 1 de 1
    • Insert your nail under the metal tab of the connector above the battery and push to loosen it.

  19. Sony Xperia XZ Premium Headphone Jack Replacement: étape 19, image 1 de 1
    • Pull the metal tab of the connector towards you with your fingers to disconnect the pins.

  20. Sony Xperia XZ Premium Headphone Jack Replacement: étape 20, image 1 de 1
    • Insert spudger in the gap above the battery and lift to loosen the motherboard.

    • Use the spudger to slide under the edges of the motherboard if the motherboard does not seem to loosen after the above step.

  21. Sony Xperia XZ Premium Headphone Jack Replacement: étape 21, image 1 de 1
    • Insert the spudger in the gap between the motherboard and the left side of the battery to further lift out the motherboard.

  22. Sony Xperia XZ Premium Headphone Jack Replacement: étape 22, image 1 de 1
    • Grab hold of the motherboard with your fingers and lift it out of the phone gently.

  23. Sony Xperia XZ Premium Headphone Jack Replacement, Headphone Jack: étape 23, image 1 de 1
    • Insert the spudger in the gap to the bottom of the headphone jack.

  24. Sony Xperia XZ Premium Headphone Jack Replacement: étape 24, image 1 de 2 Sony Xperia XZ Premium Headphone Jack Replacement: étape 24, image 2 de 2
    • Gently extract the headphone jack by pulling the orange tab with your fingers.

Conclusion

To reassemble your device, follow these instructions in reverse order.

Bolaji Makinde

Membre depuis le 04/18/18

85 Réputation

1 tutoriel rédigé

Équipe

Cal Poly, Team S18-G2, Livingston Spring 2018 Membre de l'équipe Cal Poly, Team S18-G2, Livingston Spring 2018

CPSU-LIVINGSTON-S18S18G2

5 membres

16 tutoriels rédigés

0 commentaires

Ajouter un commentaire

Nombre de vues :

Dernières 24 heures : 0

7 derniers jours : 1

30 derniers jours : 1

Total : 1,491