Aller au contenu principal

SteelSeries Arctis Pro Plus GameDAC Microphone Cable Replacement

Ce dont vous avez besoin

  1. SteelSeries Arctis Pro Plus GameDAC Microphone Cable Replacement, Headset Ear Cushions: étape 1, image 1 de 2 SteelSeries Arctis Pro Plus GameDAC Microphone Cable Replacement, Headset Ear Cushions: étape 1, image 2 de 2
    • Lift the edge of the cushion and pull out slightly.

    • Work your way around the cushion until it comes off completely.

    • Repeat for the other cushion.

  2. SteelSeries Arctis Pro Plus GameDAC Microphone Cable Replacement, Headset Circuit Board: étape 2, image 1 de 1
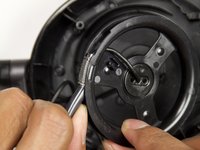
    • Remove the three 5mm screws with a Phillips #0 driver head on the headphone with the microphone.

  3. SteelSeries Arctis Pro Plus GameDAC Microphone Cable Replacement: étape 3, image 1 de 1
    • Lift the speaker off the headset to expose the circuit board.

    • Be careful not to lift the speaker too quickly or too forcefully to prevent the wires from being pulled out of their connections.

  4. SteelSeries Arctis Pro Plus GameDAC Microphone Cable Replacement: étape 4, image 1 de 1
    • Remove the three 5mm screws using a Phillips #0 driver head.

  5. SteelSeries Arctis Pro Plus GameDAC Microphone Cable Replacement: étape 5, image 1 de 1
    • Lift the circuit board out of the plastic housing.

    • Press in on the volume wheel while pulling on the circuit board to help maneuver the circuit board out of the housing.

  6. SteelSeries Arctis Pro Plus GameDAC Microphone Cable Replacement, Microphone Cable: étape 6, image 1 de 1
    Outil utilisé dans cette étape :
    Tweezers
    $4.99
    J'achète
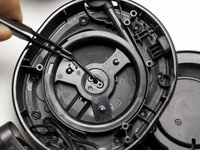
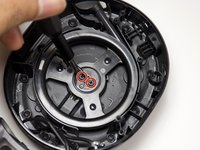
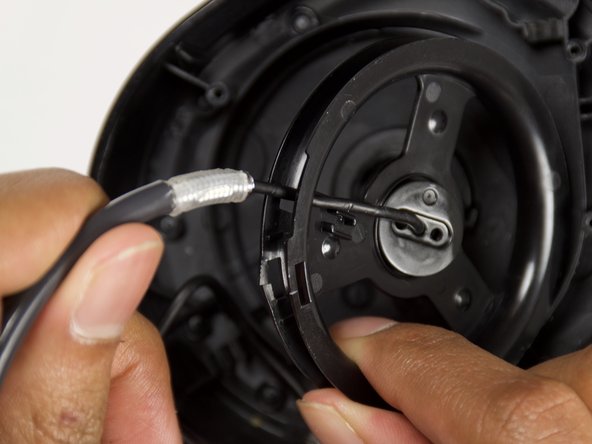
    • Pull up on the wires connected to the circuit board using tweezers to remove the circuit board from inside the headset.

  7. SteelSeries Arctis Pro Plus GameDAC Microphone Cable Replacement: étape 7, image 1 de 1
    • Desolder the six wired connections on the circuit board.

    • For help desoldering connections, follow this useful guide on Comment souder et dessouder des connexions.

    • Use caution when soldering. The heated tip may cause damage to the board or burn you.

  8. SteelSeries Arctis Pro Plus GameDAC Microphone Cable Replacement: étape 8, image 1 de 2 SteelSeries Arctis Pro Plus GameDAC Microphone Cable Replacement: étape 8, image 2 de 2
    • Lift up the wire on the rotating wheel with tweezers to move it out of the way of the screws.

    • Remove the two 5mm screws with a Phillips #0 driver head.

  9. SteelSeries Arctis Pro Plus GameDAC Microphone Cable Replacement: étape 9, image 1 de 2 SteelSeries Arctis Pro Plus GameDAC Microphone Cable Replacement: étape 9, image 2 de 2
    • Pull out the rotating wheel from the headset casing.

    • Remove the microphone from the casing with the rotator wheel.

    • After removing the rotating wheel, lift the wheel up and use your other hand to feed the microphone through the case.

  10. SteelSeries Arctis Pro Plus GameDAC Microphone Cable Replacement: étape 10, image 1 de 2 SteelSeries Arctis Pro Plus GameDAC Microphone Cable Replacement: étape 10, image 2 de 2
    • Pull the microphone wire out of the wheel.

    • Forcefully removing the microphone from the wheel may break the plastic wheel.

    • Pull the wire and wheel apart to remove the entire component.

Conclusion

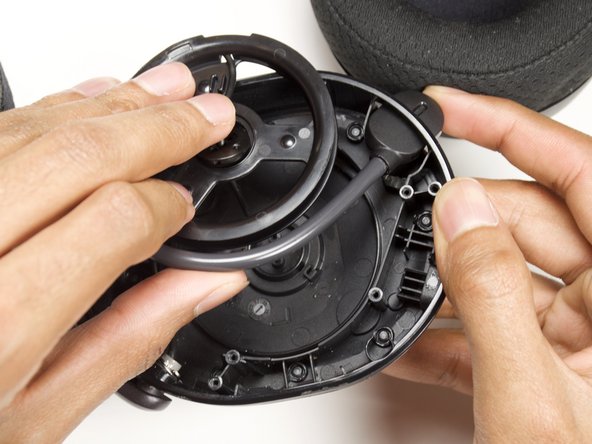
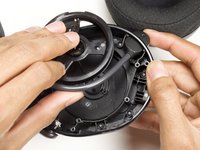
To reassemble your device, follow these instructions in reverse order.

7 autres ont terminé cette réparation.

Vanessa Beeler

Membre depuis le 01/24/19

296 Réputation

1 tutoriel rédigé

Équipe

Cal Poly, Team S18-G1, White Winter 2019 Membre de l'équipe Cal Poly, Team S18-G1, White Winter 2019

CPSU-WHITE-W19S18G1

4 membres

21 tutoriels rédigés

9 commentaires

can Ii do this with my Arctis 5?

Vantura - Réponse

Ugh! Why do they all fail at mic design so bad? Something that has been mastered for decades. It blows my mind.

Chris - Réponse

Is there any place where i can get this cable? I also need a new mic for the wireless pro but steelseries dont sell parts. Somehow it came off and i lost it.

robinmusch - Réponse

&&^& my mic died and i don’t have warranty wtf -_-

taps_so - Réponse

The left earpiece on mine has a different screw type than phillips for some reason. I think it’s a kind of hex screw but I have hex heads and none worked. Strange that the left and right earpieces use different screws.

Darren Peterson - Réponse

Ajouter un commentaire

Nombre de vues :

Dernières 24 heures : 6

7 derniers jours : 34

30 derniers jours : 150

Total : 12,143