Aller au contenu principal

Whirlpool WED87HED Dryer Control Panel Replacement

Ce dont vous avez besoin

  1. Whirlpool WED87HED Dryer Control Panel Replacement, Safety Precautions: étape 1, image 1 de 1
    • Before you begin your repair, unplug your dryer.

    • Your power cord may have four prongs rather than three. The additional prong is a ground connection.

  2. Whirlpool WED87HED Dryer Control Panel Replacement, Unfasten the top panel: étape 2, image 1 de 3 Whirlpool WED87HED Dryer Control Panel Replacement, Unfasten the top panel: étape 2, image 2 de 3 Whirlpool WED87HED Dryer Control Panel Replacement, Unfasten the top panel: étape 2, image 3 de 3
    Outil utilisé dans cette étape :
    FixMat
    $36.95
    J'achète
    • Throughout this guide, keep track of each screw and reinstall it exactly where it came from.

    • Use a 5/16 inch nut driver to remove the two 15.7 mm-long screws securing the top panel to the rear panel bracket.

  3. Whirlpool WED87HED Dryer Control Panel Replacement, Remove the top panel: étape 3, image 1 de 2 Whirlpool WED87HED Dryer Control Panel Replacement, Remove the top panel: étape 3, image 2 de 2
    • Grasp the top and slide it 1/2 to 1 inch toward the rear of the machine.

  4. Whirlpool WED87HED Dryer Control Panel Replacement: étape 4, image 1 de 2 Whirlpool WED87HED Dryer Control Panel Replacement: étape 4, image 2 de 2
    • Lift the top panel upward to separate it from the chassis.

    • Remove the top panel from the machine.

  5. Whirlpool WED87HED Dryer Control Panel Replacement, Disconnect the control panel: étape 5, image 1 de 2 Whirlpool WED87HED Dryer Control Panel Replacement, Disconnect the control panel: étape 5, image 2 de 2
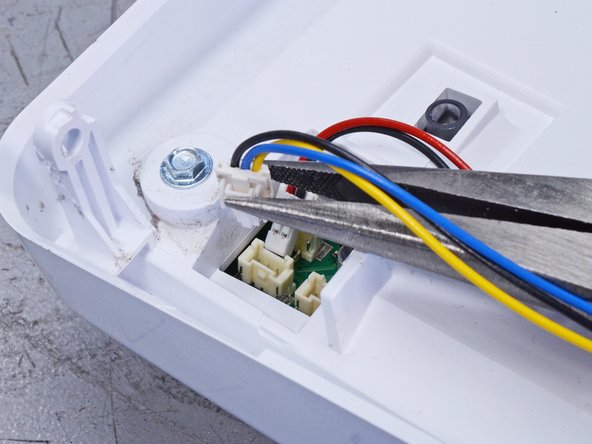
    • Disconnect the control panel cable from the main board.

  6. Whirlpool WED87HED Dryer Control Panel Replacement: étape 6, image 1 de 2 Whirlpool WED87HED Dryer Control Panel Replacement: étape 6, image 2 de 2
    • Disconnect the drum light connector.

  7. Whirlpool WED87HED Dryer Control Panel Replacement, Unfasten the control panel: étape 7, image 1 de 2 Whirlpool WED87HED Dryer Control Panel Replacement, Unfasten the control panel: étape 7, image 2 de 2
    • Use a 1/4 inch nut driver to remove the two 16.3 mm‑long sheet metal screws located at each end of the control panel.

  8. Whirlpool WED87HED Dryer Control Panel Replacement, Remove the control panel: étape 8, image 1 de 3 Whirlpool WED87HED Dryer Control Panel Replacement, Remove the control panel: étape 8, image 2 de 3 Whirlpool WED87HED Dryer Control Panel Replacement, Remove the control panel: étape 8, image 3 de 3
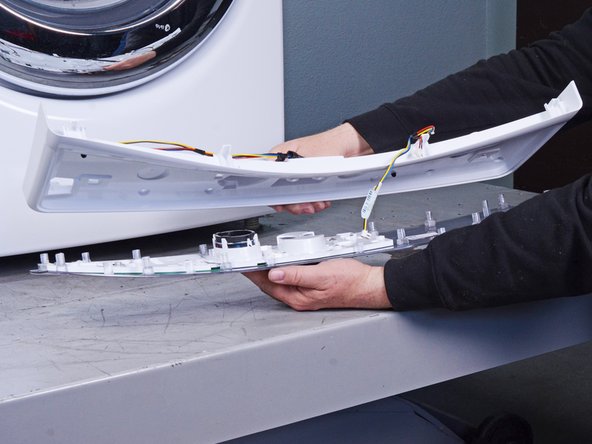
    • Lift the control panel up and tilt it away from the chassis to remove it.

    • Make sure to thread the cable through the hole in the chassis.

    • During reassembly, thread the cable through its proper hole before reinstalling the control panel.

  9. Whirlpool WED87HED Dryer Control Panel Replacement, Remove the wiring harness: étape 9, image 1 de 3 Whirlpool WED87HED Dryer Control Panel Replacement, Remove the wiring harness: étape 9, image 2 de 3 Whirlpool WED87HED Dryer Control Panel Replacement, Remove the wiring harness: étape 9, image 3 de 3
    • Disconnect the wiring harness connectors.

    • Lay the control panel down on a towel or other soft surface to perform the next few steps.

  10. Whirlpool WED87HED Dryer Control Panel Replacement, Unfasten the control board: étape 10, image 1 de 1
    • Use a 1/4 inch nut driver to remove the six 21.4 mm‑long screws which secure the front control board to its housing.

  11. Whirlpool WED87HED Dryer Control Panel Replacement, Remove the control panel unit: étape 11, image 1 de 3 Whirlpool WED87HED Dryer Control Panel Replacement, Remove the control panel unit: étape 11, image 2 de 3 Whirlpool WED87HED Dryer Control Panel Replacement, Remove the control panel unit: étape 11, image 3 de 3
    • Lift up the back plate off the control panel and remove it.

    • The control panel is a circuit board attached to a face plate. Replace the entire unit if possible.

Conclusion

To reassemble your device, follow these instructions in reverse order.

Take your e-waste to an R2 or e-Stewards certified recycler.

Repair didn’t go as planned? Ask our Answers community for help.

Bill Gilbert

Membre depuis le 06/30/22

30 362 Réputation

213 tutoriels rédigés

Équipe

iFixit Membre de l'équipe iFixit

Staff

137 membres

17 589 tutoriels rédigés

0 commentaires

Ajouter un commentaire

Nombre de vues :

Dernières 24 heures : 0

7 derniers jours : 6

30 derniers jours : 19

Total : 161