Modifications apportées à l'étape #1
Modifié par Ben Rounseville —
Modification approuvée par Ben Rounseville
- Avant
- Après
- Inchangé
Lignes de l'étape
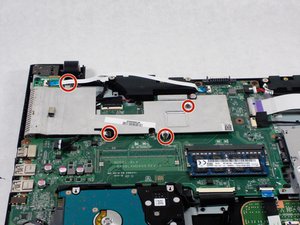
| + | [* black] Unscrew the four 5mm screws holding the heat sink in place using #0 Philips screwdriver. |
|---|---|
| + | [* black] ***NOTE:*** The 5mm screws can unscrew from the laptop but they stay attached to the heat sink. |
| + | [* black] ***NOTE:*** Be sure to screw the replacement heat sink in the correct way. |
| + | [* black] ***NOTE:*** One of the screws is underneath a ribbon. be sure to gently move it out of the way first. |
Image 1
Aucune image précédente
Ajouté
Image 2
Aucune image précédente

Ajouté