Introduction
Il faut démonter l'écran pour accéder à la plupart des composants internes de votre iMac.
Ce dont vous avez besoin
-
-
Dévissez les deux vis Phillips qui maintiennent la trappe d'accès de l'iMac.
-
Retirez la trappe d'accès de l'iMac
-
-
-
Retirez les quatre vis suivantes :
-
Trois vis Torx de 6 mm
-
Une vis Torx de 8 mm
8mm screw is 2nd from left - useful when reassembly
-
-
-
Retournez votre iMac et placez-le couché vers le bas sur une surface plane.
-
Pour enlever le cache avant de l'iMac, il faut faire plusieurs choses simultanément :
-
Utilisez vos pouces pour appuyer sur les dispositifs de RAM et maintenir l'iMac vers le bas.
-
Utilisez vos index pour tirer le petit module de matériau sur le cache avant vers vous.
-
Tirez le cache avant avec vos index.
-
Une fois que le petit module de matériau est dégagé des dispositifs de RAM, soulevez le cache avant par son bord inférieur juste assez pour dégager le bord inférieur du boîter arrière.
-
-
-
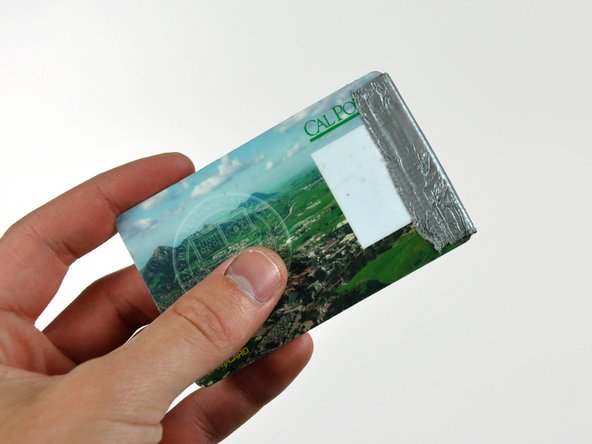
Insérez une carte en plastique dans le coin de la fente d'aération en haut du boîtier arrière.
-
Poussez la carte vers le haut de l'iMac pour ouvrir les crochets du cache avant.
-
Retirez le cache avant de la coque arrière.
-
Répétez ce processus pour l'autre côté du cache avant.
-
Si vous n'arrivez pas à détacher le cache, essayez d'appuyer sur le bord inférieur pour le faire rentrer dans le boîtier arrière et répétez le processus d'ouverture.
Apple uses a powerful magnet to release these latches, but the official tool is not available. If you have access to a few failed hard drives, you can take out the magnets from those, and stack them up to have a magnet strong enough to easily open these latches.
Simply place the magnet on an upper corner of the machine, and when you hear a click, gently pull the corner of the front case forward. Repeat the process for the other upper corner. Use care not to pull on the iSight cables.
Note: Use care when handling the hard drive magnets, they are powerful, and you don't want them to snap together on your fingers. OUCH!
You can use a credit card. Mine survived, though it did get a little bent.
I used two credit cards for extra thickness and the latches released very easily.
The magnetic latches are about 2-3 cm from the left and right edges right at the top edge of the case. I just ran a rare-earth magnet over the from of the bezel in this area. You can hear it click when it disengages. RadioShack has these kind of magnets for $3, the call them "super magnets".
This was a nuisance. Had to really move the card around to get it to finally release.
Be very careful not to damage the metal clips with a credit card. My iMac was very stubborn and I ended up bending the clips in a way they cannot be bent back. The clips do still work and the front bezel does still go back on, however it no longer sits flush with the back of the iMac.
The double credit card worked for me. Have to be persistent. It's a very light latch, no force needed or anything, or any click when it releases.
-
-
-
Posez votre iMac sur une table.
-
Soulevez le cache avant à partir de son bord inférieur et faites-la pivoter pour l'éloigner du reste de votre iMac, en faisant attention aux dispositifs de RAM susceptibles de rester accrochés.
-
Posez le cache avant au-dessus du reste de l'iMac.
-
-
-
-
Si nécessaire, retirez le morceau de ruban adhésif kapton (vous pouvez le jeter sans problèmes) enroulé autour des câbles du microphone et de la caméra.
I was able to skip Steps 6 & 7 entirely. The microphone and camera cables had enough slack to flip the front cover off and lie it flat above the rest of the computer.
Step 4 is completely unnessecary. Just lift the bezel up and wiggle it until the metal clips let go. Then lift the bezel straight up.
-
-
-
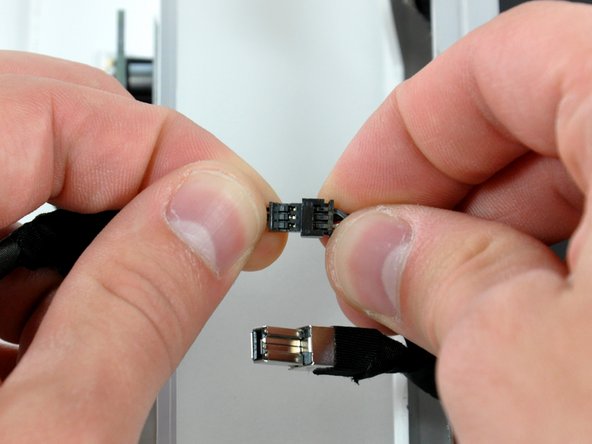
Débranchez les câbles de la caméra et du microphone.
Make sure the white wire is on the same side of both parts of the connector before reconnecting.
It is possible to reconnect the microphone cable in the wrong/reversed orientation with the connector. The microphone will still work but will be muted and result in a "tinny" sound on the receiver's end.
Can anyone ID these connectors (at least the camera connector) so that I may make an extension (to move the camera out and re-house it myself). I probably have the gear to do the mic already.
Is the camera connector some standard I can order M & F versions online to terminate to an extension cable?
-
-
-
Le câble de inverseur sur l'iMac de 24 pouces part vers la gauche.
-
Tirez le connecteur du câble de l'inverseur tout droit hors de sa prise sur la carte mère.
The inverter connector had a different location for me. It was situated next to the top left corner of the right speaker, just under the display. I didn't figure this out until I actually lifted the display off the computer.
I couldnt get this cable off, so I skipped this step. If you have this problem, just proceed; when you get to step 13, lift the display carefully as this cable will still be attached. You'll now easily be able to grip the connector and remove it.
-
-
-
Retirez le ruban EMI en aluminium des deux bords verticaux de l'écran.
The above note sounds as if one should peel the aluminum-foil colored tape back from the frame. Do NOT do this; instead, peel the BLACK-colored aluminum tape back from the display frame to reveal the crevice between the display and the case and the mounting screws you are about to remove.
I didn't actually need to peel anything at all. The screws would have been visible had I looked more carefully.
-
-
-
Retirez les quatre vis Torx T10 de 8 mm, à gros filetage et à tête épaisse de 2 mm, fixant l'écran sur le boîtier arrière.
If you really want to tackle it without proper tools: with a non-magnetised thin torx loosen the screw till its ready to come out, then wrap a little bit of duct tape (sticky side out) around the head of a spare thin screwdriver, gently push the duct taped screwdriver on top of the loosened screw. The magic tape will lift the screws out.
When re-assembling, it's also a good way to fish out the screws that missed the holes completely when your expert fingers skills are classed as clumsy.
You must have a magnetized Torx 10, 2 to 3 inches in length to safely get these screws out. Fortunately if you have the T10 you can magnetize it with your iMac.
Inside the front bezel are two magnets that hold your apple remote to the case, simply tap the T10 to the larger magnet 3 or 4 times and test it's strength in holding a weighty screw. You are good to go. I did this and the scary lose a screw into the iMac was diminished with a firm hold in both removal and install.
If you don't have a magnetic screwdriver or they are aluminum screws, you can use this old mechanics tip: Use a small piece of paper or celophane tape on the head of the screw, then press the screwdriver into it, this creates a nice snug hold so you can reinstall the screws.
I was able to slightly bend the plastic case to get my driver to seat. This was the most challenging part of the teardown and reassembly because I did not have the proper tool.
-
-
-
Soulevez l'écran par son bord inférieur et tirez-le vers vous pour retirer le blindage électromagnétique attaché à son bord supérieur.
Steps 14 & 15; If you remove the top screw, and just loosen the bottom screw you can rotate the optical drive clip out of the way, tighten it, then screw the top screw back in to hold the logic board down for later trying to remove the connector. You also save three more parts kicking around on the desktop.
-
Pour réassembler votre appareil, suivez ces instructions dans l'ordre inverse.
Pour réassembler votre appareil, suivez ces instructions dans l'ordre inverse.
Annulation : je n'ai pas terminé ce tutoriel.
51 autres ont terminé cette réparation.
Merci à ces traducteurs :
100%
Ces traducteurs nous aident réparer le monde ! Vous voulez contribuer ?
Commencez à traduire ›
2 commentaires
Please be careful at step 5. This is because the wiring attached to the microphone is very delicate and might snap when you are wiggling the bezel free from the rest of the computer. I did this and spent a lot of time soldering back the thin microphone wires. Pull the bezel away carefully, taking care not to snap any of the wires.


That is a really, really unnecessarily complex way of fitting a new hard drive. Thanks, but no thanks...
annax - Réponse
annax, if you can suggest a simpler way we're all ears!
Jake Simmonds - Réponse
I found this guide to be very useful. The installation was super easy, especially since I've never opened my iMac before. I was able to skip steps 6, 7, 9, 10 and 14. Wish I had one of those long skinny magnetic torx screwdriver's though. I had to use duct tape to hold the screws on the end of the bit for step 12.
I used this opportunity to vacuum out the dust with mini attachments. Much needed after 3 years ;0)
Awesome site!!! Thanks for sharing your knowledge and saving me time and $$$!
Eric Patten - Réponse
Yes I did it! thanks for this very good manual
Philippe d Anfray - Réponse