Aller au contenu principal

Huawei Mate 20 Pro Teardown

Anglais
Allemand

Traduction de l’étape 5

Étape 5
Huawei Mate 20 Pro Teardown: étape 0, image 1 de 2 Huawei Mate 20 Pro Teardown: étape 0, image 2 de 2
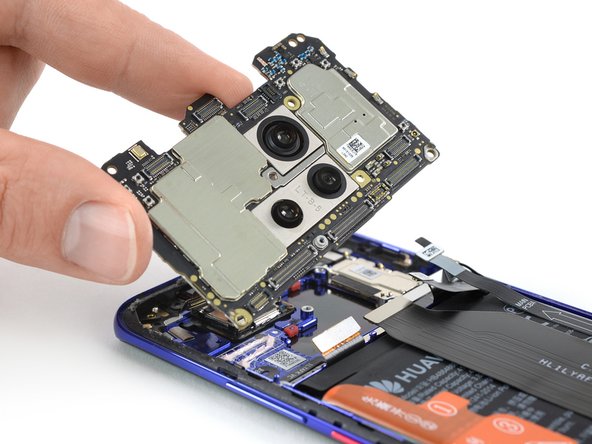
  • At first glance, the motherboard looks free to jump right out, but a closer look reveals nine flex cables holding it in place, plus an antenna cable.

  • Like the P20 Pro, the Mate 20 Pro sticks to a relatively small motherboard, leaving room for a wider battery.

  • With the 3D face unlock hardware and the triple rear camera taking up more motherboard space than usual, Huawei had to cut some camera holes and change the layout a bit.

  • After prying away some loving arms flex cables, we manage to remove the motherboard along with the rear cameras.

Auf den ersten Blick sieht es so aus als könnten wir das Motherboard einfach so rausnehmen, aber bei genauerem Hinsehen sieht man neun Flexkabel, mit denen es noch befestigt ist, sowie ein Antennenkabel.

Wie schon beim P20 Pro wurde auch beim Mate 20 Pro auf auf ein größeres Motherboard zugunsten eines fetteren Akkus verzichtet.

Da die 3-D-Gesichtserkennung und die Triple-Rückkamera mehr Platz auf dem Motherboard einnehmen als üblich musste Huawei einige neue Kameralöcher bohren und das Layout ein wenig ändern.

Nachdem wir das Motherboard aus der liebevollen Umarmung der Flexkabel gelöst haben, gelingt es uns schließlich, es zusammen mit den Rückkameras zu entfernen.

Vos contributions sont faites dans le cadre de la licence open source Creative Commons.