Aller au contenu principal

Reemplazo de interruptor de lavadora (reparación de tarjeta de control)

Anglais
Espagnol

Traduction de l’étape 12

Étape 12
Washing Machine Switch Replacement (fix control board), Installing a new switch: étape 0, image 1 de 3 Washing Machine Switch Replacement (fix control board), Installing a new switch: étape 0, image 2 de 3 Washing Machine Switch Replacement (fix control board), Installing a new switch: étape 0, image 3 de 3
Installing a new switch
  • Once the old switch is removed cut off one of the new switches (first picture) and compare the two switches. Leave enough pin length. You can always cut it shorter after soldering. Make sure it fits in the hole and that the button is roughly the same height as the old switch.

  • Note: The holes in my board are much larger than needed, even for the old switches. I found it helped to bend the pins to keep the switch from falling out of the board when I flip the board over to solder it.

  • Put the new switch in and hold it in place with one hand. Use your other hand to bend the leads in opposite directions. Bend it along the wide side of the rectangular leg (the easy way). The second picture shows the bent legs after one switch fell out before I could solder it.

  • Solder one of the switch legs to the board. Then flip the board over and see if the switch is lined up with the switch outline drawn on the front of the board. If it doesn't look centered, heat the solder and slide the switch a bit until centered.

  • Once the switch is centered put the board in place and hold it down while pressing the button on the front panel for the switch you just replaced. If you hear the switch click when the button is pressed then the switch is in the right place. If it clicked solder the remaining pin to the board.

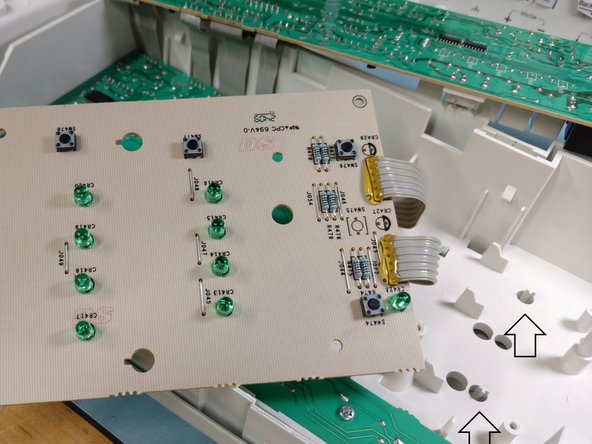
  • If it doesn't click you probably need to move the switch a bit to line up with the plunger for that switch (arrows in third picture). Try looking at the plunger and the switch as you put the board in place to get an idea which way to move the switch. Re-heat the solder and slide the switch as needed and solder the remaining pin.

Una vez que el interruptor viejo este retirado corta uno de los interruptores nuevos (primer imagen) y compara los dos interruptores. Deja suficiente espacio entre pines. Siempre puedes cortarlos después de soldar. Asegúrate que embona en el agujero y que el botón es ligeramente de la misma altura que el interruptor anterior.

Nota: Los agujeros en mi tarjeta son mas grandes que lo necesario incluso para los interruptores anteriores. Me di cuenta que esto ayuda a evitar que los interruptores caigan fuera de la tarjeta cuando volteo la tarjeta para soldarla.

Coloca el nuevo interruptor y mantenlo en su lugar con una mano. Usa tu otra mano para doblar los cables en dirección opuesta. Dóblalo a lo largo del lado ancho de la pata rectangular (la manera sencilla). La segunda imagen muestra los cables doblados después que un interruptor cayera antes de poder soldarlo.

Suelda una de las patas a la tarjeta. Después voltea la tarjeta para ver si el interruptor esta alineado con el dibujo en la parte frontal de la tarjeta. Si no parece estar centrado, calienta la soldadura y desliza el interruptor un poco hasta que este centrado.

Una vez que el interruptor este centrado coloca la tarjeta en su lugar y mantenla presionando el botón en el panel frontal del interruptor que acabas de reemplazar. Si escuchas un clik del interruptor cuando presiones el botón es porque el interruptor esta en el lugar completo. Si hizo click suelda el pin restante a la tarjeta.

Si no hace click probablemente necesites mover el interruptor un poco para alinearlo con su émbolo para ese interruptor (las flechas en la tercer imagen). Intenta mirar el émbolo y el interruptor conforme colocas la tarjeta en su lugar para darte una idea de a donde mover el interruptor.

Recalienta la soldadura y desliza el interruptor como sea necesario. y suelda el pin restante.

Vos contributions sont faites dans le cadre de la licence open source Creative Commons.