Aller au contenu principal

Remplacement des boutons d'angle du Nintendo WaveBird Wireless Controller

Anglais
Français

Traduction de l’étape 2

Étape 2
Nintendo WaveBird Wireless Controller Shoulder Buttons Replacement: étape 0, image 1 de 3 Nintendo WaveBird Wireless Controller Shoulder Buttons Replacement: étape 0, image 2 de 3 Nintendo WaveBird Wireless Controller Shoulder Buttons Replacement: étape 0, image 3 de 3
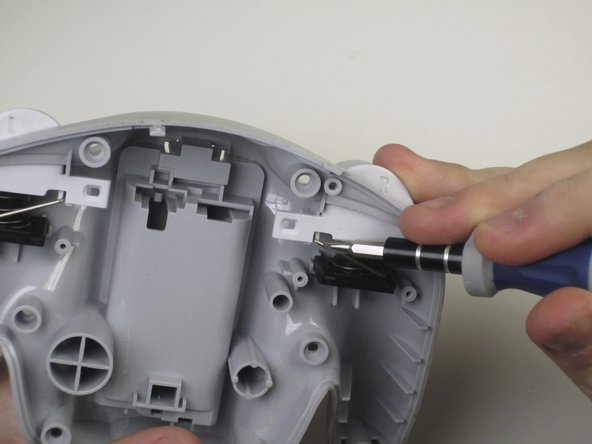
  • Using the screwdriver, carefully unlock the spring clip from its holder.

  • Once unlocked, use tweezers to pull springs out of its holster.

  • The springs will try to jump out. Be careful not to lose them when setting them aside.

  • When reattaching the clips, use tweezers to align the clip with its holder and press in until it clicks.

A l'aide du tournevis, déverrouillez délicatement le clip à ressort de son support.

Une fois déverrouillé, utilisez une pince à épiler pour retirer les ressorts de son étui.

Les ressorts essaieront de sauter. Attention à ne pas les perdre en les mettant de côté.

Lors de la remise en place des clips, utilisez une pince à épiler pour aligner le clip avec son support et appuyez jusqu'à ce qu'il s'enclenche.

[* black] Using the screwdriver, carefully unlock the spring clip from its holder.
-[* black] Once unlocked, use tweezers to pull springs out of its holster.
+[* black] Once unlocked, use [product|IF145-020|tweezers] to pull springs out of its holster.
[* icon_caution] The springs will try to jump out. Be careful not to lose them when setting them aside.
[* icon_note] When reattaching the clips, use tweezers to align the clip with its holder and press in until it clicks.

Vos contributions sont faites dans le cadre de la licence open source Creative Commons.