Aller au contenu principal

Drahtlos-Ladespule und Lautsprecher entfernen

Info : Vous modifiez un tutoriel prérequis. Toutes les modifications apportées affecteront les 12 tutoriels qui comprennent cette étape.

Anglais
Allemand

Traduction de l’étape 1

Étape 1
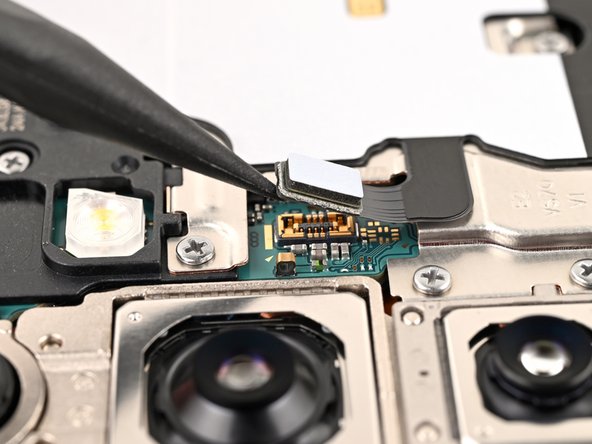
Wireless Charging Coil and Loudspeaker Removal, Disconnect the wireless charging coil: étape 0, image 1 de 2 Wireless Charging Coil and Loudspeaker Removal, Disconnect the wireless charging coil: étape 0, image 2 de 2
Disconnect the wireless charging coil
  • Use a spudger to pry up and disconnect the wireless charging coil press connector from the motherboard.

  • There's an arrow printed on the board near each press connector that indicates the recommended prying location.

  • To reconnect press connectors, align the connector carefully over its socket and press down with your fingertip—first on one side, then the other—until it clicks into place. Don't try to force the connector into place. If you're having trouble, reposition it and try again.

Heble den Druckstecker der Drahtlos-Ladespule mit der Spudgerspitze hoch und trenne sie von der Hauptplatine ab.

In der Nähe der Druckstecker ist ein Pfeil auf der Platine aufgedruckt. Heble genau an dieser Stelle, damit keine der umliegenden SMD-Bauteile beschädigt werden.

Um Druckstecker wieder anzuschließen, musst du ihn erst sorgfältig ausrichten und auf einer Seite festdrücken, bis er einrastet. Wiederhole das dann für die andere Seite. Drücke nicht in der Mitte. Wenn der Stecker schlecht sitzt, können die Kontakte verbogen und dauerhaft beschädigt werden.

Vos contributions sont faites dans le cadre de la licence open source Creative Commons.