Introduction
This is a guide for replacing the screen on a Surface Go 2 or 3, they both use the exact same part. The screen is glued down so you'll need a heat gun or hair dryer and plastic prying tools
Ce dont vous avez besoin
-
-
Use a heat gun or similar to gently heat up the display around the edges. The top edge has the thickest adhesive so start heating there, but be careful not to use too much heat and damage the display
 Demander à FixBot
-
-
-
The green areas have foam adhesive tape which you will need to break up with a plastic tool. The top edge has the most adhesive so focus on that first.
-
It is safe to slice under the camera area as there are no cables there
-
-
-
Insert an opening pick into one of the speaker grilles, and slice the adhesive in the area between the grille and the edge of the screen
-
Use a suction cup to create a small gap
-
-
-
Use multiple plastic picks to break up the adhesive, starting near the speaker grille and along the top edge, then the right edge. Be careful prying in the bottom and left edges to avoid damagin the touchscreen cables.
-
If it is too stubborn, heat up the display again or use isopropyl alcohol. Leave 1-2 picks along each edge to stop them from re-adhering
-
-
-
-
Once all the adhesive is loose, gently lift up the screen from the top edge. Don't fully remove it until you have disconnected the LCD cable. You may want to rest it against a wall like shown.
-
-
-
Pry up the black metal bracket; I used a Jimmy tool as shown. Don't use a thick tool or you may damage it.
-
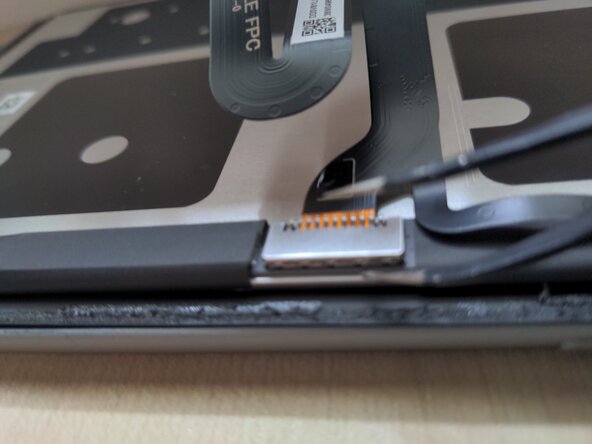
Lift up the black latch and disconnect the display cable. There is a small amount of adhesive on the cable, so pull slightly upwards and then away from the socket
-
-
-
There are certain (expensive) tools that can be used to separate the LCD and touchscreen layers, if the LCD itself is still working. These are designed for tablets and use a vacuum pump to hold the screen in place while a thin wire is used to slice the OCA adhesive
-
Most replacement screens come with the touchscreen and LCD bonded together, so there is no need for this step
-
-
-
Your new display may not come with certain parts, so they will need to be transferred:
-
Display cable: use tweezers to pry up the metal cover, then pop off the press connector from underneath. Finally, lift up the black tab on the touchscreen ZIF connector and unplug the cable
-
Touchscreen board: use tweezers to remove the large metal shield, prying in the circled areas. Carefully disconnect both ZIF connectors, then pry up on the board and stick it onto the new display.
-
If the speaker meshes or light diffusers (white circles) are left on the old display, they will need to be adhered to the new display in the next step
-
Reconnect all cables and metal shields
-
-
-
Power on the device to make sure the new display is working, including the touchscreen
-
-
-
Power off your Surface
-
Scrape off any adhesive from the casing; a little isopropyl alcohol works well to soften it.
-
Your replacement screen may come with adhesive pre installed, otherwise you will need to apply your own. Generic double-sided tape should work well if it is applied in roughly the same areas as the original. Peel off the backing layers when you are ready to install the screen
-
Reapply the old speaker meshes onto the exposed tape
-
-
-
Adhere the new screen to the rest of the device and allow the adhesive to set. You may want to apply gentle pressure (e.g. with a thick book) to ensure the display adheres properly
-