Printer still indicate low ink?
After replacing new ink cartridge, the printer still indicate low ink?
Cette question est-elle utile ?
Indice
18
Rep: 217
![]() 2
2
![]() 2
2
![]() 1
1
After replacing new ink cartridge, the printer still indicate low ink?
Cette question est-elle utile ?

Rep: 319
![]() 4
4
![]() 1
1
![]() 2
2
there is a little gear which can get out from it place in time. Check its position and if its moved - use a glue to hold it at place.
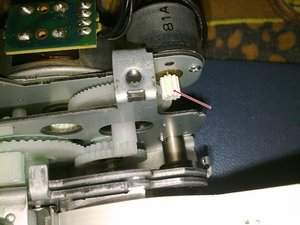
here is an example of wrong position of the gear:

If you can't figure out where is the gear in a printer - look at the bottom right corner of the picture:

If you need a replacement part:
Cette réponse est-elle utile ?
You are a genius. Thanks a million!! Zach
Thanks! My wife now thinks I can fix anything. Made my day.
Thanks Alexander! That was it!
how do you get to the gear?
Thanks for that
Rep: 23
![]() 2
2
![]() 1
1
I solved this problem but printer stiil give the same message. Any ideea?
Many thanks!
Cette réponse est-elle utile ?
Rep: 1,3k
![]() 10
10
![]() 7
7
![]() 5
5
Done! The gear was still there but it was almost totally off the shaft. I applied a small dab of Gorilla glue in the gear and pressed it back on. And now I have a printer again!
Cette réponse est-elle utile ?

Awesome! Stuck some gaffa tape to the metal on the far side - good for now!
Cette réponse est-elle utile ?
Thanks so much. You are a genius. It’s working well now

Thank you! Worked for me as well for a newer model CP-1200 !
Cette réponse est-elle utile ?
Amazing, and it works. To Canon's credit the opening and access to the printer's innards is easy and commendably simple. It is a shame that their engineers did not think to put the same thread lock paste they used for the screws securing the mechanism to the enclosure. Many thanks for giving a 12 year-old CP910 a new lease of life!
Cette réponse est-elle utile ?
Just confirmed that this also applies to the Selphy CP1200 which Martin Merz previously confirmed...
The exact same gear in the exact same location..
When that little gear started to move over, pictures were starting to print out with some yellowing on the right side. This would slowly progress to the middle of the print.
Once that yellowing hit the middle of the print, then the printer would no longer detect a replacement print cartridge.
One little note to mention: When attempting this fix, slide that little gear only part way back, just a smidgen back. Use a very small dab of superglue on the very tip of a toothpick to just apply a miniscule amount of Super Glue to the shaft.. Then slide the gear back over the Super Glue all the way back to it's original position. This way you won't accidentally super glue gears to each other..
Cette réponse est-elle utile ?

Hey! I tried it on some older models (CP760 and 2x CP780). They also have this problem. Moving gear into place fixed it
Cette réponse est-elle utile ?
Dernières 24 heures : 17
7 derniers jours : 114
30 derniers jours : 624
Total : 33,801
2 commentaires
I had the same issue with my CP1200. The solution was exactly like with the CP910 described here
par Martin Merz
Just confirmed that this also applies to the Selphy CP1200 which Martin Merz previously confirmed...
The exact same gear in the exact same location..
When that little gear started to move over, pictures were starting to print out with some yellowing on the right side. This would slowly progress to the middle of the print.
Once that yellowing hit the middle of the print, then the printer would no longer detect a replacement print cartridge.
One little note to mention: When attempting this fix, slide that little gear only part way back, just a smidgen back. Use a very small dab of superglue on the very tip of a toothpick to just apply a miniscule amount of Super Glue to the shaft.. Then slide the gear back over the Super Glue all the way back to it's original position. This way you won't accidentally super glue gears to each other..
par Andrew Jones